RMA
Extension Installation
For Magento Marketplace Customers
-
Find the Composer name and version of the extension in the extension's composer.json file.
-
Login to your SSH and run:
- composer require mavenbird/module-rma
- Wait for Composer to finish updating your project dependencies and make sure there aren't any errors.
-
To verify that the extension installed properly, run the command:
- php bin/magento module:status Mavenbird_Rma
- By default, the extension is probably disabled.
- Enable the extension and clear static view files:
- php bin/magento module:enable Mavenbird_Rma --clear-static-content
- php bin/magento setup:upgrade
- For Magento version 2.0.x to 2.1.x - php bin/magento setup:static-content:deploy
- For Magento version 2.2.x & above - php bin/magento setup:static-content:deploy --f
- php bin/magento cache:flush
For Mavenbird Customers
- Extract the zip folder and upload our extension to the root of your Magento 2 directory via FTP.
- Login to your SSH and run below commands step by step:
- php bin/magento setup:upgrade
- For Magento version 2.0.x to 2.1.x - php bin/magento setup:static-content:deploy
- For Magento version 2.2.x & above - php bin/magento setup:static-content:deploy --force
- php bin/magento cache:flush
Enhance your Magento 2 store’s return management with an efficient RMA Extension. Automate and streamline the product return, exchange, and credit memo process with a single management panel. Improve customer satisfaction with a user-friendly interface for submitting RMA requests and maintain seamless communication throughout the return process.
- Handle all return, exchange, and credit memo tasks from a single panel.
- Track all customer interactions on each RMA request.
- Speed up responses with ready-to-use reply templates.
- Assign RMA statuses and managers automatically.
- Define custom statuses, reasons, and resolutions.
- Accept RMA requests from physical store purchases.
Configuration
Go to Store > Configuration > MAVENBIRD EXTENSIONS > Rma.
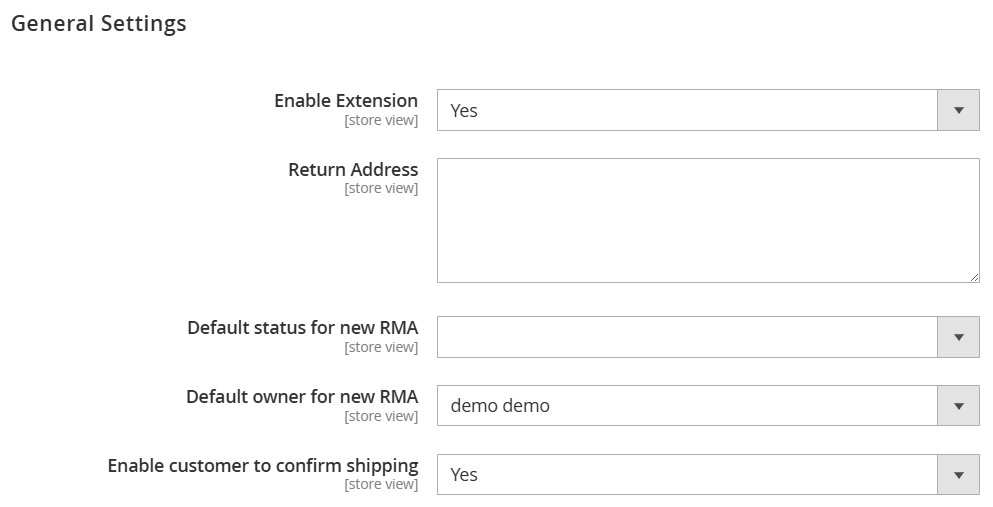
Enable Extension: Enable functionality of RMA extension.
Return Address: Default Return address of the store. Will be shown in the RMA Packing Slip.
Default status for new RMA: When the customer creates a new RMA, this option sets the RMA default status.
Default owner for the new RMA: Sets the default owner for a new RMA.
Ask customer to confirm shipping: If the option is enabled, the customer will be asked to confirm the shipping of the returned items.
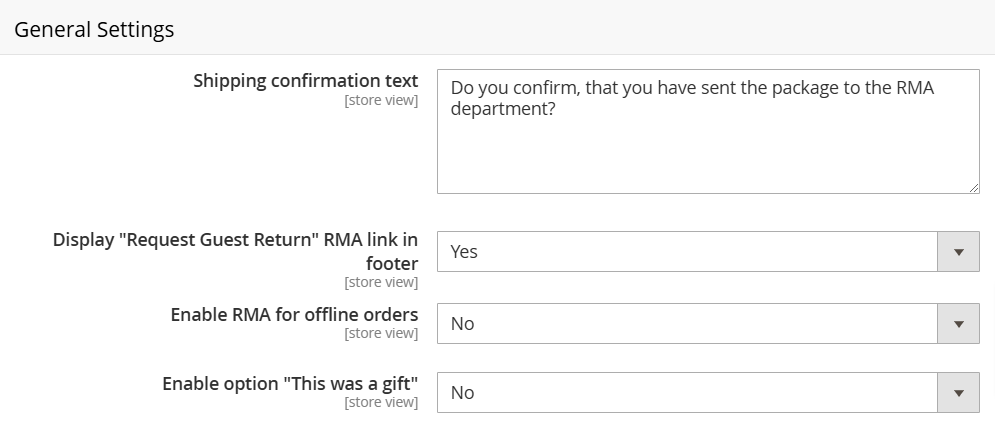
Shipping confirmation text: Text of the shipping confirmation dialog.
Display "Request Guest Return" RMA Link in Footer: Yes/No dropdown to enable or disable the display of the "Request Guest Return" link in the footer for guest users.
Enable RMA for offline orders: If option is enabled, RMA requests will be available for offline orders.
Enable option "This was a gift": This option is useful when your customers buy gifts for their friends. Friends can create an RMA request for a gift and the initial customer will not be notified about such RMA.
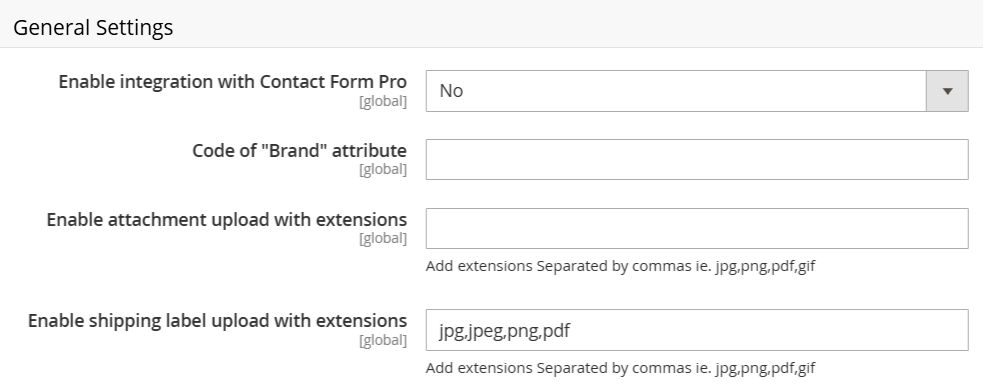
Enable integration with Contact Form Pro: Allows to integrate RMA requests to the Help Desk system.
**Code of "Brand" attribute: **You can set the code of the brand attribute.
Enable attachment upload with extensions: Customers will be allowed to upload only those types of files.
Enable shipping label upload with extensions: Customers will be allowed to upload shipping labels with the specified types of files.
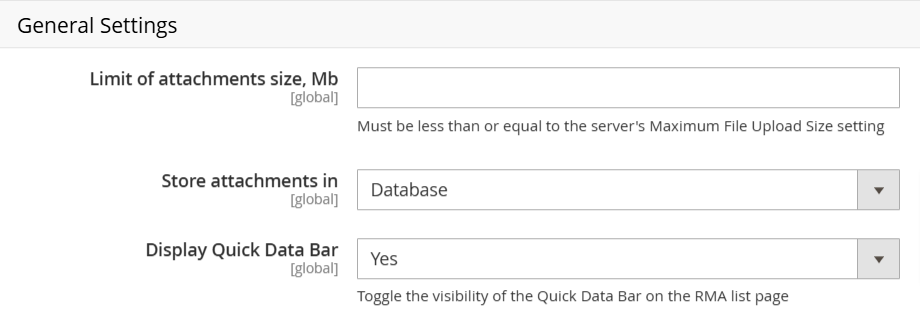
Limit of the attachment size, Mb: Customers will not be able to upload files with a size that is greater than this limit.
Store Attachments In: Dropdown to select where to store attachments, with options like “Database” or possibly filesystem options.
Display Quick Data Bar: Yes/No dropdown to toggle the visibility of the Quick Data Bar on the RMA list page.
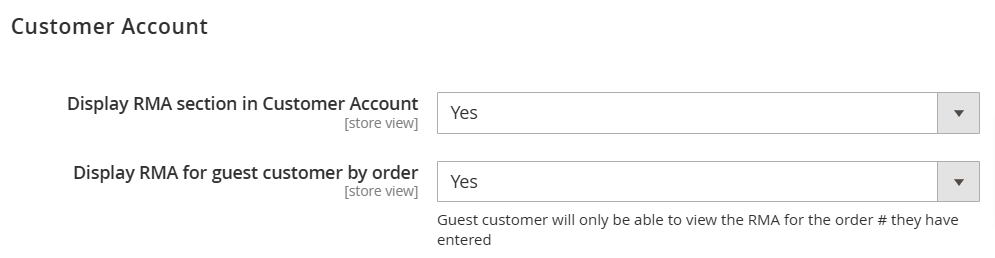
Display RMA section in Customer Account: If the option is enabled, the RMA section is displayed in a customer account.
Display RMA for guest customer by order: If the option is enabled, the guest customer will only see RMA for the entered order number.
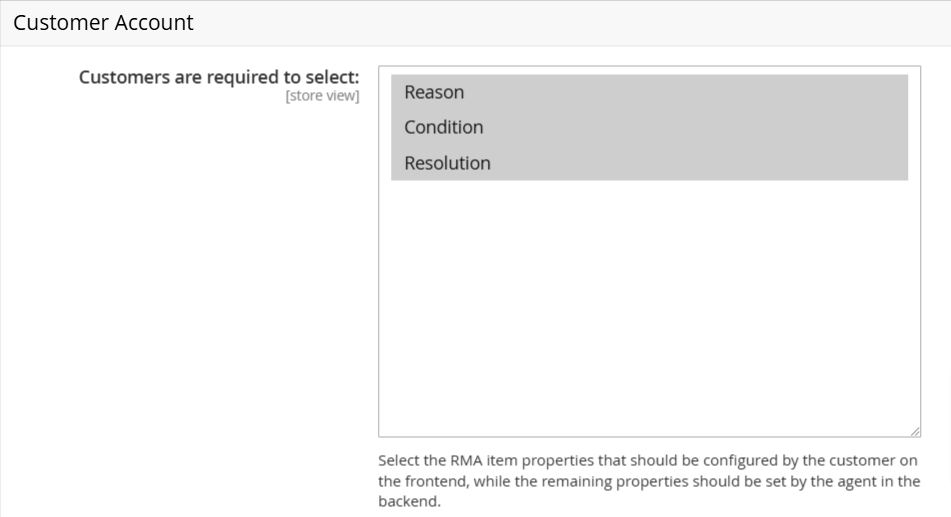
Customers are required to select: List option that allows you to choose which basic return parameters (e. q. Reasons, Conditions, Resolutions) shall be submitted by the customer.
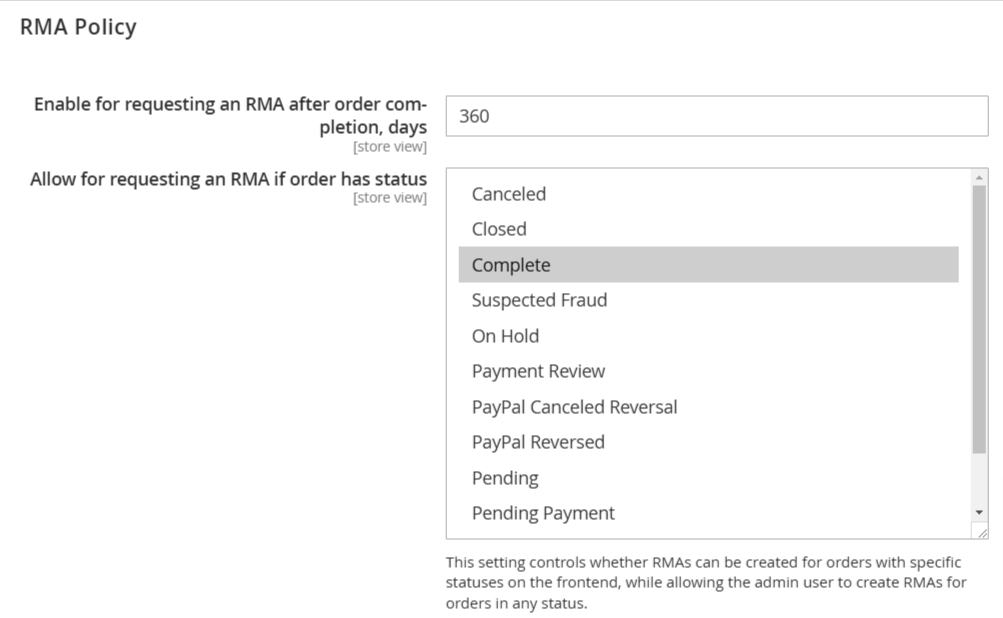
Enable for requesting an RMA after order completion, days: Number of days after order completion when a customer can create an RMA request.
Allow for requesting an RMA if order has status: Sets product's order status(es) which allows a customer to create a RMA request.
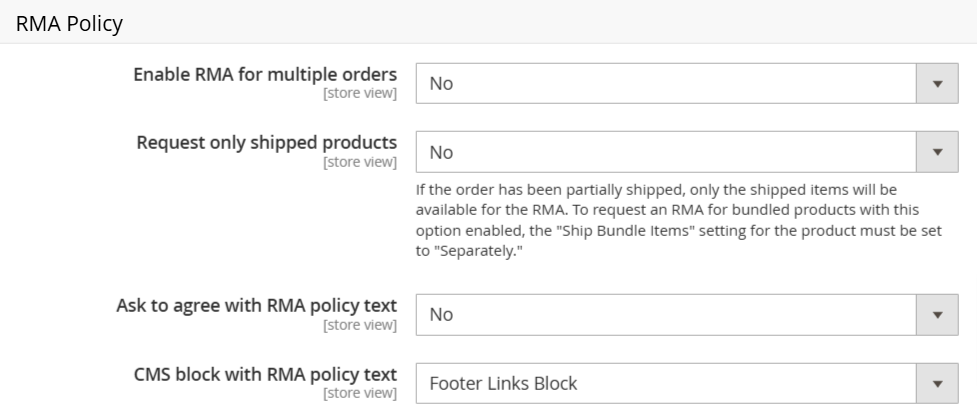
Enable RMA for multiple orders: If the option is enabled, the module allows for creating an RMA that includes items from two or more orders.
Request only shipped products: If the order has only been partially shipped, then only the shipped items will be available for the RMA.
Ask to agree with RMA policy text: If option is enabled, RMA policy is shown when a customer creates a new RMA. Customers must accept the policy to proceed with the RMA.
CMS block with RMA policy text: Sets CMS static block with the text of the RMA policy. To create and manage this block go to the: CMS > Static Blocks.
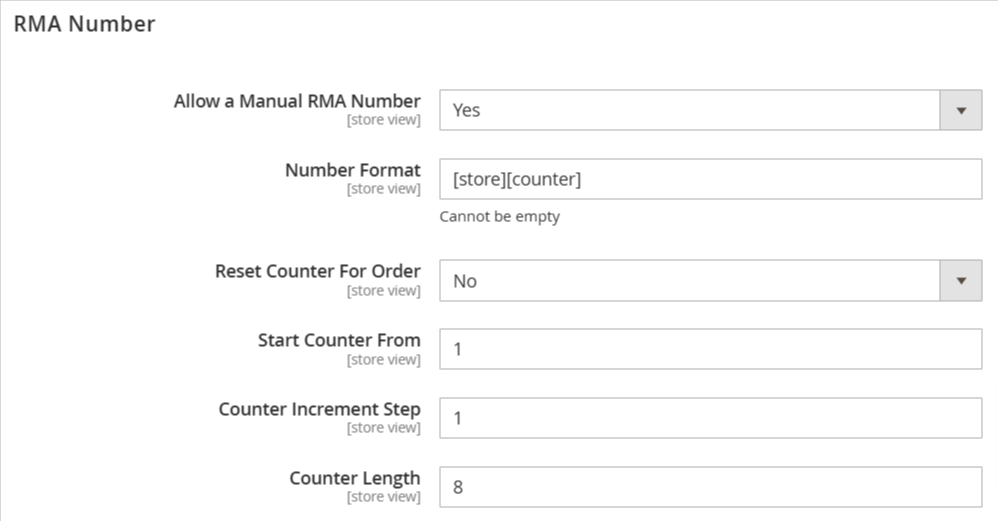
Allow a Manual RMA Number: If option is enabled, "RMA #" can be changed on backend RMA edit page
Number Format: You can specify a custom format for RMA numbers. You can use variables [store], [counter], [order]. For example, you have a format 'RM-[store][counter],' and you'll receive RMAs with the numbers RM-1000001, RM-1000002, RM-1000003, etc. Or format '[order]', you'll receive RMAs with the numbers equal to the original order number.
Reset Counter For Order: Allows resetting RMA order numbers for the RMAs created for the next orders.
Start Counter From: Initial number of the counter.
Counter Increment Step: Counter's increment step.
Counter Length: Number of digits in the counter.
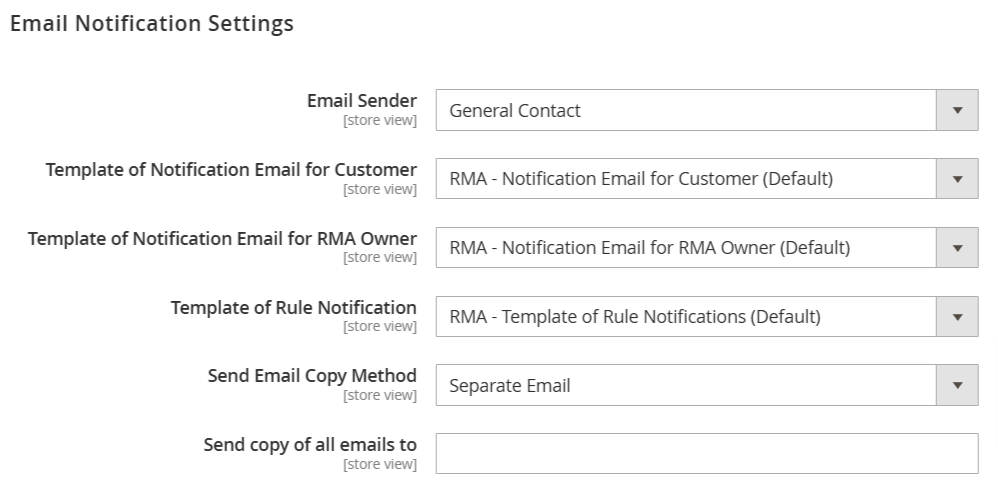
Email Sender: Dropdown to select the email contact (e.g., General Contact) that will appear as the sender for RMA notifications.
Template of Notification Email for Customer: Dropdown for selecting the template used for customer notification emails regarding RMA updates.
Template of Notification Email for RMA Owner: Dropdown for selecting the template used for notifying the RMA owner.
Template of Rule Notification: Dropdown for selecting the template for rule-based notifications related to RMAs.
Send Email Copy Method: Dropdown for selecting how copies of emails are sent, with options like "Separate Email."
Send Copy of All Emails To: Field to input email addresses to receive copies of all RMA-related emails.

Force Theme to Apply Styles: If set to "Yes," this option will ensure that the extension’s styles are applied even if the theme overrides Magento's default style inclusion methods.
Manage Rma
Navigate to Mavenbird > RMA > Manage RMA to view, manage, edit, and remove all return requests. This section allows you to create new RMA requests, including both standard and offline returns, ensuring efficient handling of customer returns and exchanges.
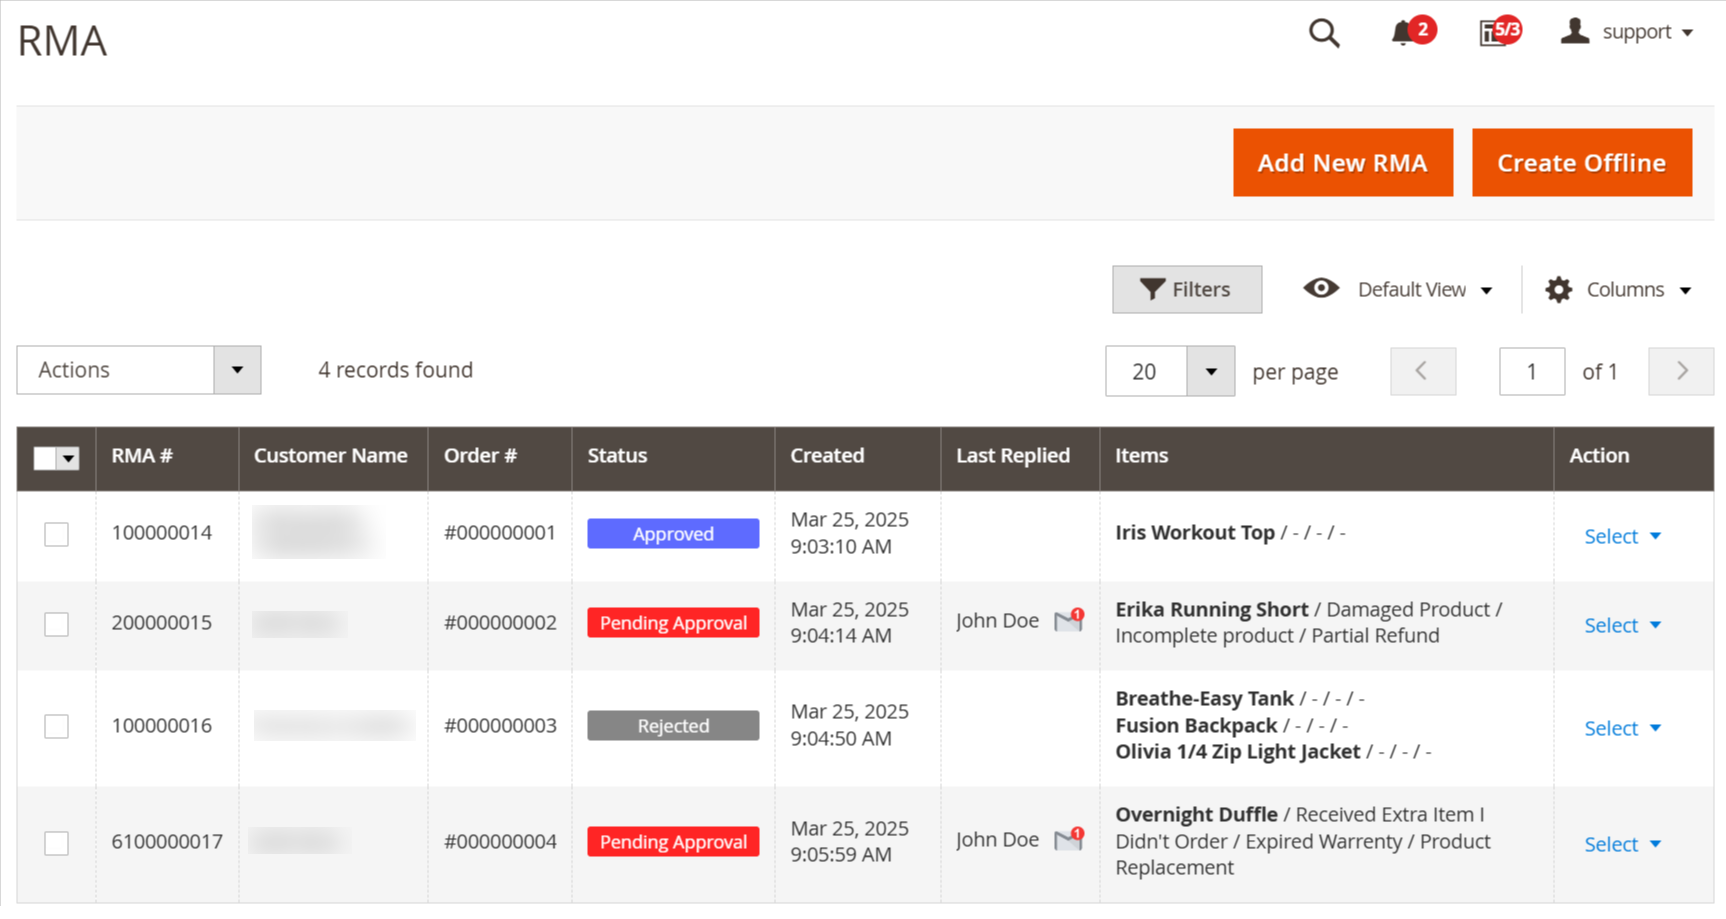
The RMA Edit Page in Magento 2 provides a streamlined interface for managing return requests efficiently. At the top, an action ribbon offers several key functions:
Save: Apply changes made to the RMA.
Save and Send Message: Apply changes and notify the customer.
Print: Generate a printable version of the RMA.
Create Exchange Order: If an item is marked for exchange, the agent can initiate an exchange order.
Create Replacement Order: If the customer wants an identical product replacement, the agent can generate a replacement order.
Create Credit Memo: If an item is marked for a refund, a credit memo can be created.
Below the action ribbon, multiple sections provide detailed information and tools for managing RMA cases effectively.
General information
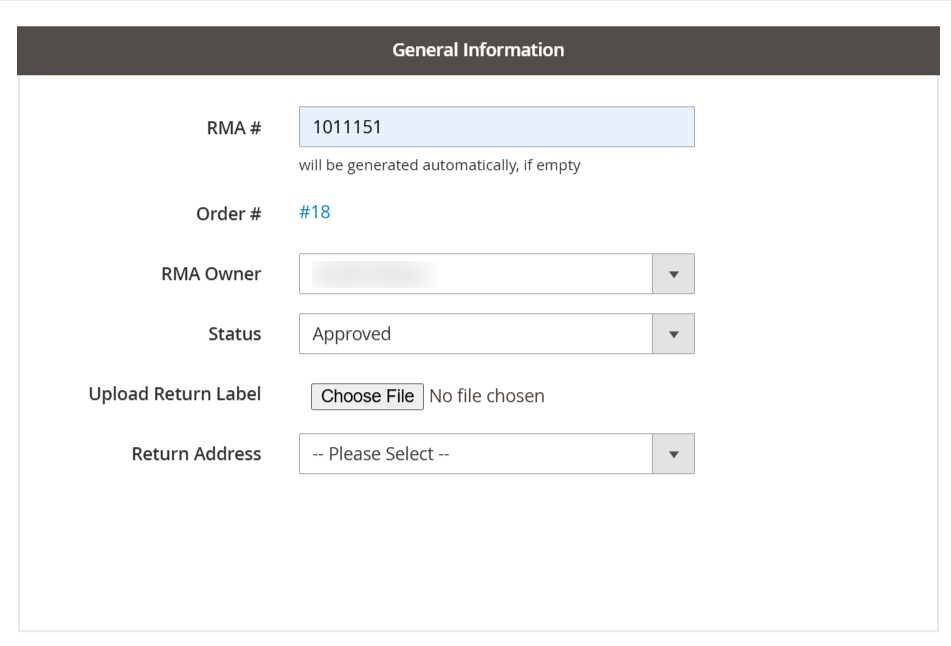
RMA Number: Unique ID assigned to the RMA request.
Order Number: Associated order ID for the return request.
Customer Name: The name of the customer who initiated the return.
RMA Handler: The store agent responsible for managing the RMA process.
RMA Status: The current status of the return request.
Upload Return Label: Allows the store agent to upload a return label (PDF or image). If uploaded, the customer can download and print it from their account.
View RMA Request: Opens the RMA request page on the frontend for quick access.
Return Address: The designated address where the returned items should be sent.
Items
The RMA items section displays details based on the type of RMA. For regular RMAs, it includes complete product information such as Name, SKU, Price, and a thumbnail image. For offline RMAs, only the product Name is shown.
Items section for Regular RMA

Items section for Offline RMA

The following fields are applicable to all return types in the Items section:
Quantity to Return: The number of items the customer wishes to return.
Reason for Return: The reason for the return request. Custom return reasons can be created.
Item Condition: The current condition of the item being returned. Custom conditions can be defined.
Resolution: The proposed resolution for the return. Custom resolutions can be created.
Contact information
This section provides detailed information about the customer associated with the RMA request.
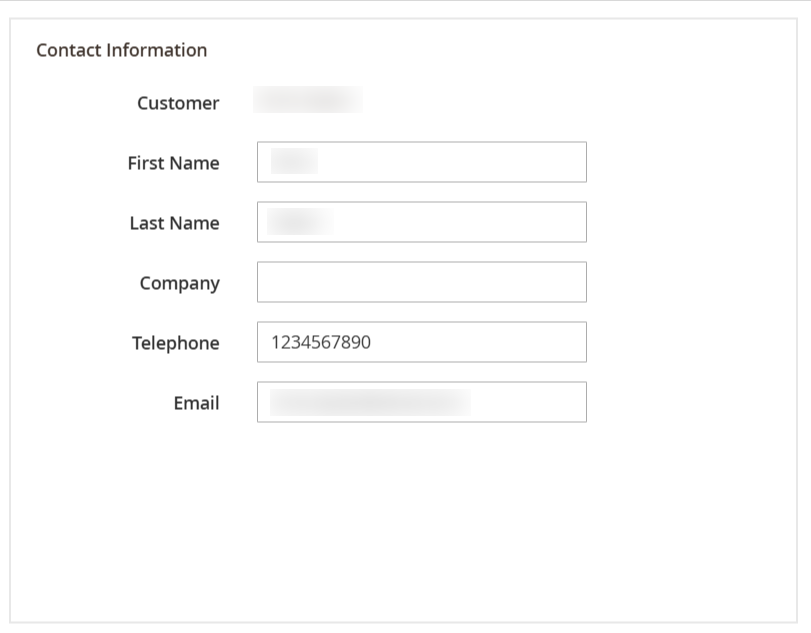
Customer: Direct link to the customer profile in the admin panel.
First Name: Customer's first name.
Last Name: Customer's last name.
Company: Name of the company associated with the customer.
Telephone: Customer's contact number.
Email: Customer's registered email address.
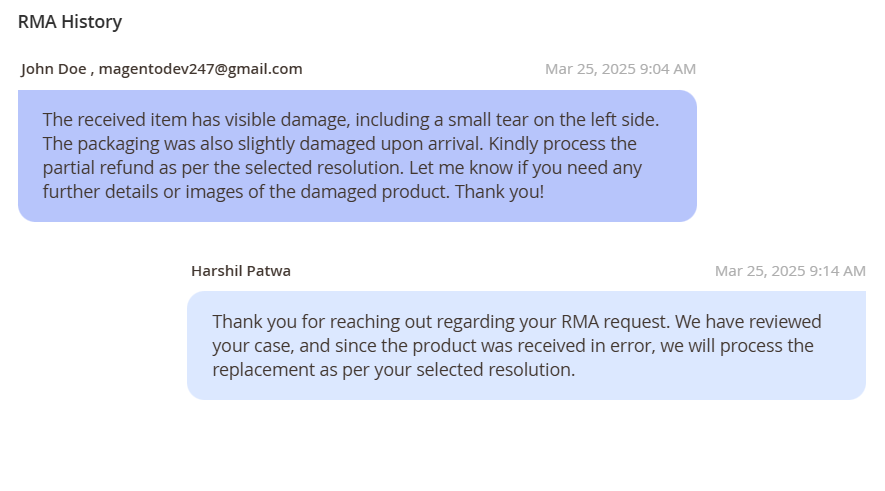
RMA history
This section displays a complete history of RMA messages, including status updates and communication between customers and agents.
Add message
This section enables store agents to send messages to customers or add internal notes to the RMA for better tracking and communication.
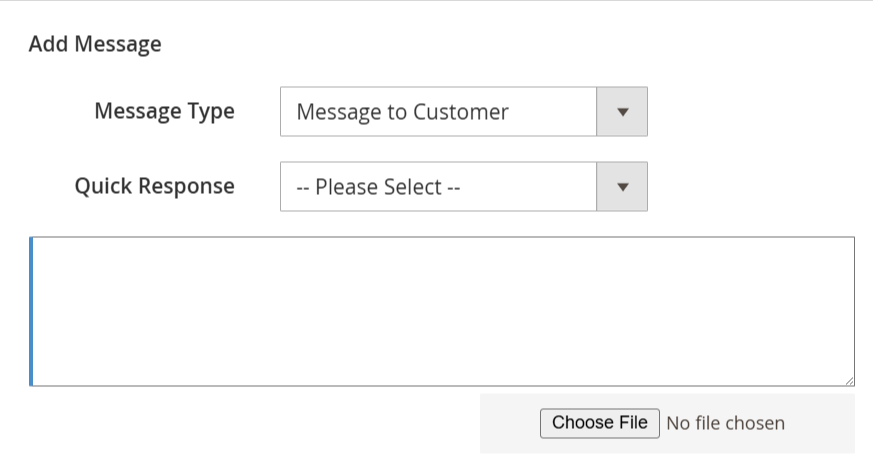
You can choose from the following message types when responding to an RMA request:
Customer Message: A direct response that will be sent to the customer. This is the default message type.
Internal Note: A private message visible only to support agents. Customers will not see this note or receive it via email.
Quick Response: Insert a predefined reply into the response field. For more details on quick responses, refer to the Quick Responses section in our documentation.
Seamless RMA Workflow for Customer
Enhance customer satisfaction with a seamless RMA (Return Merchandise Authorization) workflow in Magento 2. Registered customers can request a return from the My Returns section in their account, while guest users can submit an RMA request through the Guest RMA Form, typically accessible from the storefront footer.
Ensure RMAs are submitted within the allowed time frame set in the RMA Policy Settings, with configurable conditions such as eligible order statuses and return request periods. Customers can initiate returns only if the predefined criteria are met. For existing orders, RMAs can be submitted in Regular Mode, available for registered users via a dropdown or through the Guest Form.
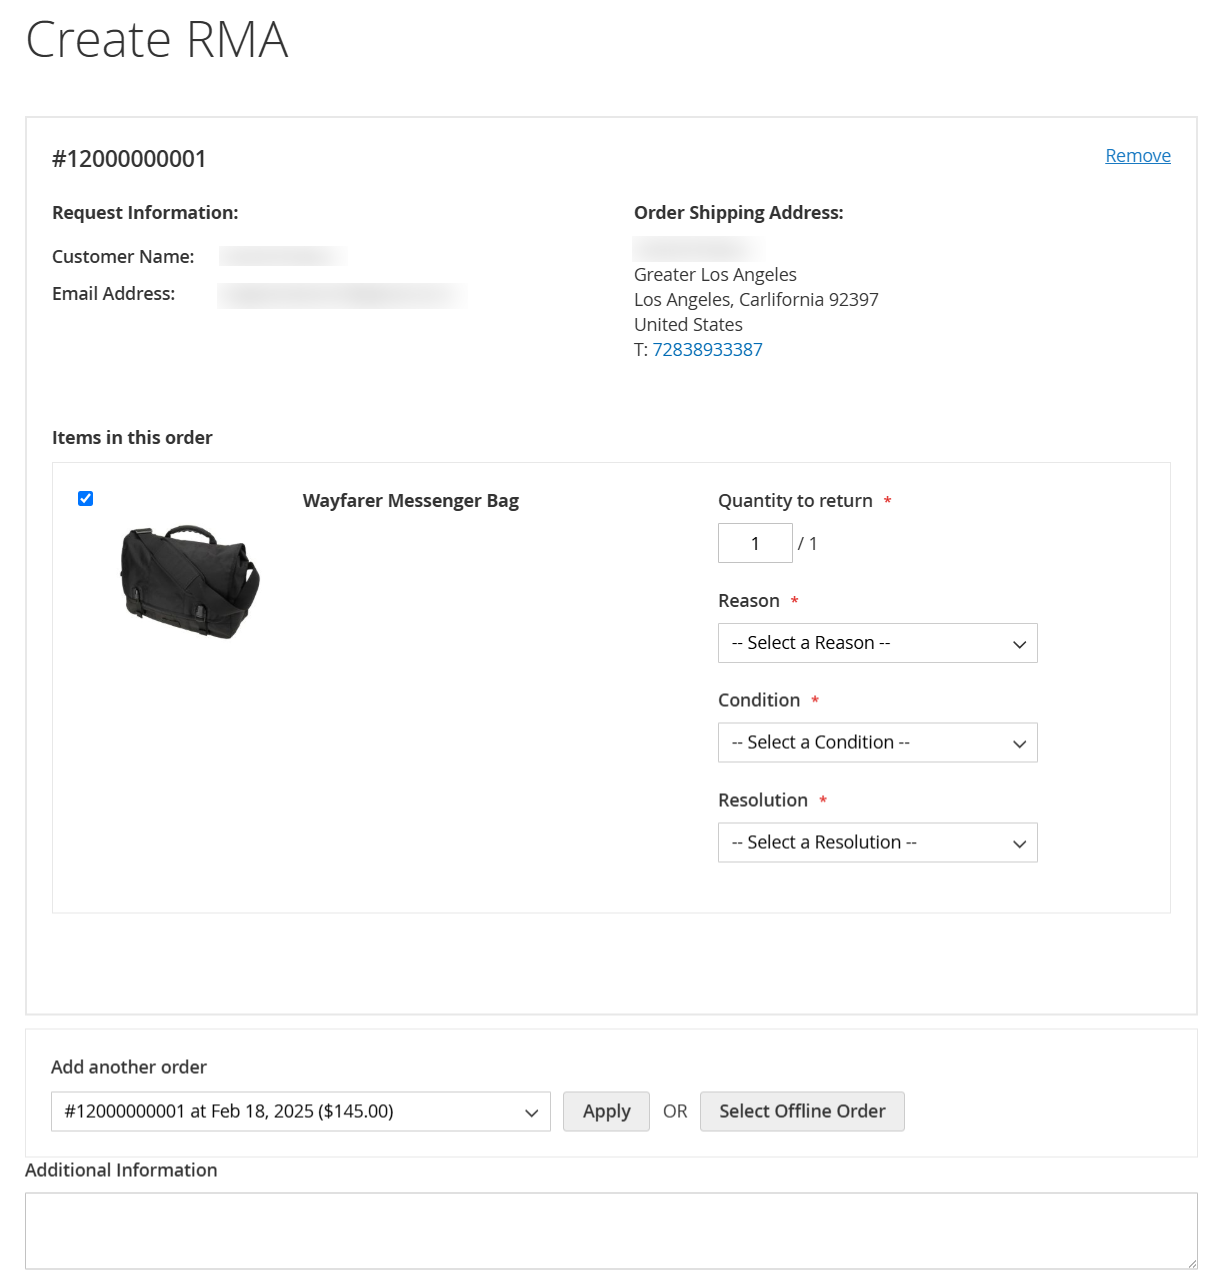
If an order does not exist in the system, customers can create an RMA in Offline mode by selecting the "Create Offline Order" option from the drop-down. They will be required to manually enter the order number and specify the products they wish to return.
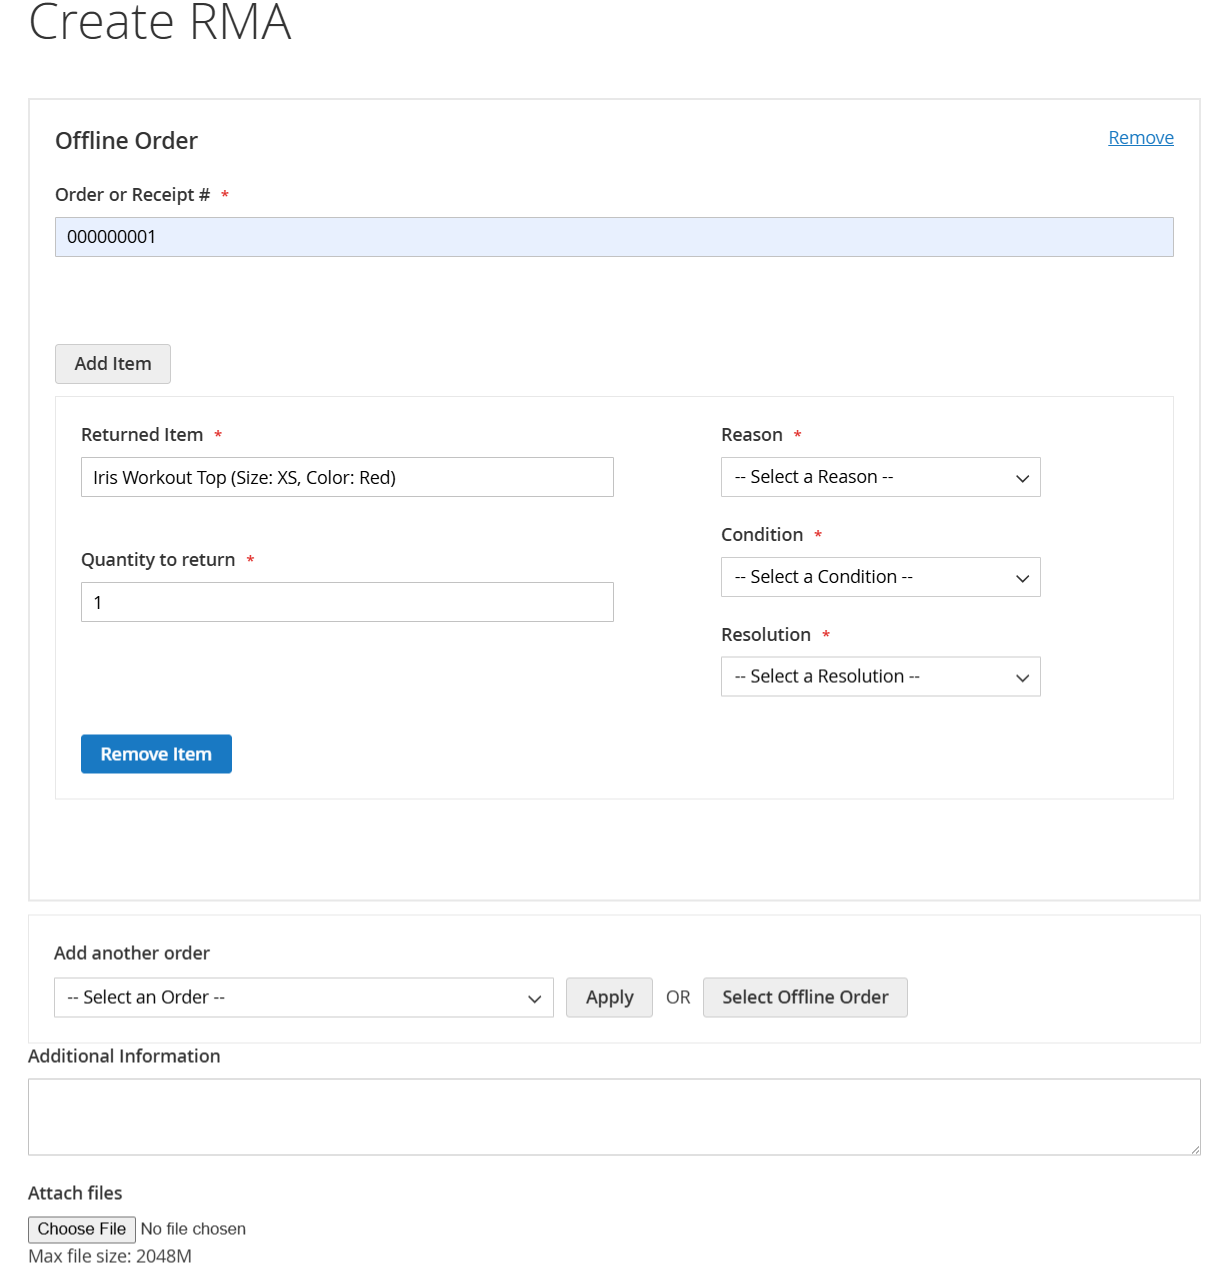
Customers must specify the Condition, Return Reason, and Resolution Preference for each product in the RMA request.
Once products are selected, the RMA request is submitted and assigned a Pending Approval status with an automatic email notification to the customer.
RMA requests can be processed automatically using Workflow Rules.
Customers and staff can communicate via emails (with notifications) or through the frontend for return coordination. RMA request outcomes:
- If rejected, the RMA is archived, and the customer is notified.
- If approved, the return process begins, and the customer gets an email confirmation.
Upon approval, customers can print the RMA packing slip and confirm shipping.
After shipping confirmation, the RMA status changes to Package Sent.
When the package arrives at the store:
For Exchanges:
- A Replacement Order is created for the same product.
- An Exchange Order is created for a different product, with price adjustments if necessary.
For Refunds:
- A Credit Memo is issued, and the amount is refunded to the customer.
After completion, the RMA status is set to Closed, and the request is archived.
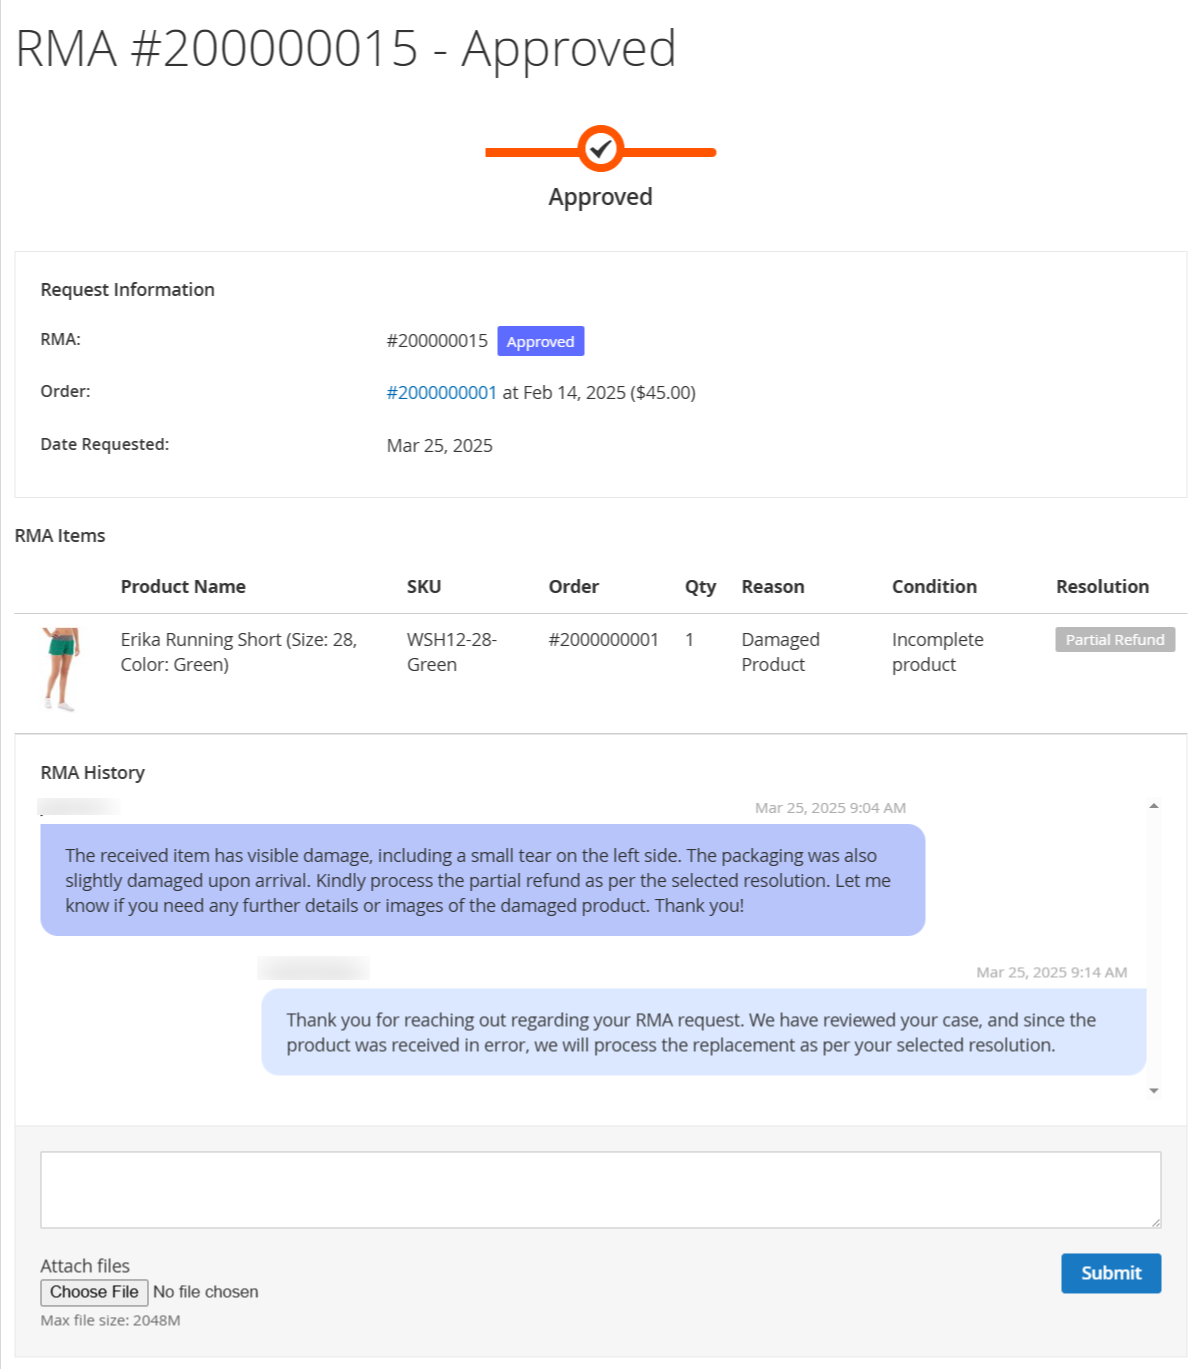
When the admin can approve the rma request from the backend that is shown on frontend like below.
Statuses
You can create and manage Rma Statues in Mavenbird > RMA > Statuses.
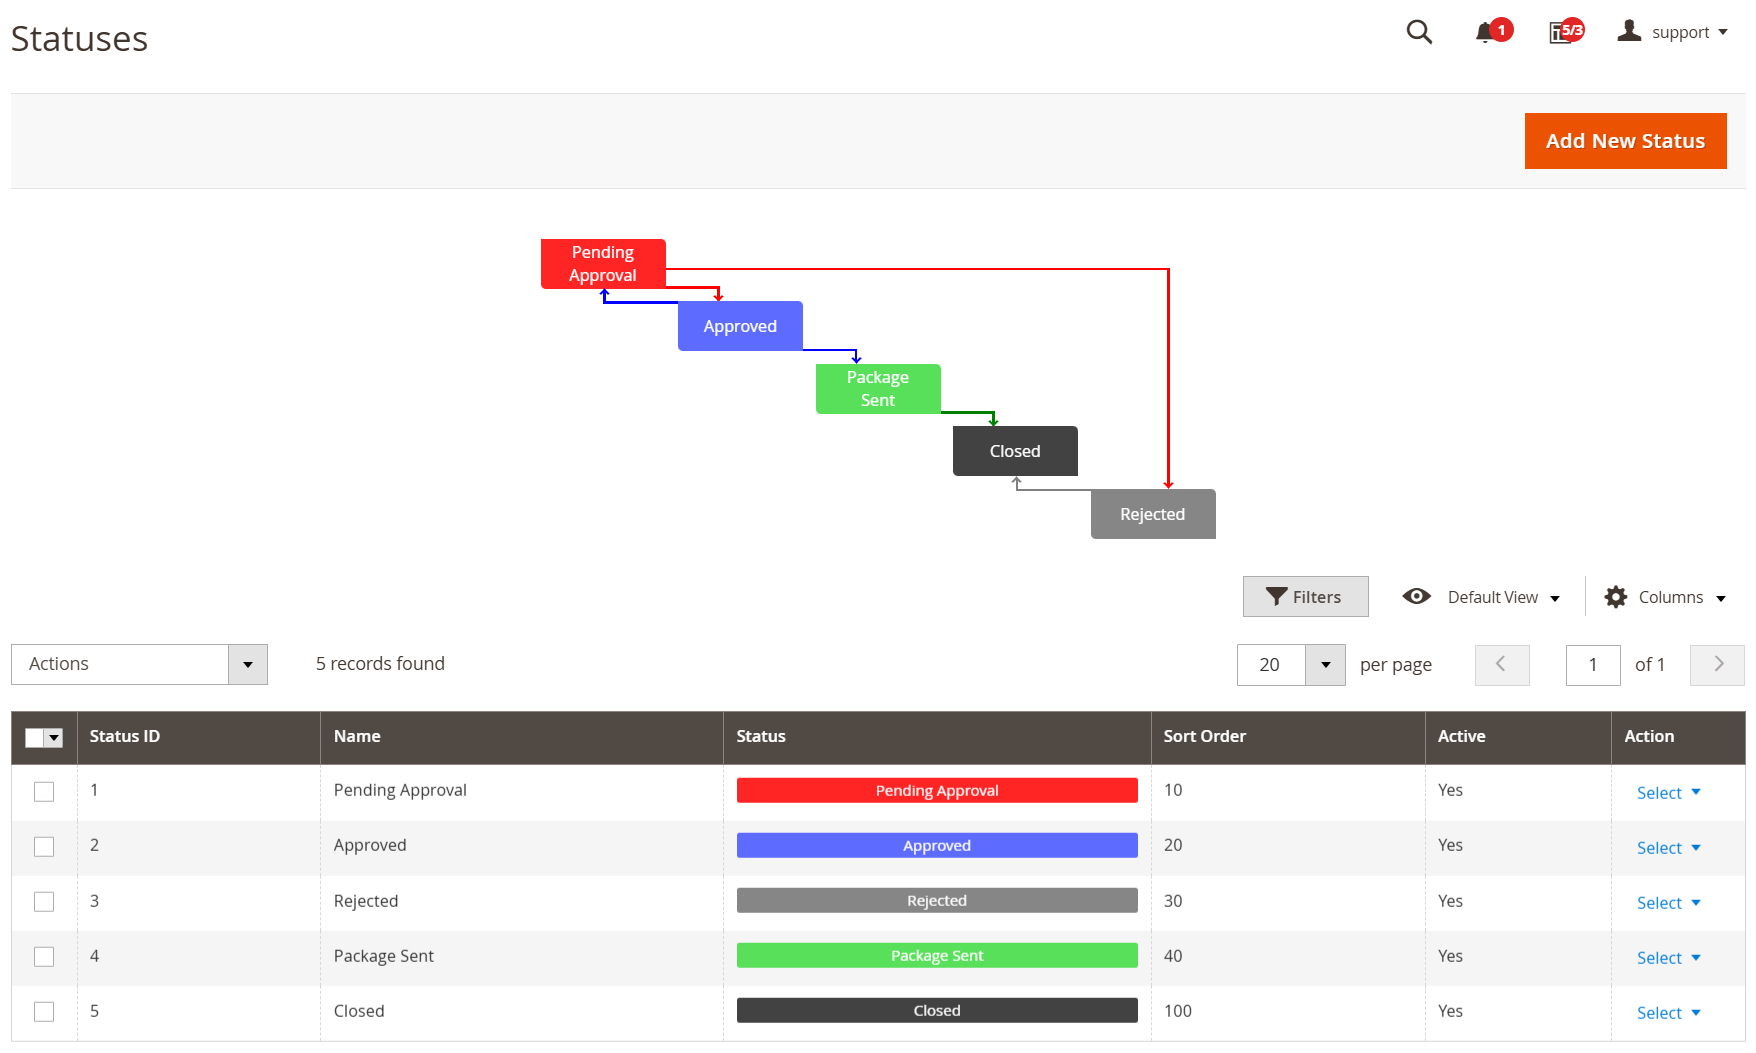
Pending approval: The RMA request has been submitted and is pending review. This status is automatically assigned upon submission unless changed in RMA -> Settings -> General Settings -> Default Status for New RMA.
Approved: The RMA request has been validated. Customers can now generate and print the RMA packing slip to return their items.
Package Sent: The customer has confirmed that the returned items are on their way back to your store.
Rejected: The RMA request has been denied due to unmet conditions.
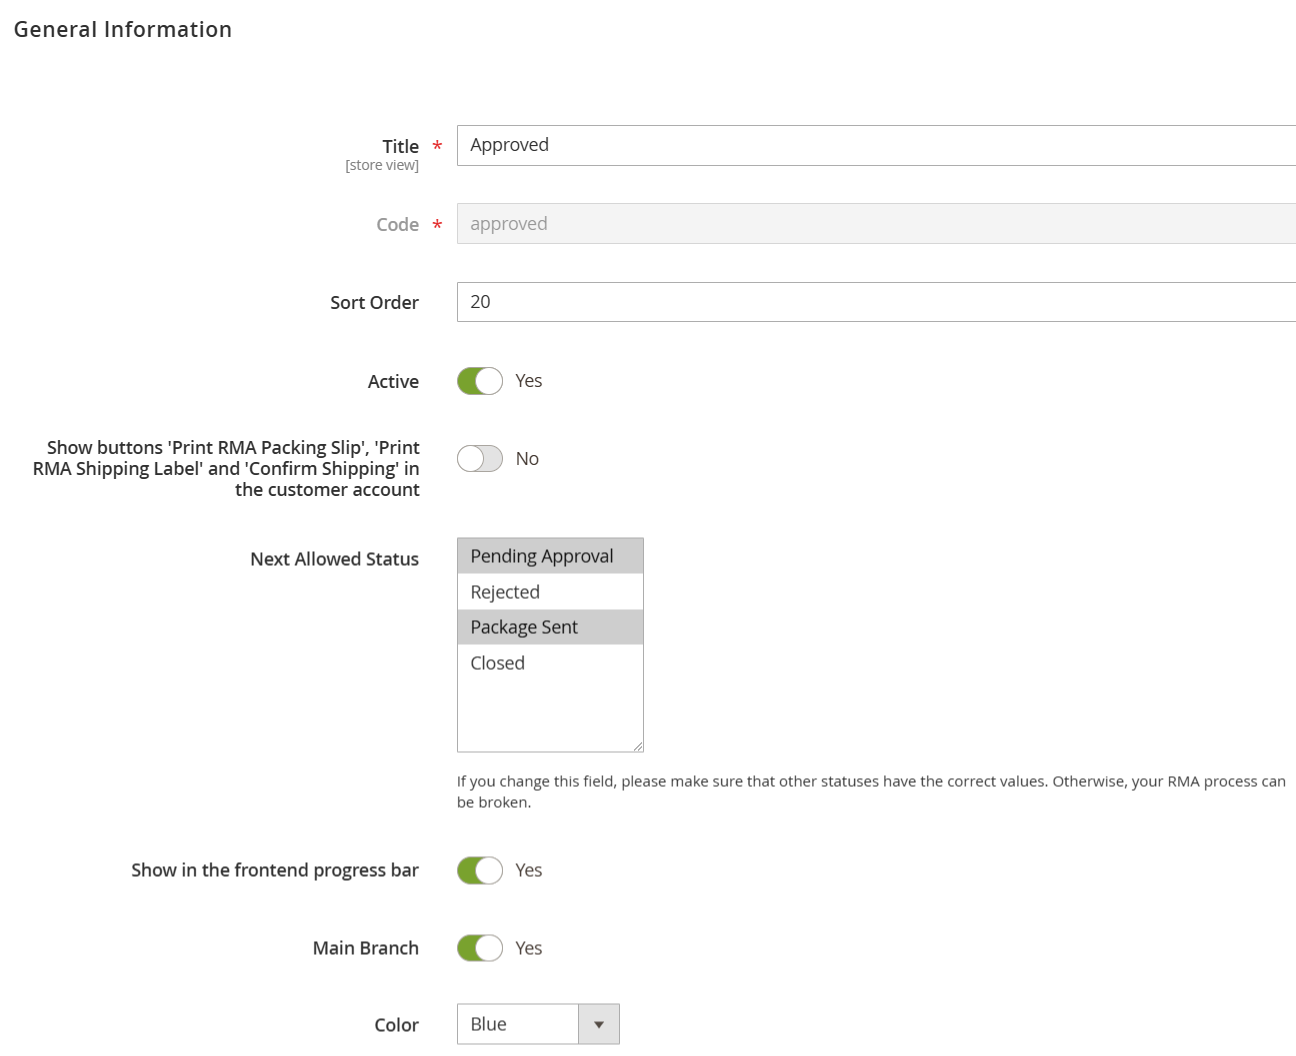
Title: The designated name for your status, allowing for easy identification of each step in the return process.
Code: A unique identifier for your status, useful for backend management and reference.
Sort order: Adjust the sequence in which statuses appear in the drop-down menu.
Is active: Toggle this option to control whether the status is visible to your team and customers during RMA creation and editing.
Show buttons 'Print RMA packing slip' and 'Confirm shipping' in the customer account: When this status is activated, customers will have the ability to print the packing slip or confirm shipping.
Next allowed status: Specify the subsequent status that an admin can select for the RMA process.
Show in the frontend progress bar: If enabled, this status will be shown in the frontend RMA progress bar, enhancing clarity for customers.
Main branch: Configure which status should be prioritized as the "next" step in the RMA process when multiple pathways exist.
Color: Set a custom color for the status in the progress bar, making it easily recognizable for both customers and admin users.
To send a notification, fill in the relevant fields with your message. If you prefer not to send a notification, simply leave the fields blank.
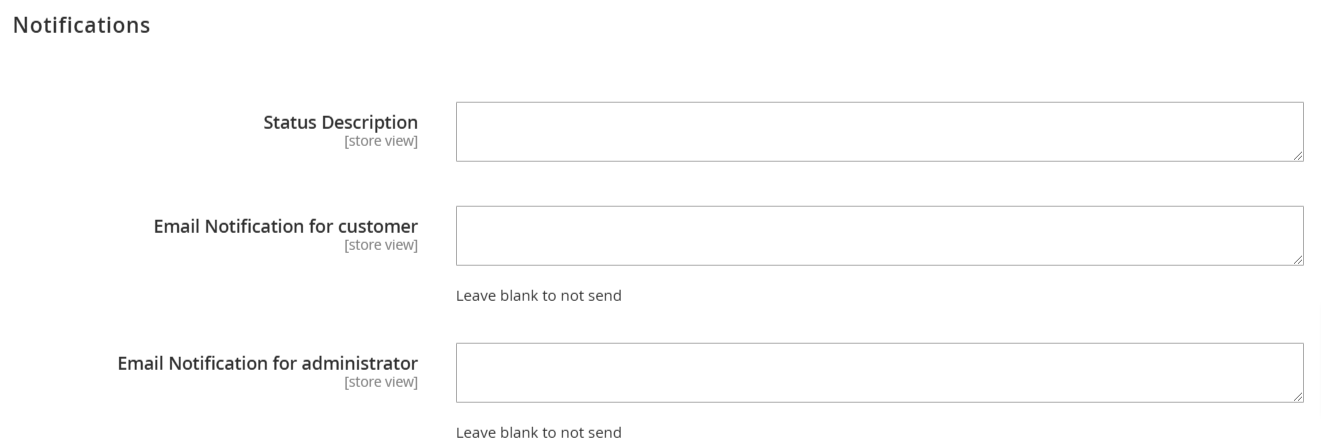
Email notification for customer: The content of the email sent to customers when their status changes.
Message for RMA history: A note that is recorded in the RMA history log, ensuring that your team remains informed.
Email notification for administrator: The email notification dispatched to store staff upon status changes, assisting them in managing their responsibilities effectively.
Reasons
You can create and manage Rma Reasons in Mavenbird > RMA > Reasons.
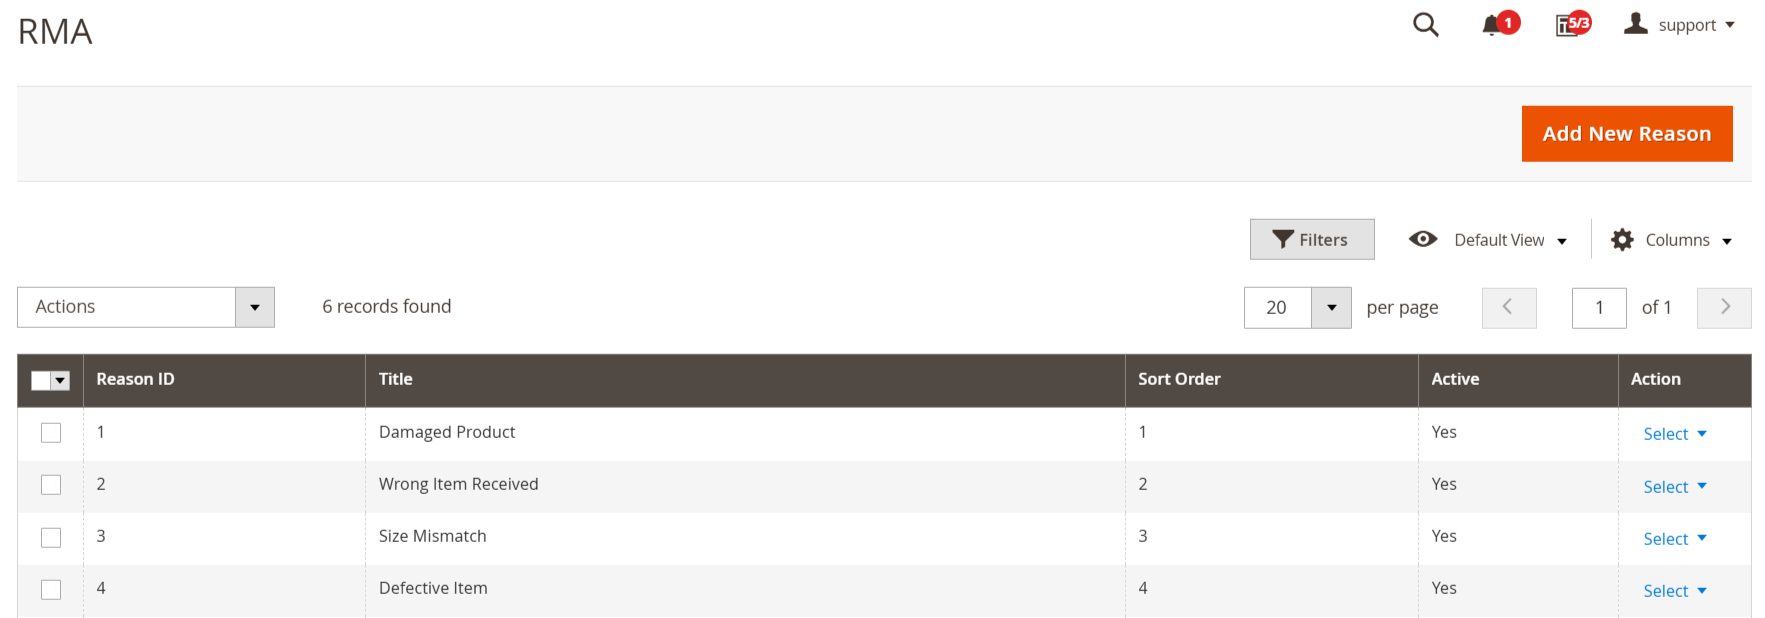
Grasping the reasons behind product returns is essential for enhancing your product range and overall customer experience.
By associating a reason with each return, you can collect valuable insights into customer preferences, product effectiveness, and areas needing improvement. This information not only aids in minimizing future returns but also sharpens your sales strategy and boosts customer satisfaction.
Our extension offers predefined conditions, but you have the flexibility to customize and create your own as needed.
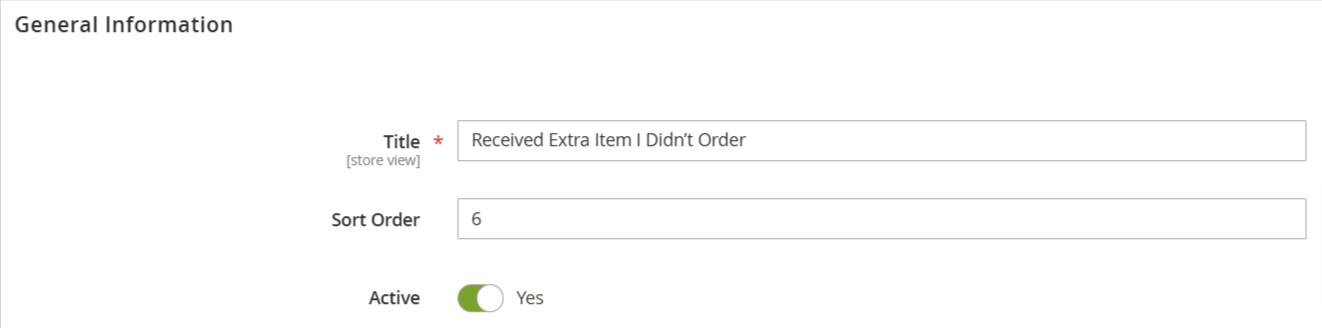
Title: The designation for the return reason, clearly indicating why a customer decided to return the item.
Sort order: Arrange the return reasons in a logical sequence for your business, as they appear in a drop-down menu.
Is active: Manage the visibility of this return reason on the RMA creation and editing pages.
Conditions
You can create and manage Rma Conditions in Mavenbird > RMA > Conditions.
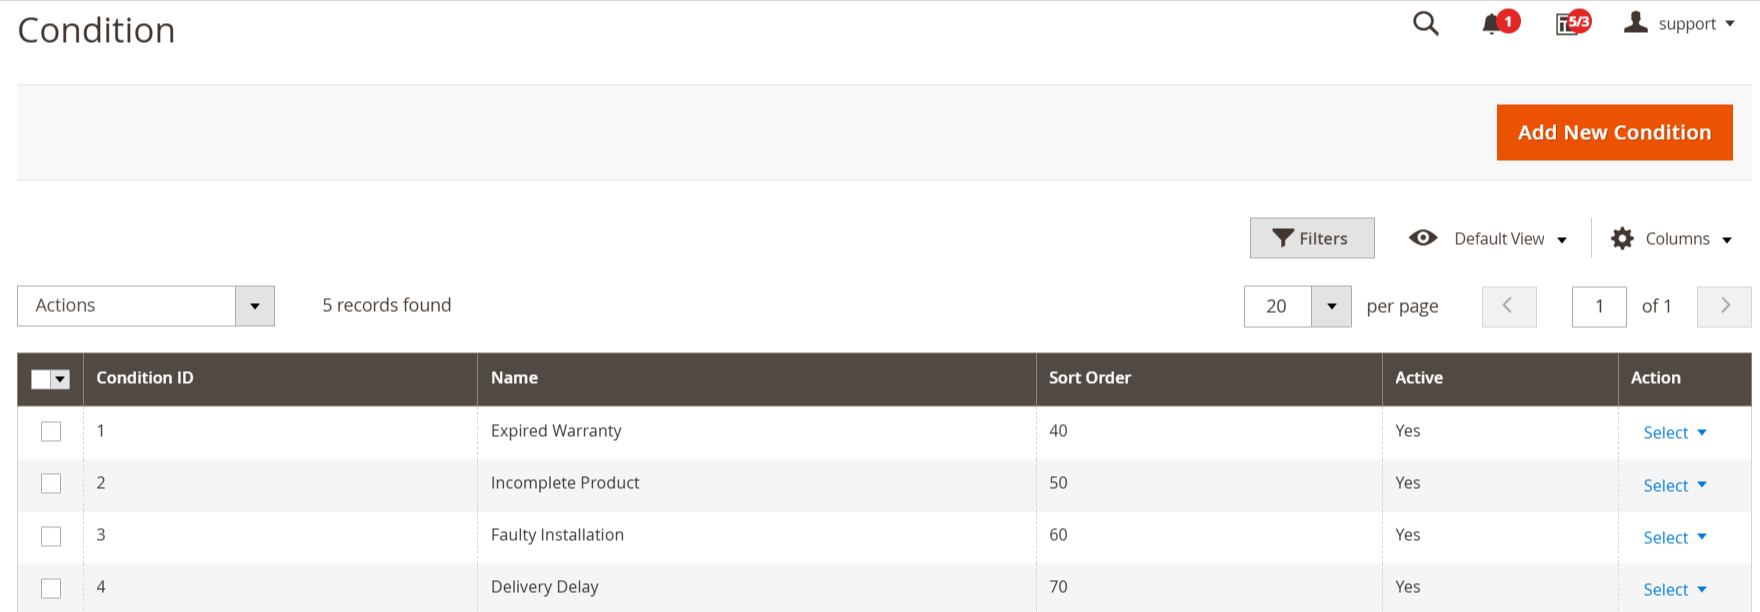
Comprehending the status of returned products is essential for optimizing your return management process and ensuring accurate handling of all returns.
By categorizing each returned item with its condition, your team can clearly establish the product's state upon arrival or during processing. This approach enhances tracking and fosters transparency and accountability throughout the return process.
Our extension includes predefined conditions, but you can easily customize and create your own as necessary.
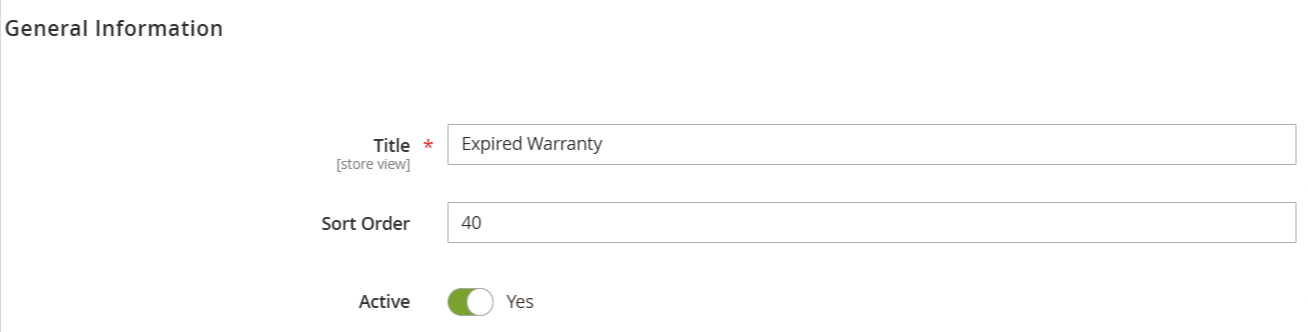
Title: A clear and descriptive label for the condition, assisting both your team and customers in understanding the state of the product.
Sort Order: Specify the sequence in which conditions are listed in the drop-down menu for straightforward selection.
Is active: Decide whether this condition should be displayed during the creation or editing of an RMA, providing flexibility based on your return management requirements.
Resolution
You can create and manage Rma Resolution in Mavenbird > RMA > Resolution.
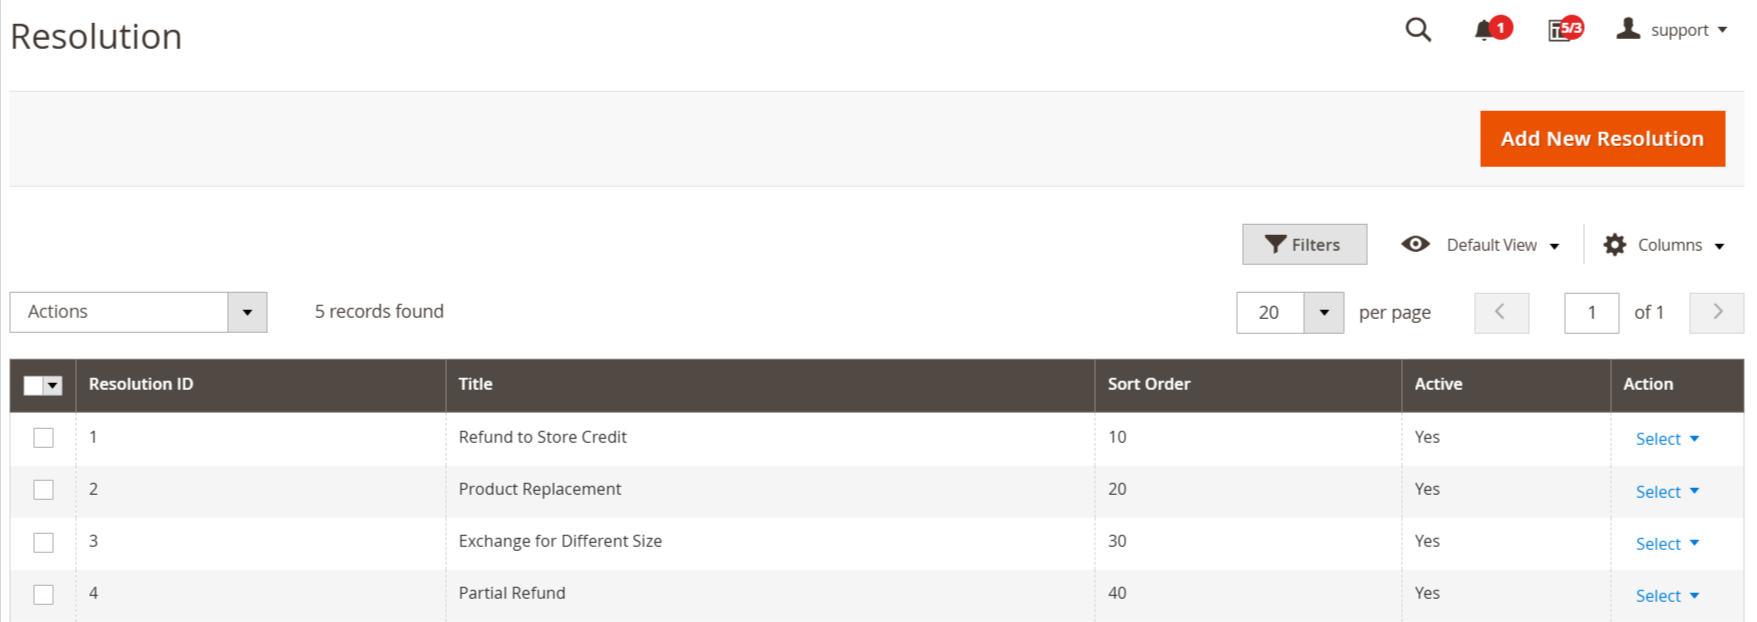
When customers submit a return request, they typically have preferences for how they want the issue resolved—whether through an Exchange or a Refund.
While these two choices are fundamental to any effective return service, businesses may require additional flexibility. You might offer specialized refund types or repair services. Providing customers with various options enhances their trust in your brand and fosters loyalty.
Our extension enables you to create as many return resolution options as your policies require.
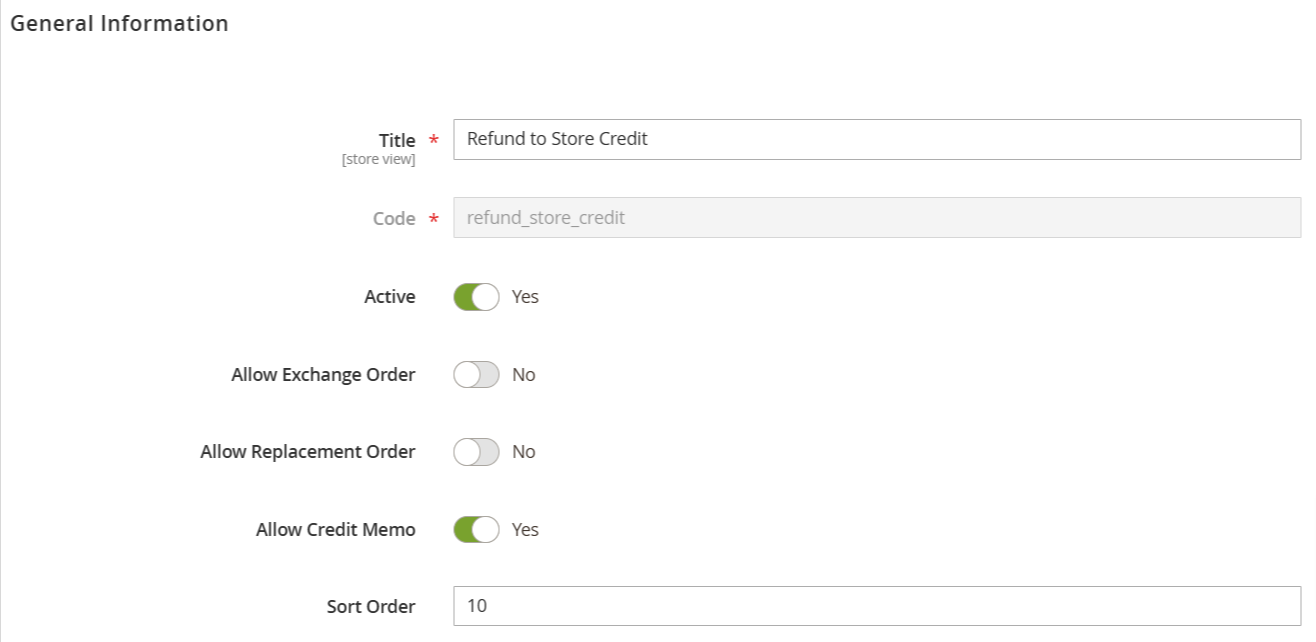
Title: A clear designation for the resolution, ensuring both your staff and customers understand its purpose.
Code: A distinct internal identifier for this resolution.
Is active: Determine whether this resolution is available during RMA creation or editing, providing flexibility based on your return workflow.
Is Exchange order allowed: If activated, the admin can conveniently create an exchange order directly from the RMA order page.
Is Replacement order allowed: If activated, the admin can generate a replacement order directly from the RMA order page.
Is Credit memo allowed: If activated, the admin can issue a credit memo straight from the RMA order page, simplifying the refund process.
Sort order: Specifies the order in which resolutions are displayed in the drop-down menu for easy selection.
Custom Fields
You can create and manage Rma Custom Fields in Mavenbird > RMA > Custom Fields.
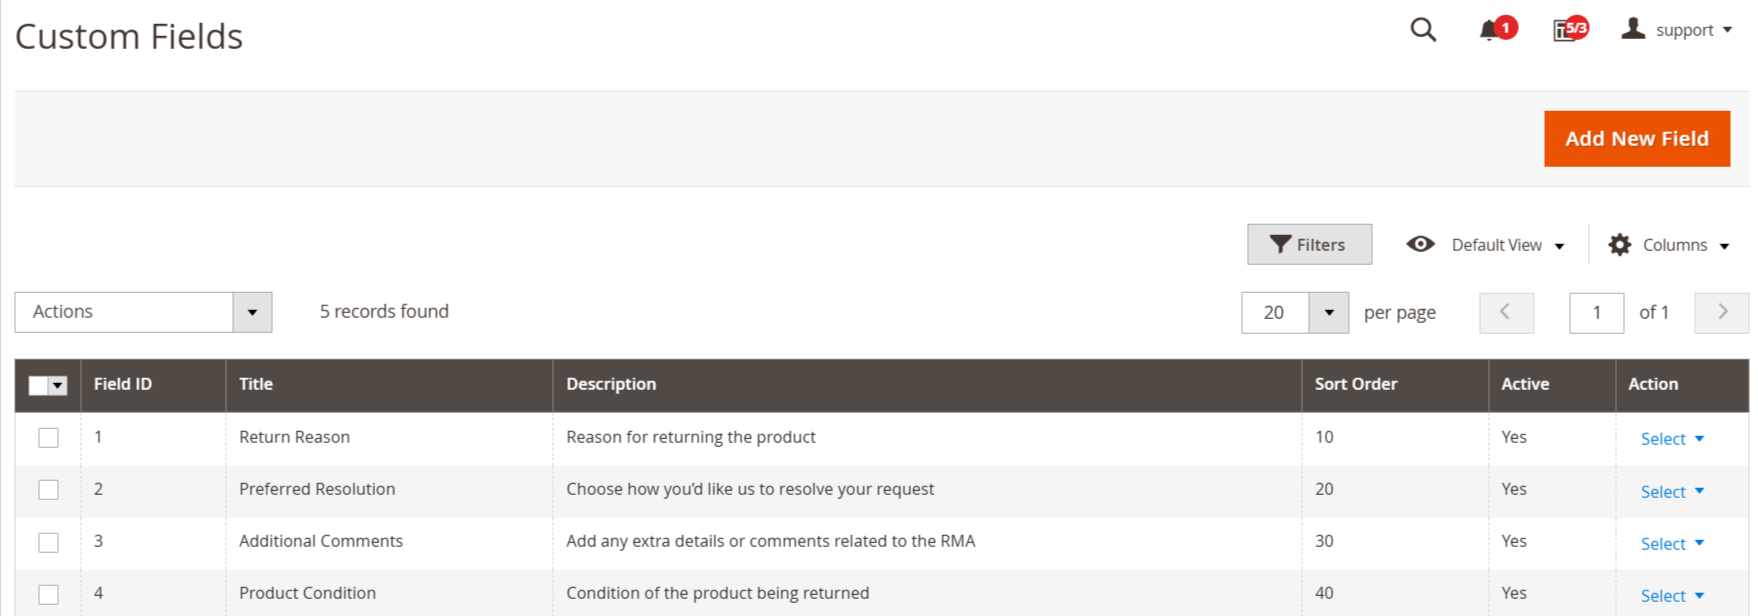
Custom fields provide a powerful method to enhance your return services by enabling the collection and storage of additional information related to RMAs.
By implementing these fields, you can customize the return process to gather essential data tailored to your needs. Whether it's capturing shipping information or collecting further insights about a product, custom fields introduce flexibility and efficiency to your RMA workflow.
For example, when customers confirm the shipment of their RMA package, custom fields can be utilized to gather details such as carrier name and tracking number, facilitating smooth tracking and communication throughout the return process.
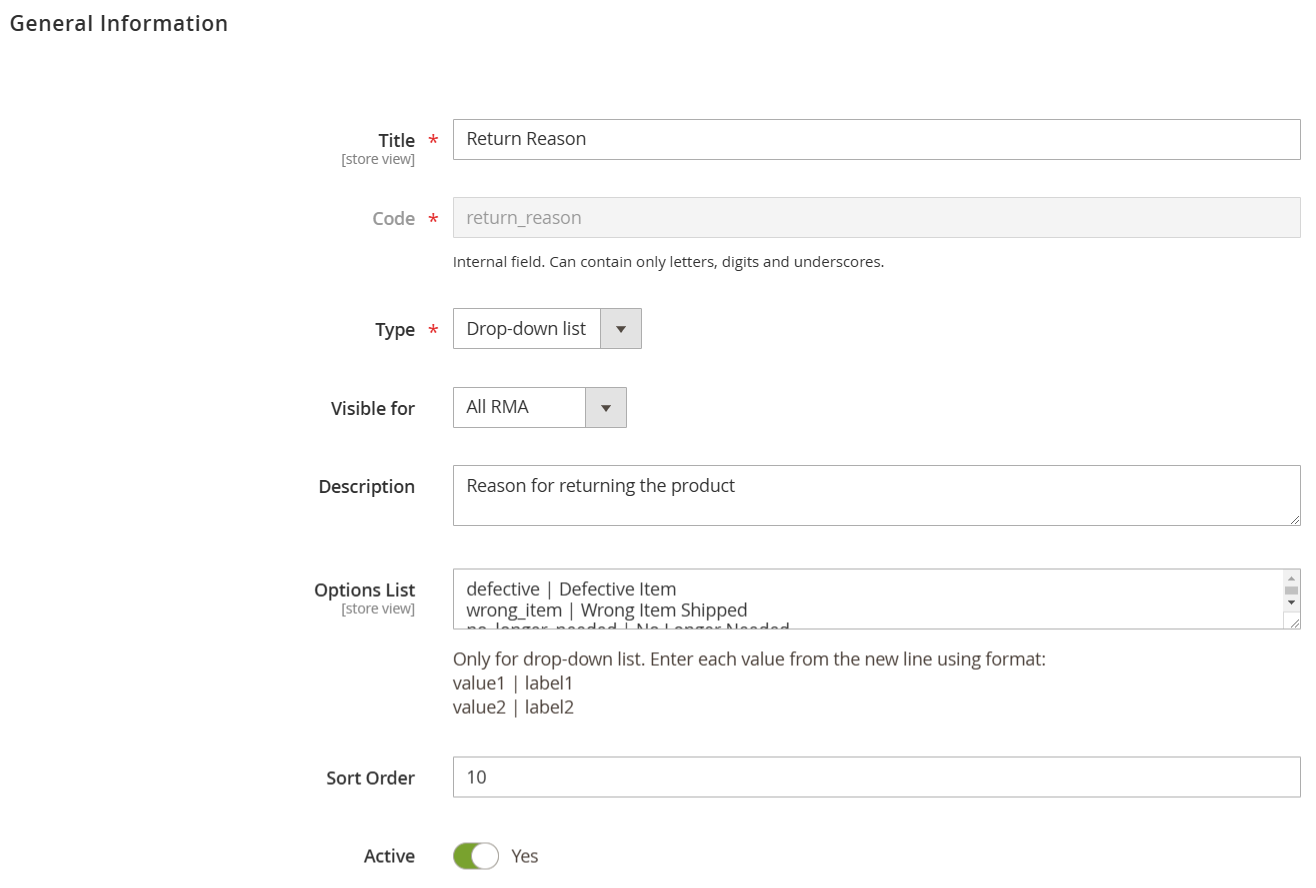
Title: A clear designation for the custom field, facilitating easy identification and use. Code: A unique code for the field used for programmatic access to its value. Type: Specifies the type of input the field will accept, with the following options available:
- Text: A single-line field for brief inputs.
- Multi-line Text: A larger text area for more extensive inputs.
- Date: A field that includes a calendar picker for easy date selection.
- Checkbox: A simple checkbox for yes/no responses.
- Drop-down List: A dropdown menu for selecting from predefined options (requires an options list).
Description: A brief description that serves as a tooltip to assist users in understanding the field's purpose.
Options list: Used for dropdown fields. Enter each option on a new line in the following format:
- Value1 | label1 value2 | label2
Sort order: Specifies the order in which the fields appear in the interface.
Active: If enabled, the custom field is considered active and will be displayed in the RMA process.
Quick Responses
You can create and manage Rma Quick Responses in Mavenbird > RMA > Quick Responses.
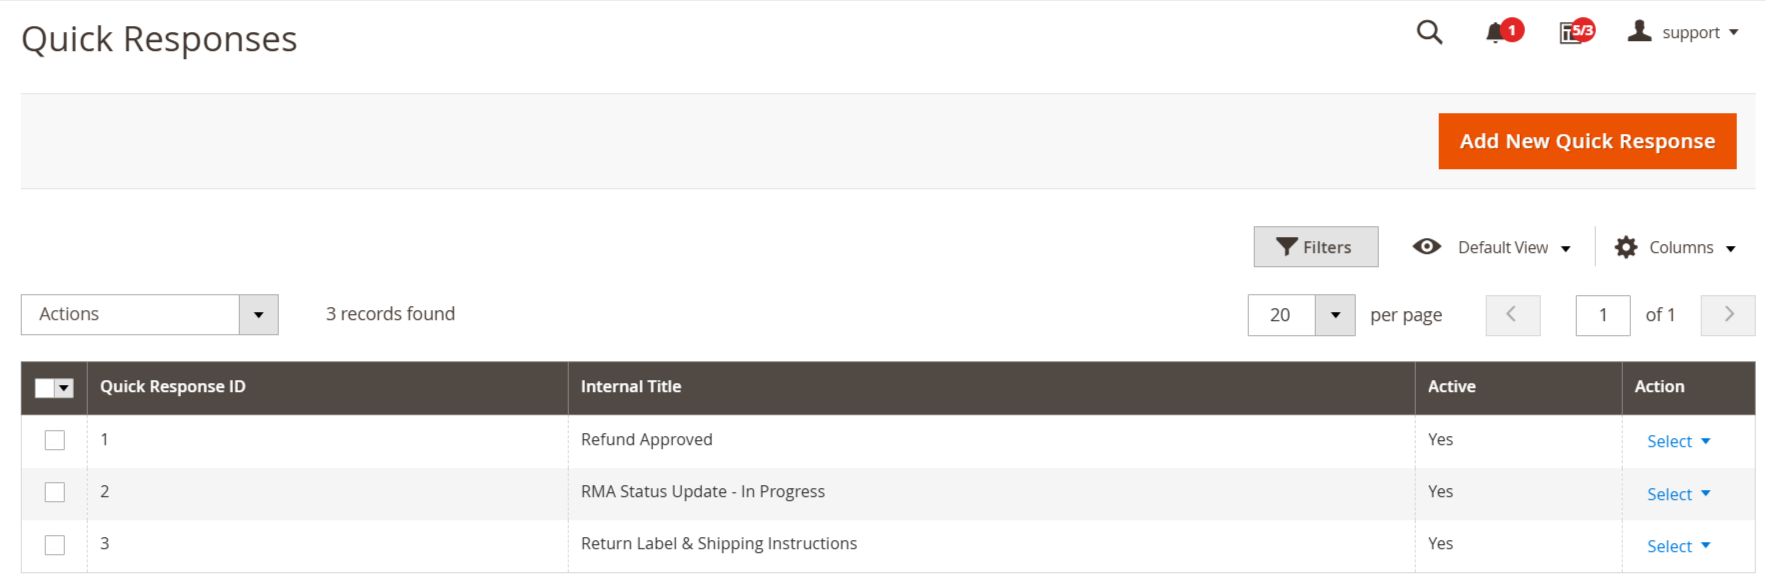
Quick responses provide an effective solution for improving communication speed and efficiency in customer interactions.
When dealing with repetitive inquiries or situations that require standard replies, Quick Responses help streamline your responses, leading to quicker RMA processing and enhanced customer satisfaction.
While some tasks can be automated using statuses or workflow rules, many scenarios still call for personalized communication.
Quick Responses enable you to swiftly insert a predefined message into the reply field, make any necessary customizations (such as adding the customer’s name), and send it with ease, saving you valuable time and effort.
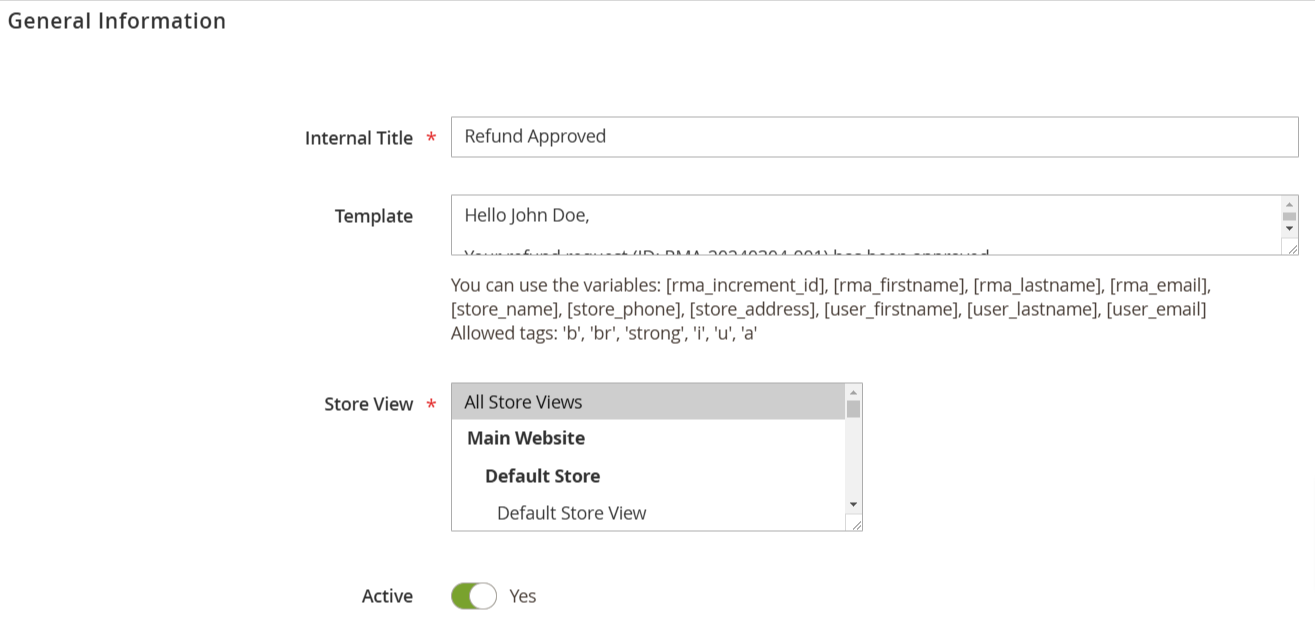
Internal title: The internal name of the quick response, visible only to your staff when composing new messages. Ensure it is clear and descriptive to assist agents in quickly selecting the appropriate response.
Is active: Enable or disable the quick response as necessary. Keep your list current by deactivating outdated templates.
Template: The actual text of the quick response that will be inserted into the message field. You can use dynamic variables to automatically personalize the message. Supported variables include:
- [rma_increment_id]: RMA ID
- [rma_firstname]: Customer's first name
- [rma_lastname]: Customer's last name
- [rma_email]: Customer's email address
- [store_name]: Store name
- [store_phone]: Store phone number
- [store_address]: Store address
- [user_firstname]: Agent's first name
- [user_lastname]: Agent's last name
- [user_email]: Agent's email address
Stores: Specify the store views where the quick response will be accessible. This functionality is important for businesses operating in multiple languages or regions, as it allows for different responses tailored to various store views.
Workflow Rules
You can create and manage Rma Workflow Rules in Mavenbird > RMA > Workflow Rules.
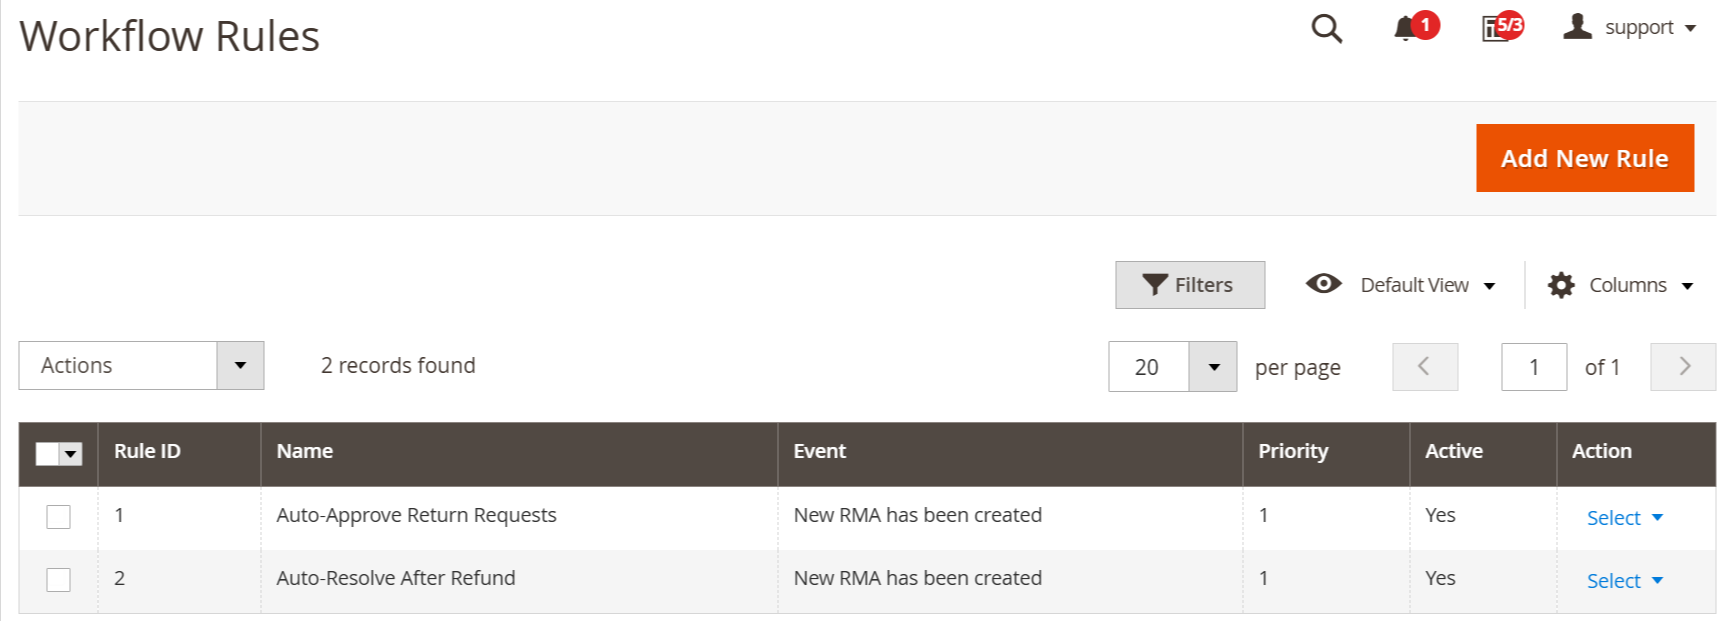
Maximize the efficiency of your RMA process with Workflow Rules, a robust automation tool designed to simplify and streamline repetitive tasks involved in RMA submissions and processing.
Workflow Rules enable you to provide timely, efficient, and personalized service, ensuring your customers receive the exceptional experience they expect.
By automating routine scenarios based on predefined events, Workflow Rules minimize manual effort, enhance response times, and allow your team to focus on delivering high-quality support.
Whether you need to automatically assign tickets to team members, send timely notifications, or effortlessly manage RMA statuses, Workflow Rules are the solution you need.
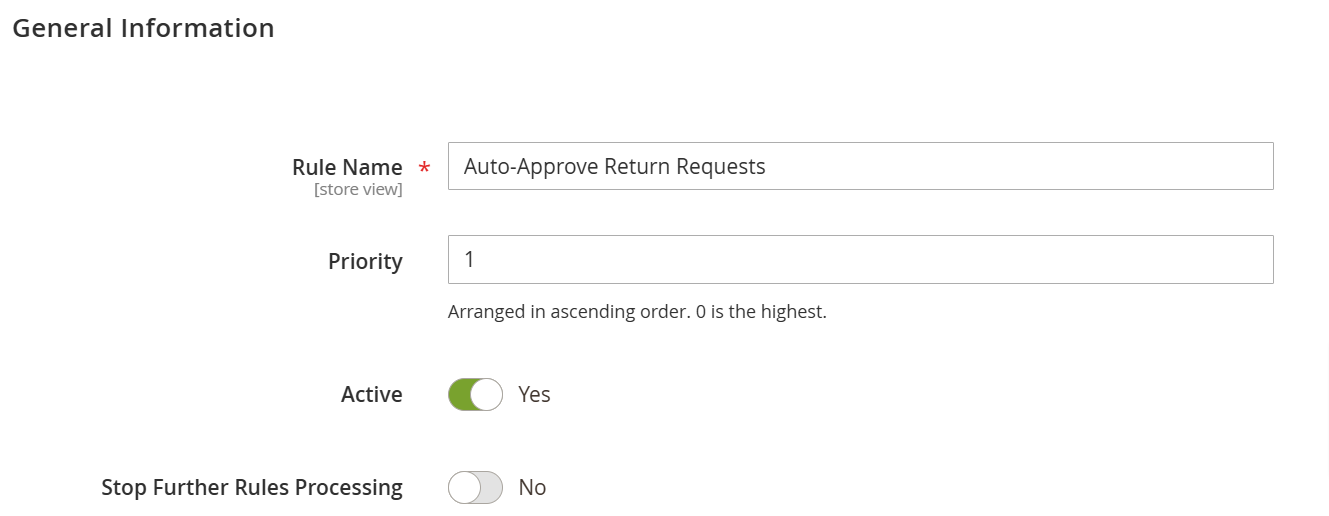
Rule Name: Assign a clear and descriptive name to your rule for easy identification.
Priority: Define the execution order for rules linked to the same event. Rules with higher priority will be triggered first.
Active: Toggle the activation status of the rule to determine if it is currently in use.
Stop Further Rules Processing: When enabled, this option prevents any other rules with the same or lower priority from being triggered if this rule is executed.
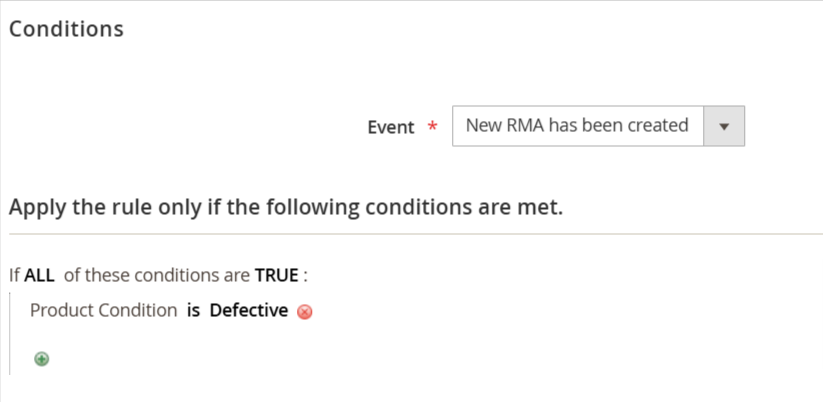
In the event block settings, you can configure the necessary RMA event conditions:
New RMA Created: Triggered when a customer submits a new RMA request.
RMA Changed: Triggered whenever any updates are made to the existing RMA.
New Reply from Customer: Triggered when the customer sends a response.
New Reply from Staff: Triggered when a support team member replies to the customer.
Following the events, condition blocks allow you to specify conditions that must be met for the rule to trigger actions. Actions will only execute if the current RMA meets these conditions. Here’s a list of the available conditions:
Last Message Body: Checks the content of the last public message on the RMA.
Created At: Based on the date the RMA was submitted.
Updated At: Checks the date of the most recent update made to the RMA.
Store: Indicates the store from which the RMA was submitted. Note that this condition cannot detect RMAs created from the backend since they can be associated with any store.
Status (Before Change): Represents the status of the RMA before the event was triggered (for events where the RMA has been changed).
Status: The current status of the RMA.
Owner (Before Change): Displays the owner of the RMA before the event (for RMA changed events).
Owner: The current owner of the RMA.
Last Reply By: Identifies the last message sender, either customer or staff, within the RMA.
Hours Since Created: Time elapsed since the particular RMA was created. This condition lacks precision, so use equal, greater than, or less than comparators.
Hours Since Updated: Time elapsed since the last update to the specific RMA. Similarly, this condition is not precise, so use equal, greater than, or less than comparators.
Hours Since Last Reply: Time elapsed since the last message was posted in the specific RMA. Like the previous conditions, this one is not precise, so use equal, greater than, or less than comparators.
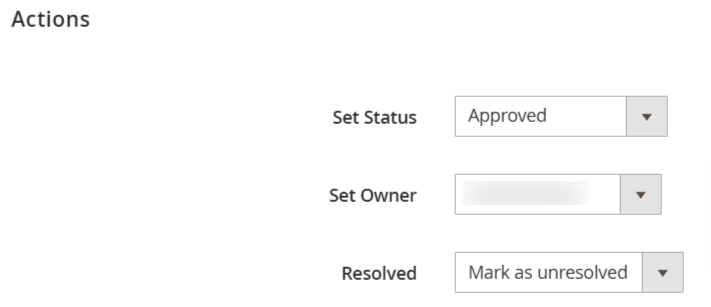
When all specified conditions are met, the system will automatically execute the corresponding action. Currently, the following actions are supported:
Set Status: Automatically updates the status of the RMA.
Set Owner: Reassigns the RMA to a different owner.
Resolved: Marks the RMA as resolved or unresolved based on the configured conditions.
Return Addresses
Go to the Mavenbird > RMA > Return Addresses. Press the button Add New. Address button.
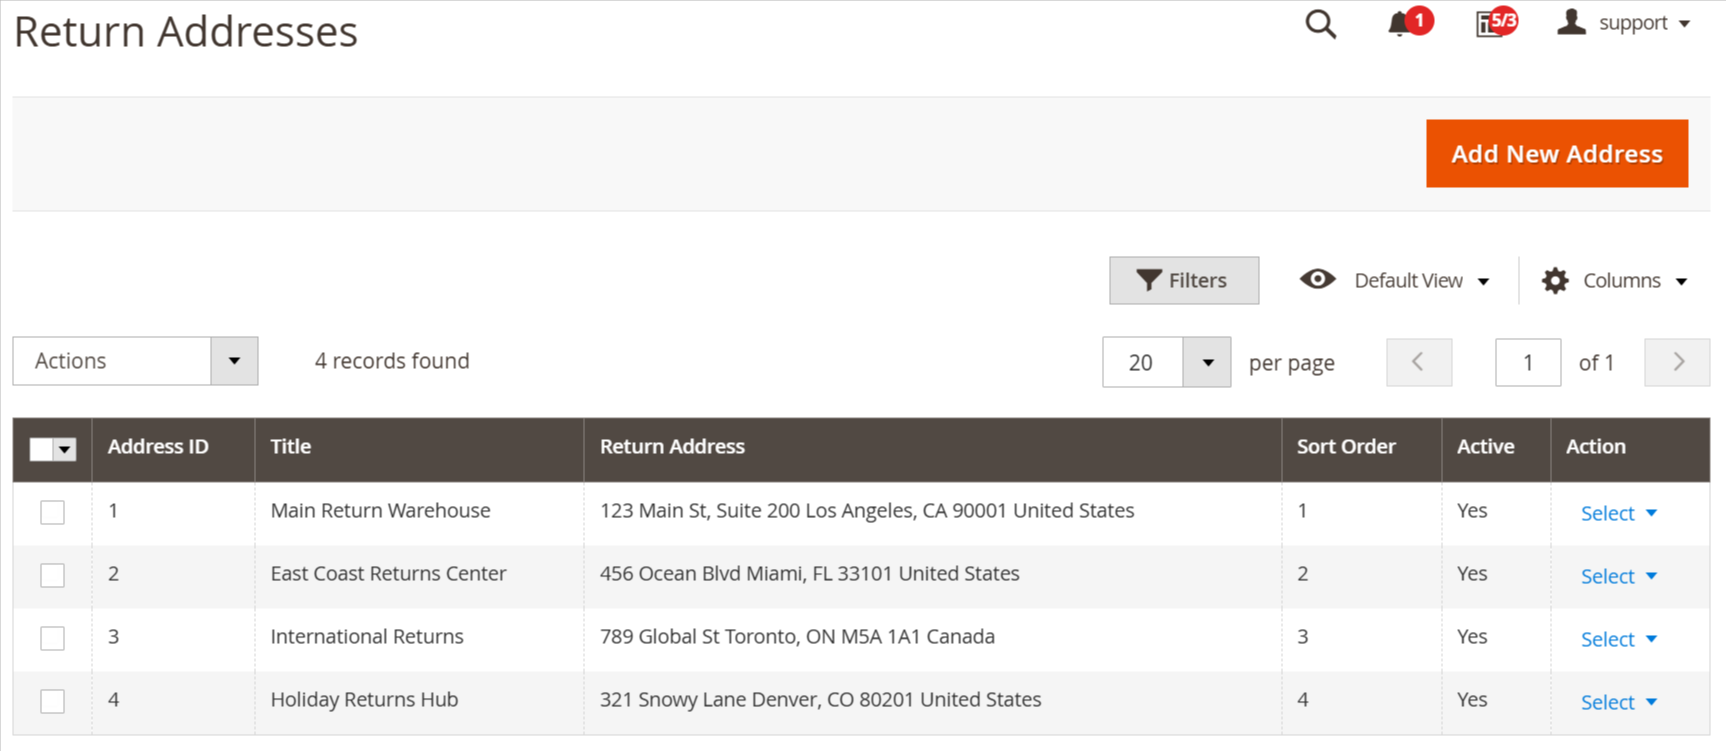
The RMA extension allows you to effortlessly create and manage a list of return addresses, offering your customers clear and convenient options while enhancing your workflow efficiency.
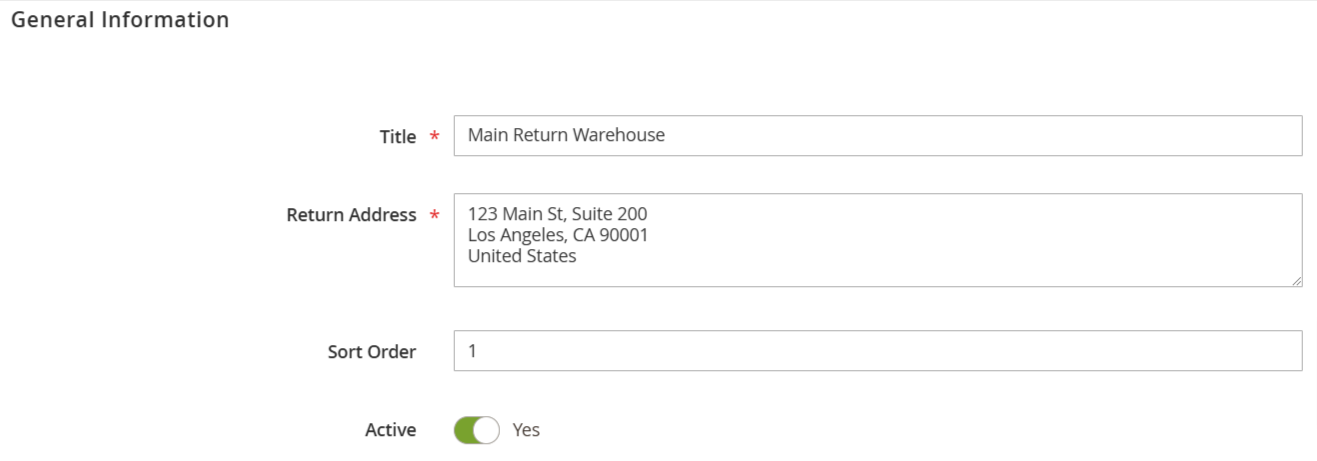
Title: Assign a clear and recognizable title to each return address to simplify identification for your team.
Address: Specify the complete return address where customers should send their returned items. Ensure accuracy to prevent any delivery issues or delays.
Sort Order: Organize the return addresses in your preferred display order, ensuring a smooth selection process for your team.
Active: Use this option to activate or deactivate a specific return address. Active addresses will be visible in the RMA selection, allowing you to manage availability in real time.