Contact Form Pro
Extension Installation
For Magento Marketplace Customers
-
Find the Composer name and version of the extension in the extension's composer.json file.
-
Login to your SSH and run:
- composer require mavenbird/module-contactformpro
- Wait for Composer to finish updating your project dependencies and make sure there aren't any errors.
-
To verify that the extension installed properly, run the command:
- php bin/magento module:status Mavenbird_ContactFormPro
- By default, the extension is probably disabled.
- Enable the extension and clear static view files:
- php bin/magento module:enable Mavenbird_ContactFormPro --clear-static-content
- php bin/magento setup:upgrade
- For Magento version 2.0.x to 2.1.x - php bin/magento setup:static-content:deploy
- For Magento version 2.2.x & above - php bin/magento setup:static-content:deploy --f
- php bin/magento cache:flush
For Mavenbird Customers
- Extract the zip folder and upload our extension to the root of your Magento 2 directory via FTP.
- Login to your SSH and run below commands step by step:
- php bin/magento setup:upgrade
- For Magento version 2.0.x to 2.1.x - php bin/magento setup:static-content:deploy
- For Magento version 2.2.x & above - php bin/magento setup:static-content:deploy --force
- php bin/magento cache:flush
Empower your Magento 2 store with a powerful Contact Form Pro Extension to deliver seamless customer support. Manage inquiries, emails, and offline chats in one place without losing track of any communication. Automatically route messages to the right department or agent, improve response times, and gain insights with detailed reports and customer feedback surveys.
- Collect and manage all customer messages, emails, and chats in a single location.
- Set up rules to auto-assign inquiries to the right department or agent.
- Collaborate with external teams directly through support tickets.
- Get real-time updates for new messages and ticket activity.
- Access complete message and action logs for every inquiry.
- Create tailored fields to collect all necessary customer details.
- Set permissions to define who can view or manage tickets.
- Gather feedback with post-support surveys.
- Analyze support team performance and track efficiency.
Configuration
Go to Store → Configuration → Mavenbird Extensions→ Contact Form Pro.
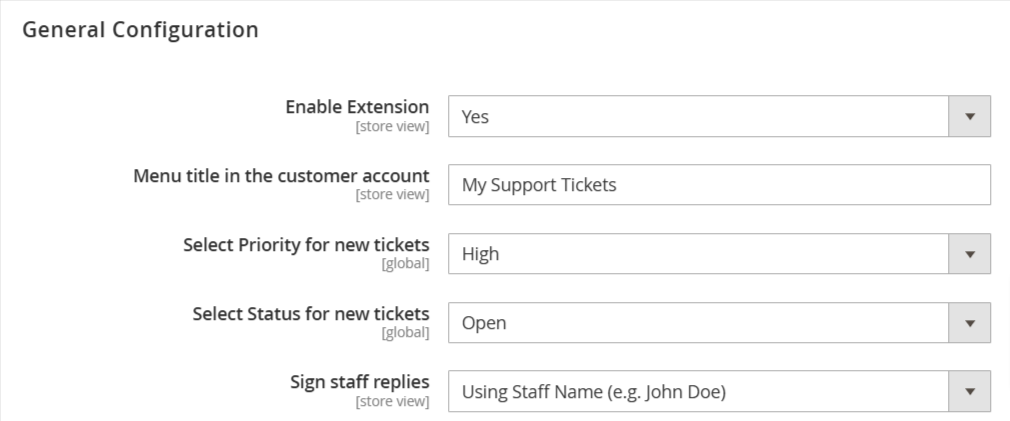
Enable Extension: A dropdown menu allowing the user to enable or disable the extension, with options like "Yes" or "No." Menu Title in Customer Account: Sets the ticket page header that is visible for the customer in their account on the frontend.
Select Priority For New Tickets: Sets the default priority for new tickets.
Select Status for new tickets: Sets the default status for new tickets.
Sign staff replies: This option allows you to specify how the agent's replies should be signed. Contactform Pro can sign them using the agent's name, or the name of the agent's department.
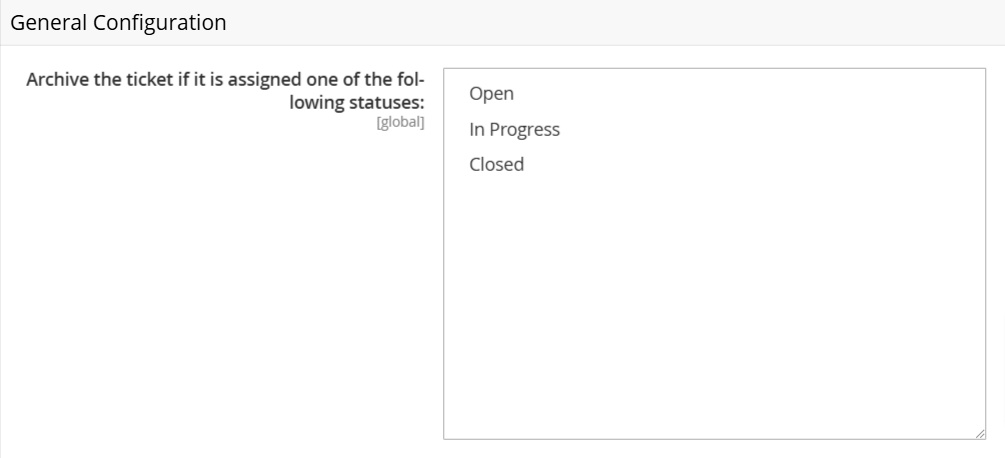
Archive the ticket if it is assigned one of the following statuses: Option allows you to place solved tickets into the archives solved- e.g., you can automatically move tickets to the archive with the status Closed.
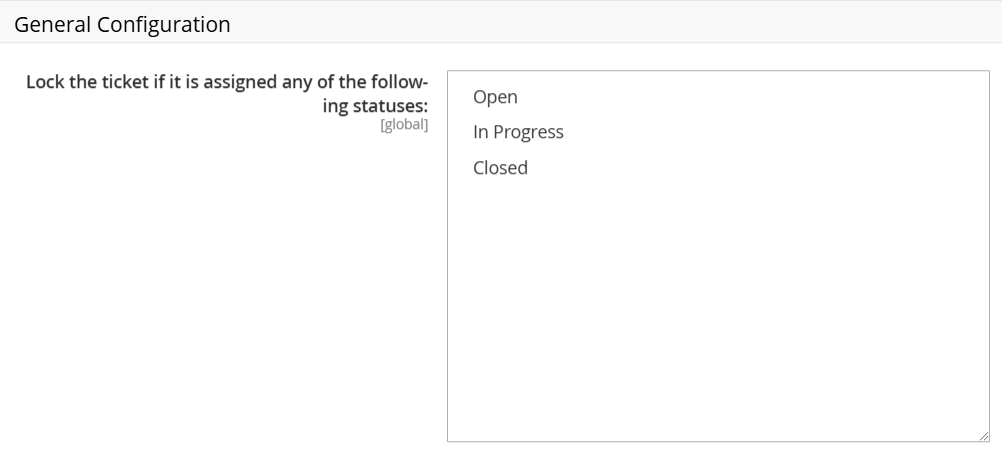
Lock the ticket if it is assigned any of the following statuses: When activated, the customer cannot add a new message to the ticket. Choose the ticket status for the option to automatically lock tickets with the selected status.
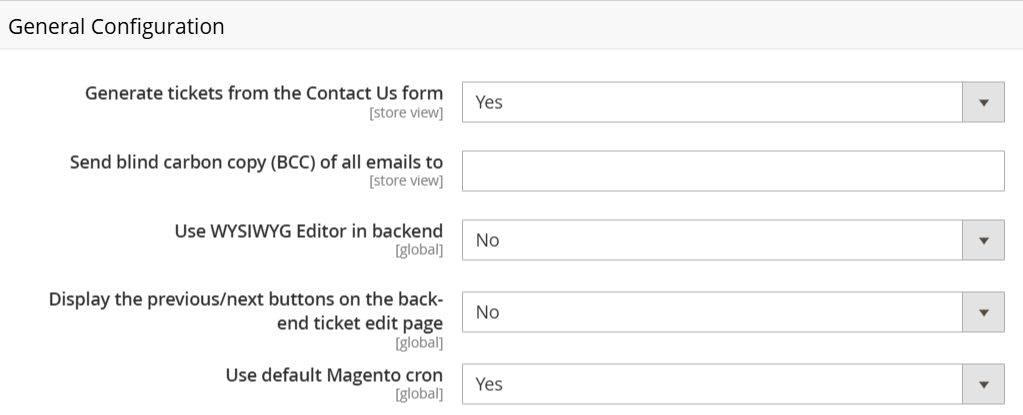
Generate tickets from the contact us form: If the option is enabled, Contactform Pro will replace the default Magento contact form (/contacts/) with the Contact FormPro. This form has additional fields and allows you to create a new ticket when the customer posts a message.
Send blind carbon copy (BCC) of all emails to: Here you can enter a comma-separated list of emails. The Contact Form Pro will send a blind carbon copy (BCC) of all outgoing emails using the email addresses.
Use WYSIWYG Editor in backend: Allows for a rich text editor in backend messages and dictionary forms options. After setting this option, you need to purge the cache to apply the options changed and make the editor appear or disappear.
Display the previous/next buttons on the backend ticket edit page: Allows you to jump from ticket to ticket using two additional buttons on the toolbar - Previous Ticket and Next ticket.
Use the default Magento cron: If the option is enabled, the default Magento cron will be used.
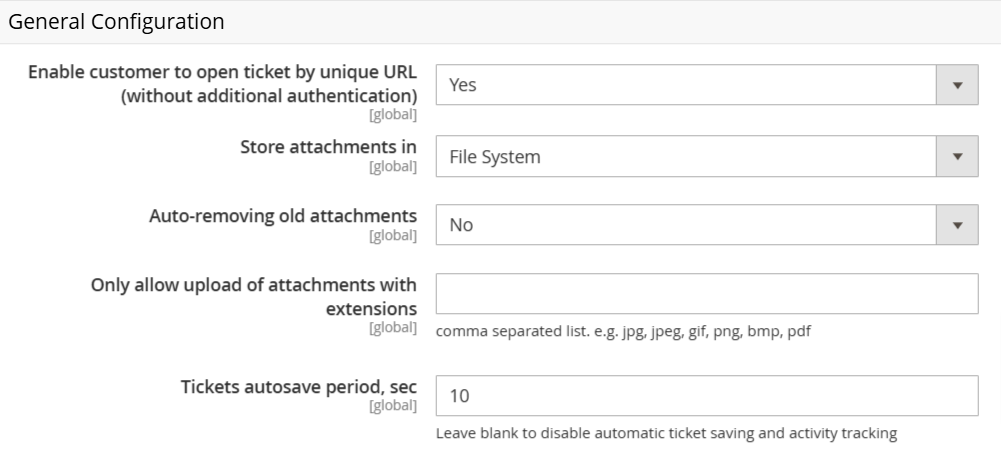
Enable customer to open ticket by unique URL (without additional authentication): A button "Show source" appears when a customer hovers over a reply in a ticket in his account. The "Show source" button has a direct link to the reply.
Store attachments in: Enables automatic removal of files attached to ticket messages.
Auto-removing old attachments: Set the threshold in days for the automatic removal of attachments.
Only allow upload of attachments with extensions: Sets a list of file types allowed for uploading in the ticket.
Tickets autosave period, sec: Specify in seconds a time period for the ticket reply to be autosaved.
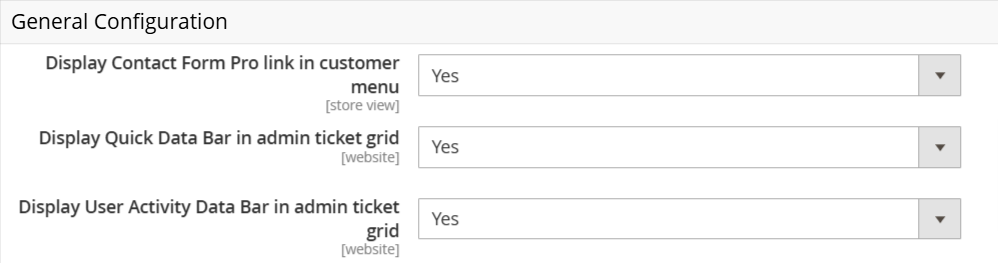
Display Contact Form Pro link in customer menu: A link to the Contactform Pro page is placed in the customer menu dropdown on the frontend.
Display Quick Data Bar in admin ticket grid: Enables the tickets grid page i admin to display a data block with recent statistics on tickets. It shows the number of current admin tickets (My Tickets), the total number of tickets, ticket statistics for each admin, and the number of open, closed, and in-progress tickets.
Display User Activity Data Bar in admin ticket grid: Enables the tickets grid page in the backend to display statistics on tickets per admin at the bottom.
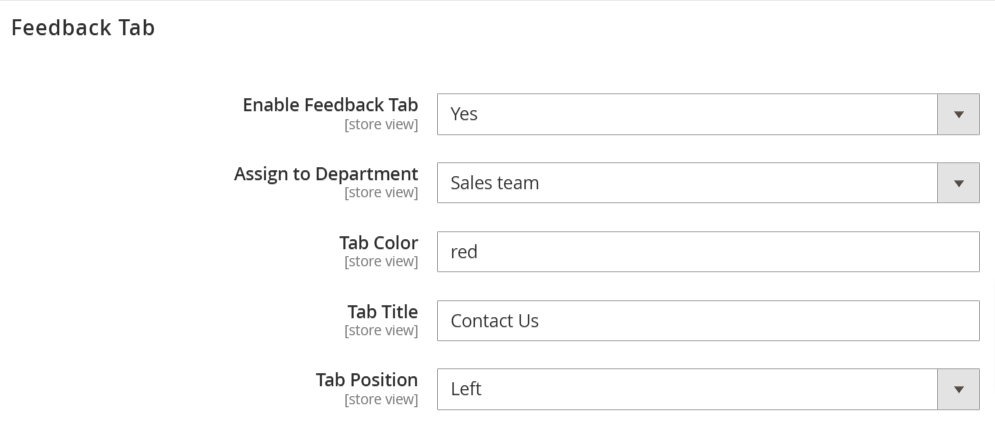
Enable Feedback Tab: If the option is enabled, Contact Form Pro will show a Feedback Tab at the side of each frontend page.
Assign to Department: Sets default department for new tickets created via Feedback Tab.
Tab Color: Sets the color of the Feedback Tab.
Tab Title: Sets the title of the Feedback Tab.
Tab Position: Sets the position of Feedback Tab ( at the left or right side of your store).
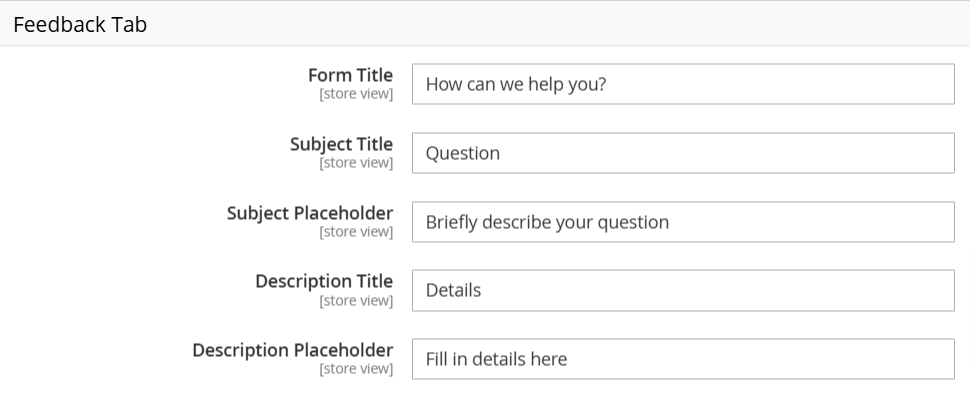
Form Title: Sets the title of the popup window.
Subject Title: Sets the title of field 'Subject'.
Subject Placeholder: Sets placeholder of field 'Subject'.
Description Title: Sets the title of field 'Description'.
Description Placeholder: Sets the placeholder of the field 'Description'.
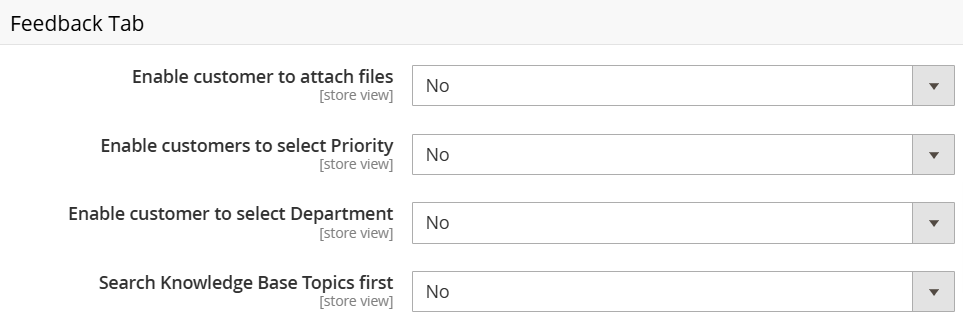
Enable customer to attach files: Enable or disable the ability to attach files.
Enable customers to select Priority: Enable or disable the ability to set the priority.
Enable customer to select Department: Enable or disable the ability to select the department.
Search Knowledge Base Topics first: A store-based setting can be used when Mirasvit Knowledge Base is installed, and integration enabled. Then, just the prior ticket submission customer will be presented with search results of their inquiry in Knowledge Base articles.
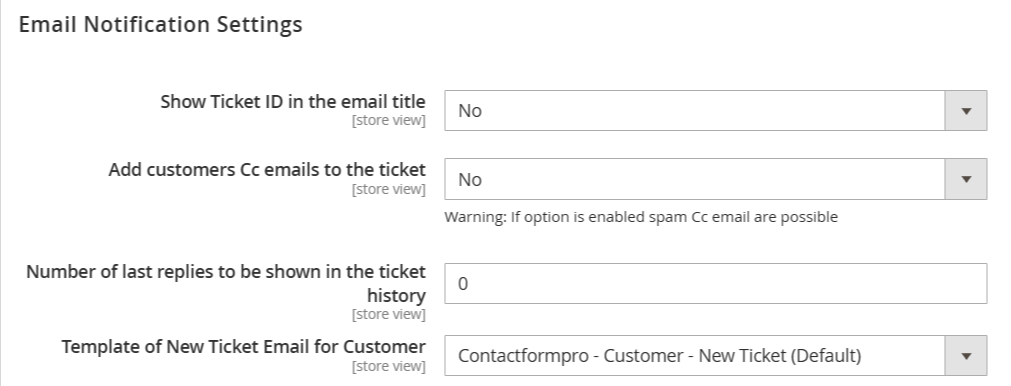
Show Ticket ID in the email title: If the option is enabled, the email subject will contain a ticket ID (e.g. [#VEP-728-96190] Email subject here..)
Add customers Cc emails to the ticket: Enables sending a CC email. Warning: If option is enabled spam CC email is possible.
Number of last replies to be shown in the ticket history: When a customer receives a reply from an agent, the email includes a conversation history. You can limit the number of last replies to the history using this option. If you set it to 0, you will completely hide the history.
Template of New Ticket Email for Customers': When a customer creates a new ticket, he or she receives an email with confirmation. This option sets a template for this email.
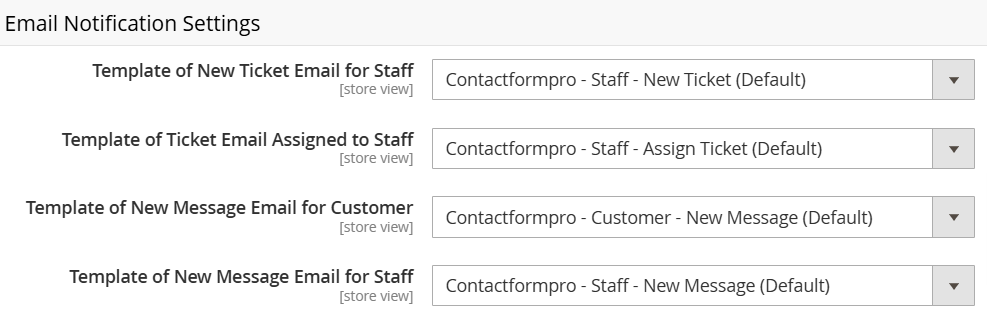
Template of New Ticket Email for Staff: When the customer creates a new ticket, the agent receives an email notifying the agent about the new ticket. This option sets a template for an email.
Template of Ticket Email Assigned to Staff: When the agent replies to a ticket, the customer receives an email with this reply. This option sets a template for this email.
Template of New Message Email for Customer: When a customer replies to a ticket, the agent receives an email with this reply. This option sets a template for this email.
Template of New Message Email for a Staff: This option sets a template for an email that an agent sends to 3rd party users.
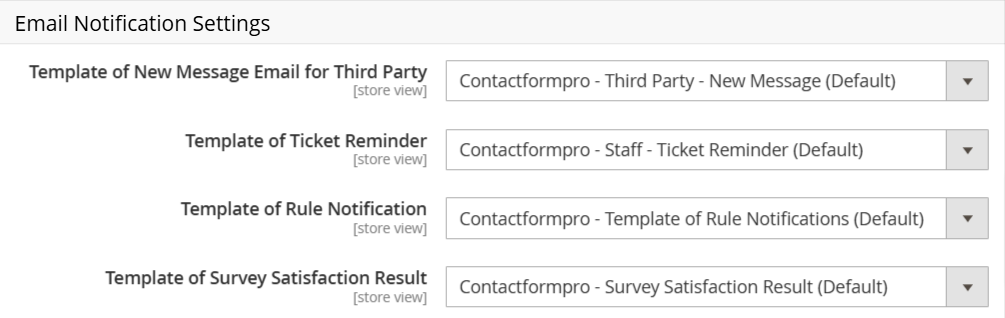
Template of New Message Email for Third Party: Dropdown menu for selecting the template used when sending new message notifications to third parties.
Template of Ticket Reminder: Dropdown menu for selecting the template used for sending ticket reminder emails.
Template of Rule Notification: Dropdown menu for setting the template for rule notifications related to tickets.
Template of Survey Satisfaction Result: Dropdown menu for selecting the template used for sending survey satisfaction results.
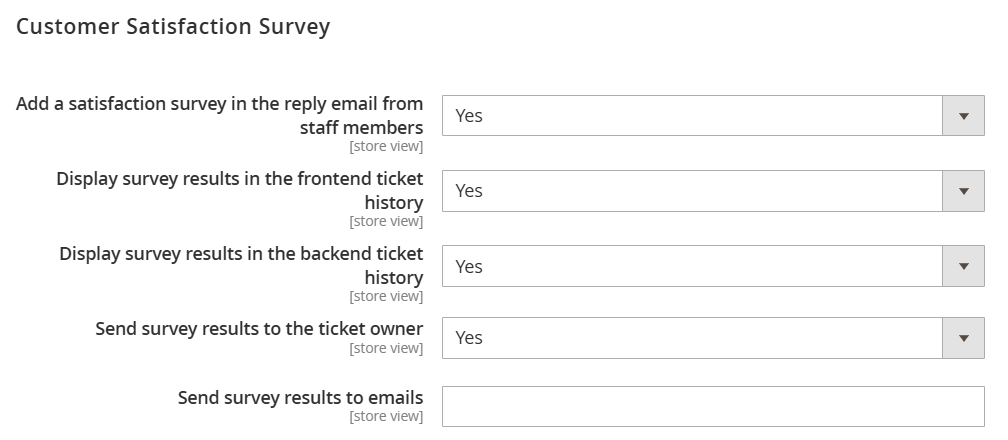
Add a satisfaction survey in the reply email from staff members: Includes a satisfaction block to the email notifications, sent after staff have submitted a message to the ticket.
Display survey results in the frontend ticket history: Enables the customer to view the satisfaction rating they provided in their account.
Display survey results in the backend ticket history: Enables display of customer satisfaction rates (per message) in the backend ticket Edit page.
Send survey results to the ticket owner: If the option is enabled, the store agent will receive a result of the customer's support rate for their reply.
Send survey results to emails: Sets emails that will receive the results of the support survey. You can enter multiple emails separated by a comma.
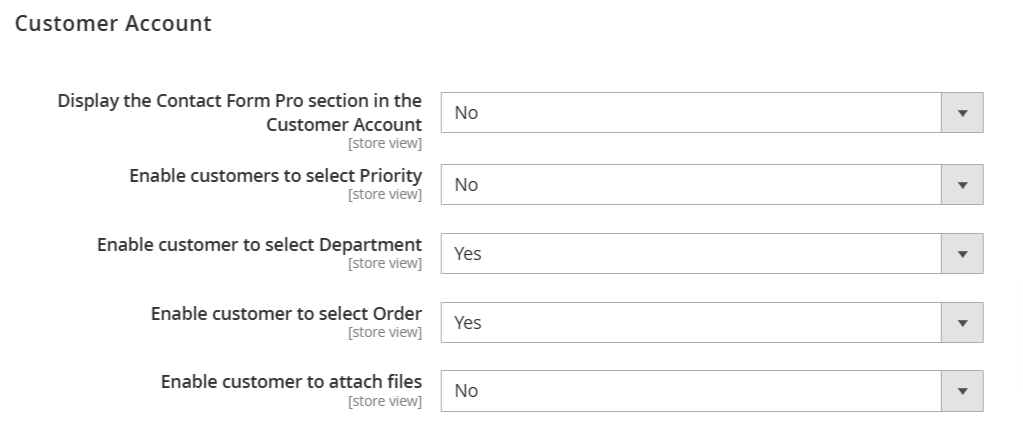
Display the Contact Form Pro section in the Customer Account: If the option is enabled, customers will see a Contact Form Pro section in the customer account of the store.
Enable customers to select Priority: If the option is enabled, customers can select a priority for a new ticket.
Enable customers to select Department: If the option is enabled, customers can select a department for a new ticket.
Enable customers to select Order: If the option is enabled, customers can select an order for a new ticket.
Enable customers to attach files: Enable/disable the ability to attach files.
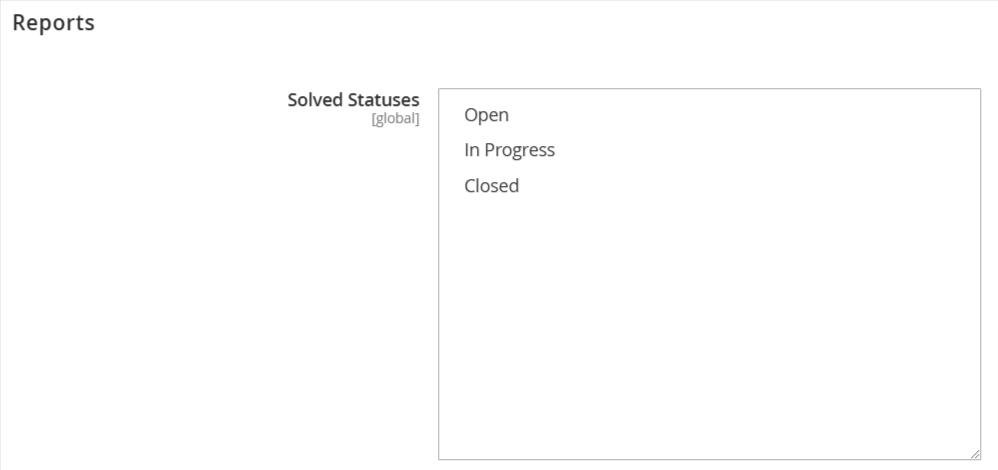
Reports: This section contains only one option - Solved Statuses. This list box allows you to set custom ticket Statuses, which will be used by the Contact Form Pro reporting subsystem to determine how many tickets were resolved for a certain period.
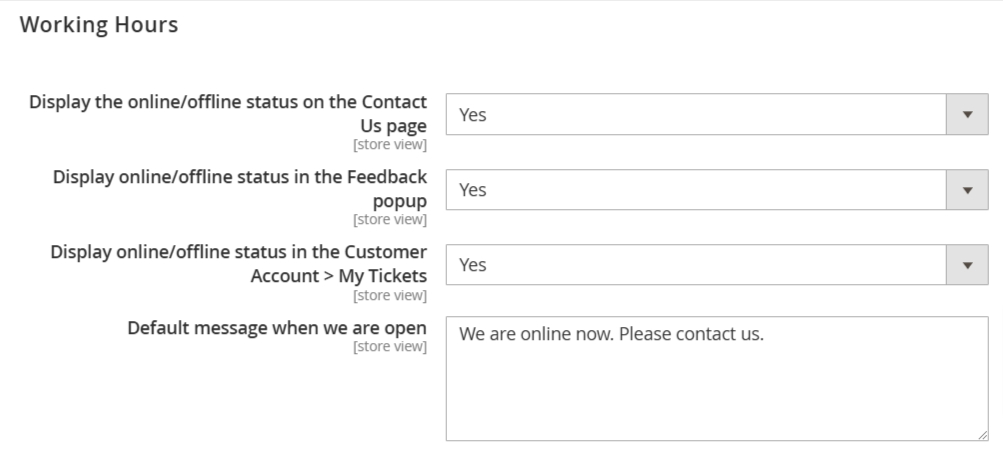
Display the online/offline status on the Contact Us page: If this option is enabled, customers will see your store's status on the Contact Us page.
Display online/offline status in the Feedback popup: If this option is enabled, customers will see your store's status in the Feedback popup.
Display online/offline status in the Customer Account > My Tickets: If the option is enabled, customers will see your store's status in the Customer Account > My Tickets.
Default message when we are open: Default message when we are open. Can be overwritten for each schedule in Customers > Contact Form Pro > Working Hours.
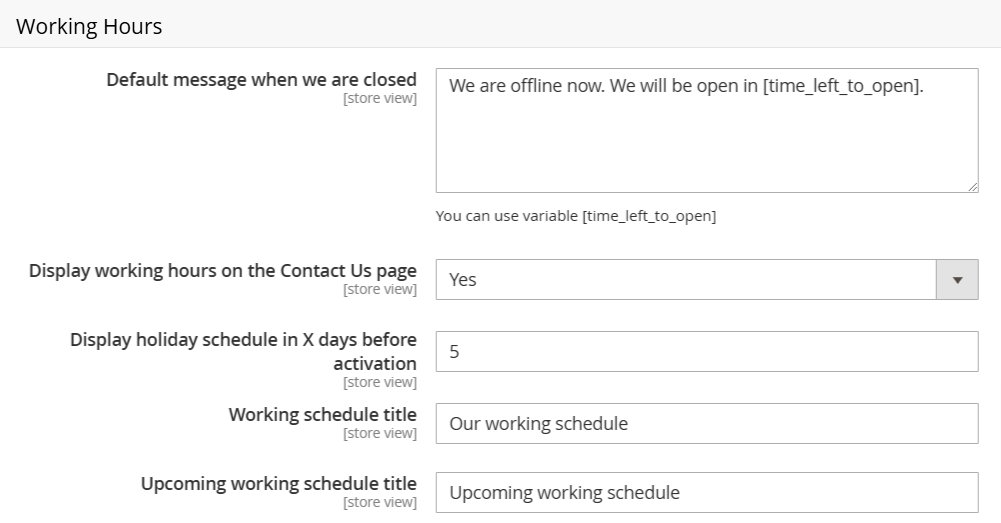
Default message when we are closed: Default message when we are closed. Can be overwritten for each schedule in Customers > Help Desk MX > Working Hours. You can use the variable [time_left_to_open].
Display working hours on the Contact Us page: If the option is enabled, customers will see the Working Hours of your store on the Contact Us page.
Display holiday schedule X days before activation: The number of days to display holiday schedule before activation.
Working schedule title: Title of Working Hours block on the Contact Us page.
Upcoming working schedule title: Title of Upcoming Working Hours block on the Contact Us page.
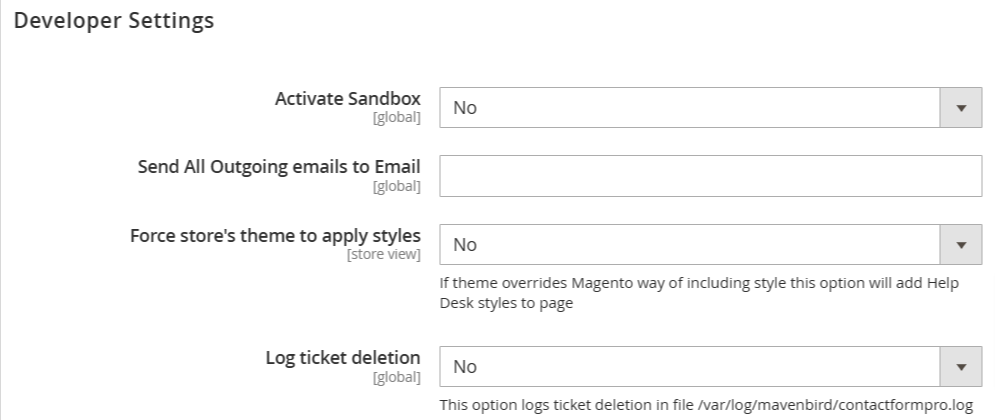
Activate Sandbox: If the option is enabled, the Help Desk will not send any email to your customers. All emails will be sent to the sandbox email.
Send All Outgoing emails to Email: Specifies a sandbox email (see previous option).
Force store's theme to apply styles: If a store theme overrides the Magento way of including styles, this option will add Help Desk styles to the page.
Log ticket deletion: This option logs ticket deletion in file.
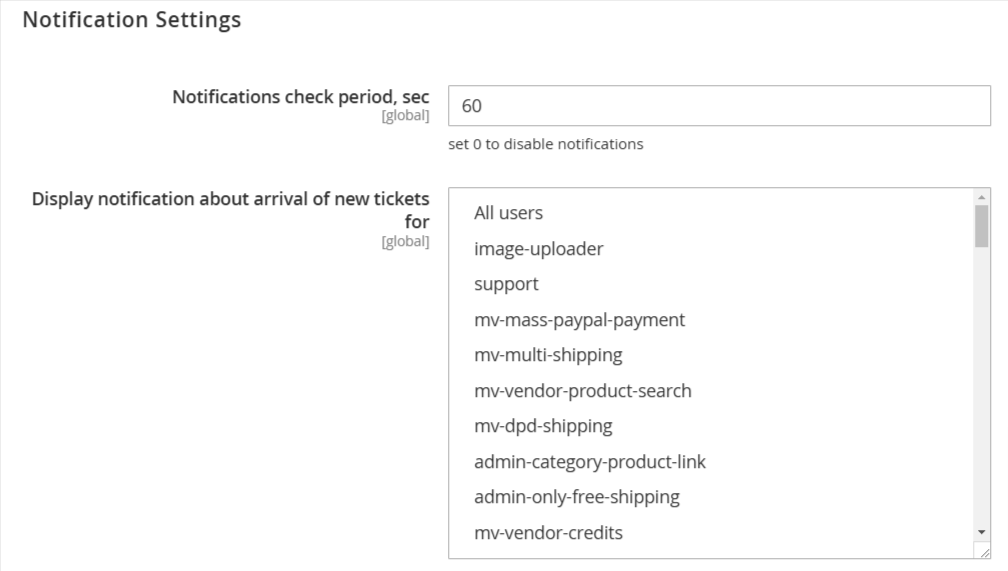
Notifications check period, sec: Frequency of updates checks. Setting to 0 will disable them.
Display notification about the arrival of new tickets for: Users to display a notification for.
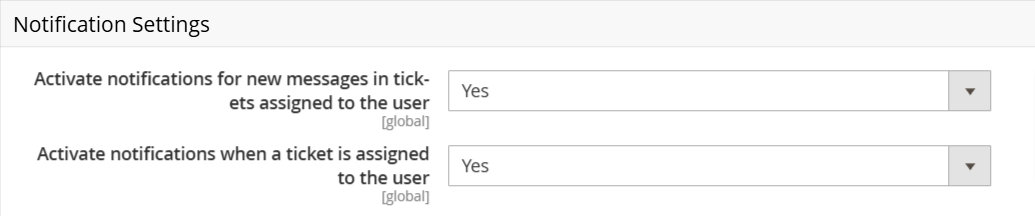
Activate notification for new messages in ticket assigned to the user: If the option is enabled, users will receive notifications about new messages in their tickets.
Activate notification when a ticket is assigned to the user If the option is enabled, users will receive notifications about new tickets assigned to them.
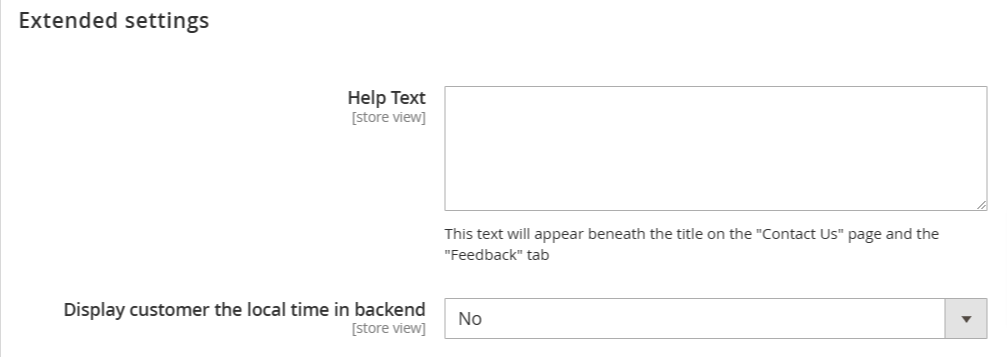
Help Text: This text will be shown under title on "Contact Us" page and "Feedback" tab
Display customer the local time in backend: Display the customer's local time in the backend. To ensure the option works correctly, you need to download a timezone database.
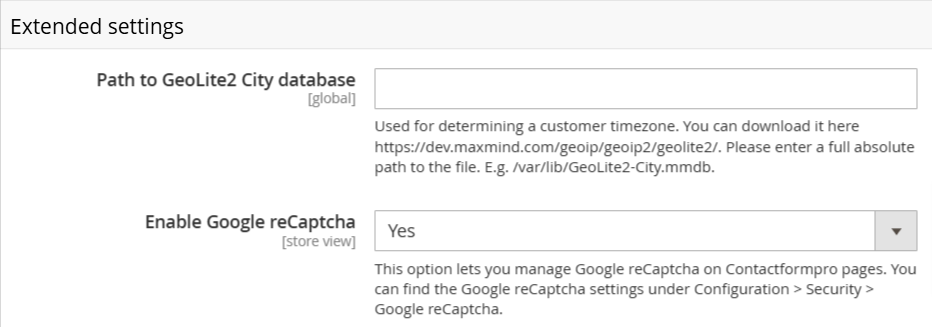
Path to GeoLite2 City database: Used for determining a customer's timezone by using a timezone file.You can download it here https://dev.maxmind.com/geoip/geoip2/geolite2/. Please enter a full absolute path to the file. E.g. /var/lib/GeoLite2-City.mmdb.
Enable Google reCaptcha: This option allows you to control Google reCaptcha on Helpdesk pages. Find settings for Google reCaptcha in Configuration > Security > Google reCaptcha.
Add Ticket
The core feature of the Customer Support Ticketing System is the Tickets Overview section. You can find this under Mavenbird > Contact Form Pro > Tickets. It displays a comprehensive list of all customer-submitted support tickets.
To create a new ticket click on the “Create New Ticket” button.
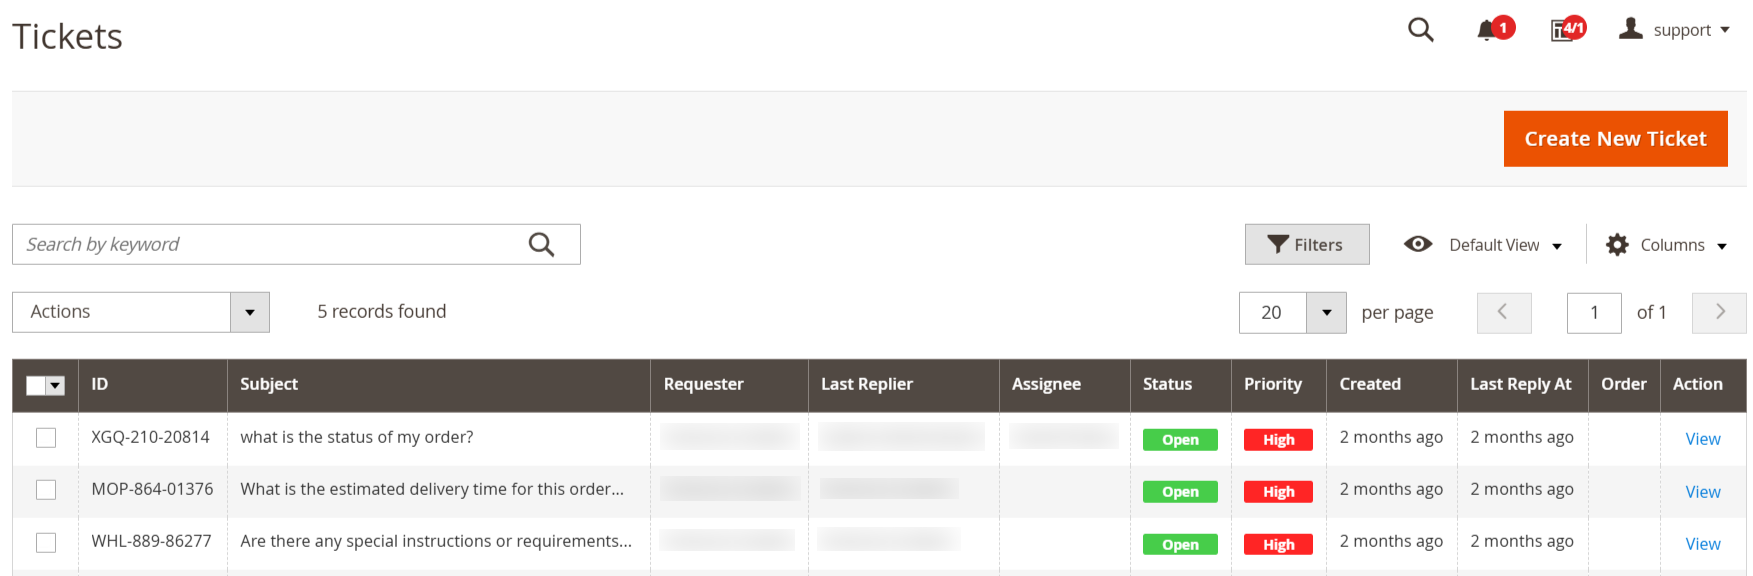
Ticket Management Interface
The Ticket Management Interface is crafted for optimal efficiency, providing an intuitive, user-friendly experience that enhances ticket handling within your support system. Whether addressing customer queries, order issues, or technical support requests, this interface ensures you have all the necessary information readily available to deliver outstanding customer service.
General Tab:
In the admin panel, tickets can be efficiently managed through the General tab, organized into various functional sections to facilitate seamless ticket processing. Below is an overview of the essential components found within the ticket management interface.
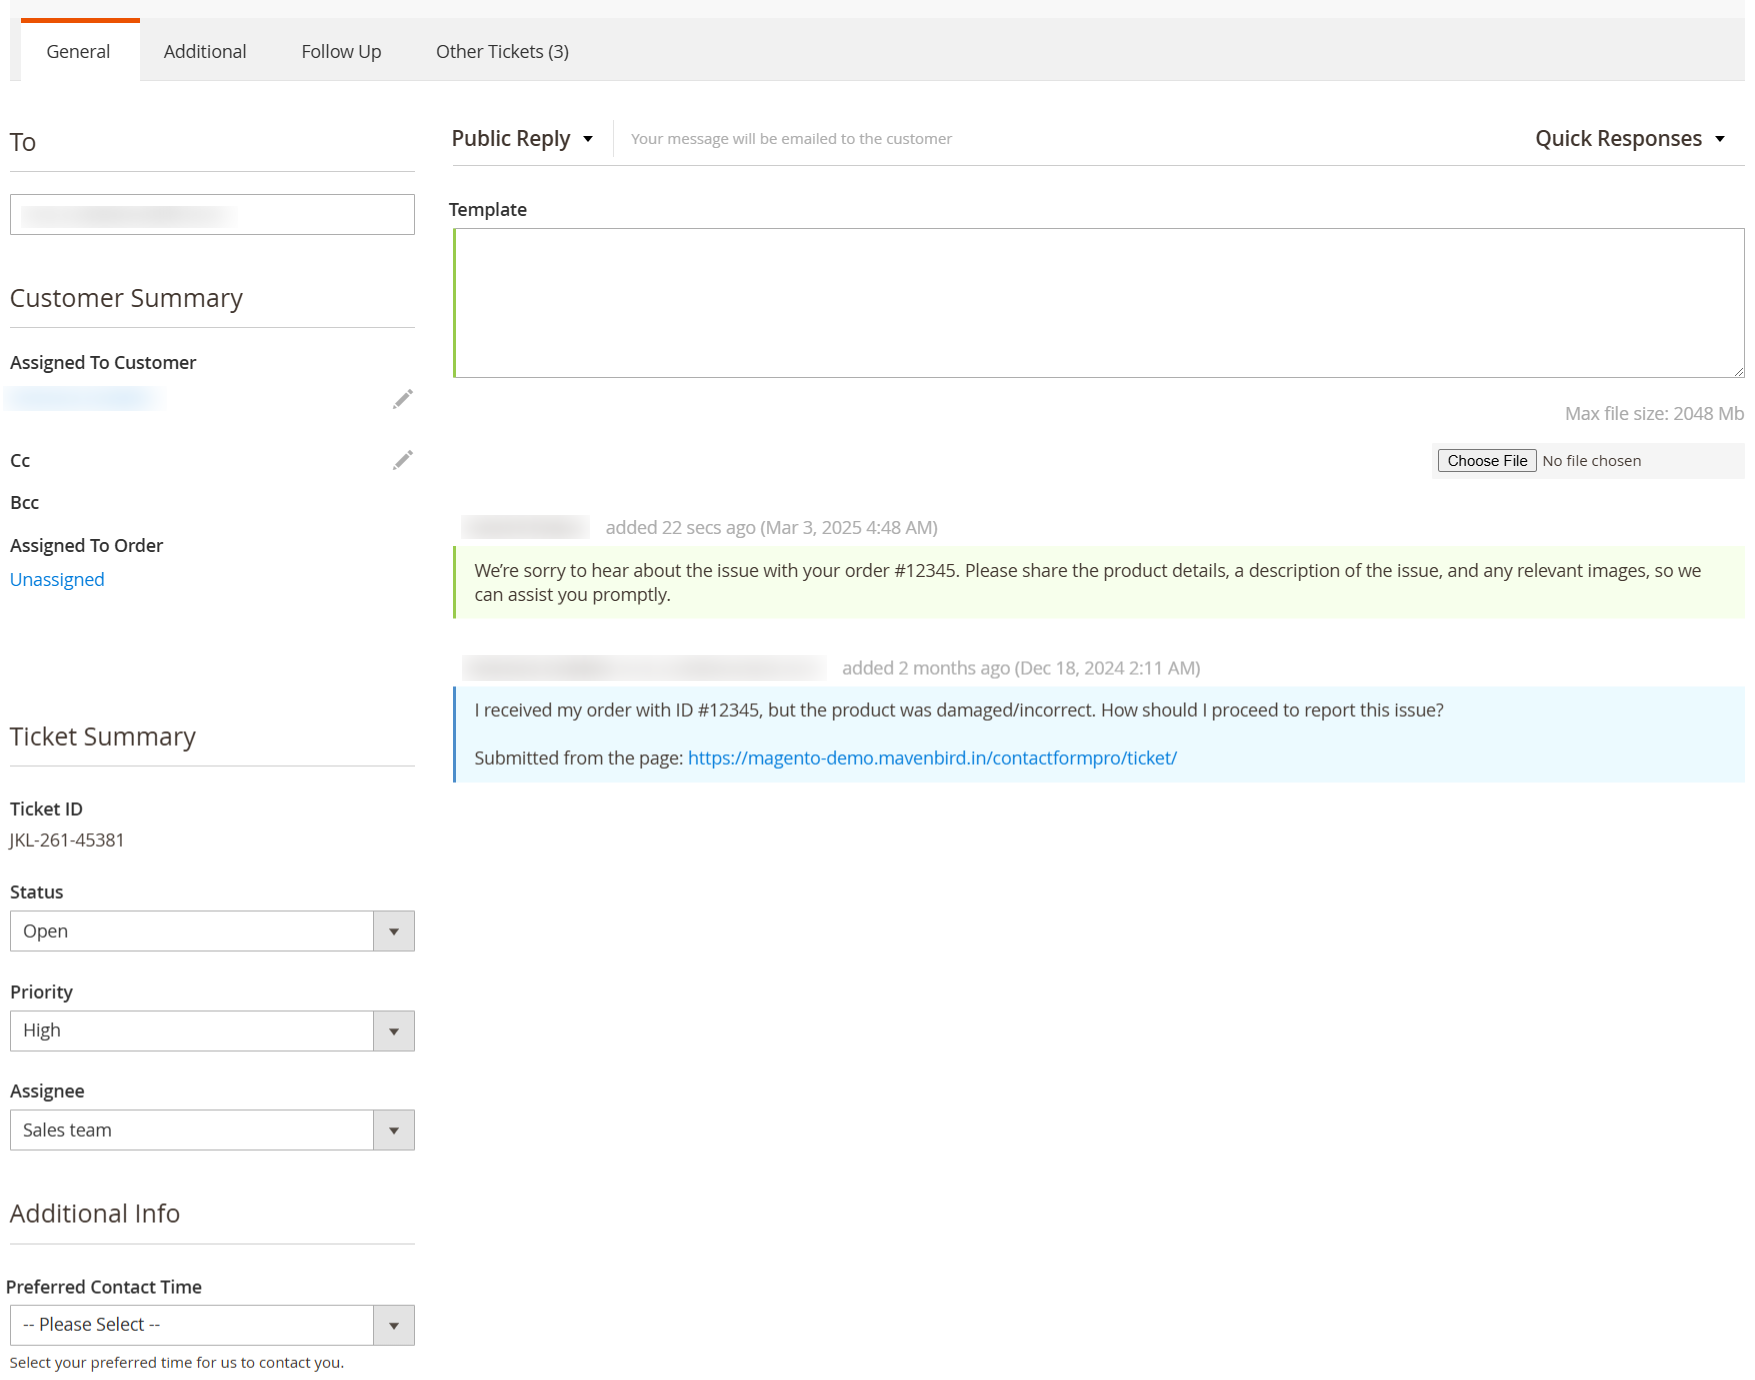
To: This field captures the customer’s email address. For registered customers, the email is automatically filled in when creating a ticket. You can also manually enter an email or select a registered customer from the dropdown list.
Customer Summary: This section displays the name and email of the customer linked to the ticket. It also shows the associated order details if the ticket pertains to a specific order.
Ticket Summary: This area outlines the key details of the ticket:
- Ticket ID: A unique identifier for the ticket.
- Status: The current status of the ticket (e.g., Open, Pending, Closed).
- Priority: The urgency level assigned to the ticket (e.g., High, Medium, Low).
- Assignee: The department or staff member tasked with resolving the ticket.
- Additional Info: This section presents custom fields that provide extra information pertinent to your ticketing process.
Reply Section: This area allows you to respond directly to the customer. For comprehensive guidance on replying to tickets, please refer to the "How to Reply to a Ticket" section in our documentation.
Ticket History: This feature displays the communication thread, including customer messages and support responses. It offers a clear record of all interactions, indicating who added messages or replies and when, ensuring transparency in ticket progress.
Additional Tab
Each ticket includes valuable information that can be utilized for various types of analysis. This information is found in the Additional tab and comprises the following attributes:
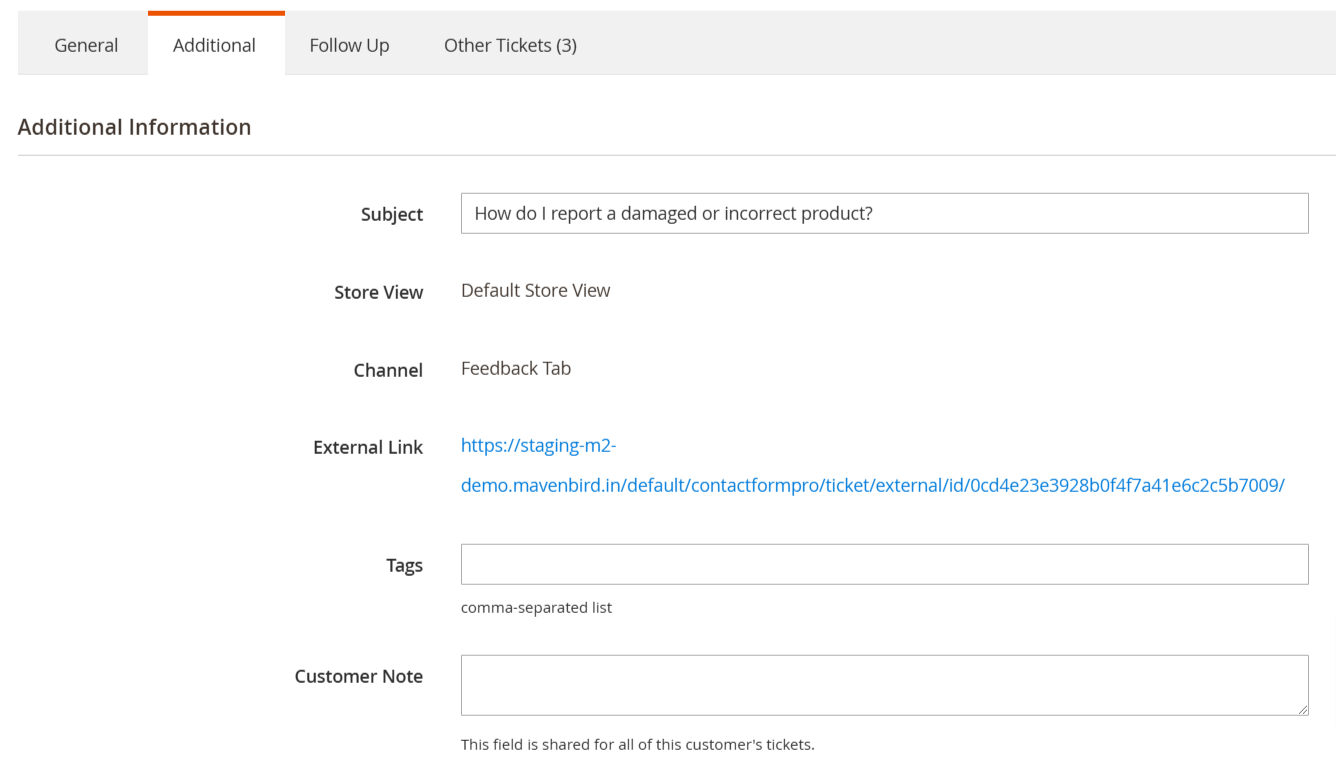
Subject: The concise subject line of the initial message that initiated this ticket (or email, if it was converted from one).
Store View: Displays the store view or views where this ticket was created.
Channel: Automatically assigned during ticket creation, this field describes how the ticket was generated.
External Link: Contains a link sent in email notifications, which can also be shared with third parties to access the ticket message thread.
Tags: Tags associated with the current ticket. Unlike other properties, tags can be entered here in a comma-separated format. This feature is particularly beneficial for ticket review and helps manage their workflow effectively.
Follow Up Tab
The Follow Up tab is intended for overseeing follow-up actions related to the ticket. It enables agents to set reminders for tickets that have not received a response for an extended period, ensuring that no tickets remain unresolved.
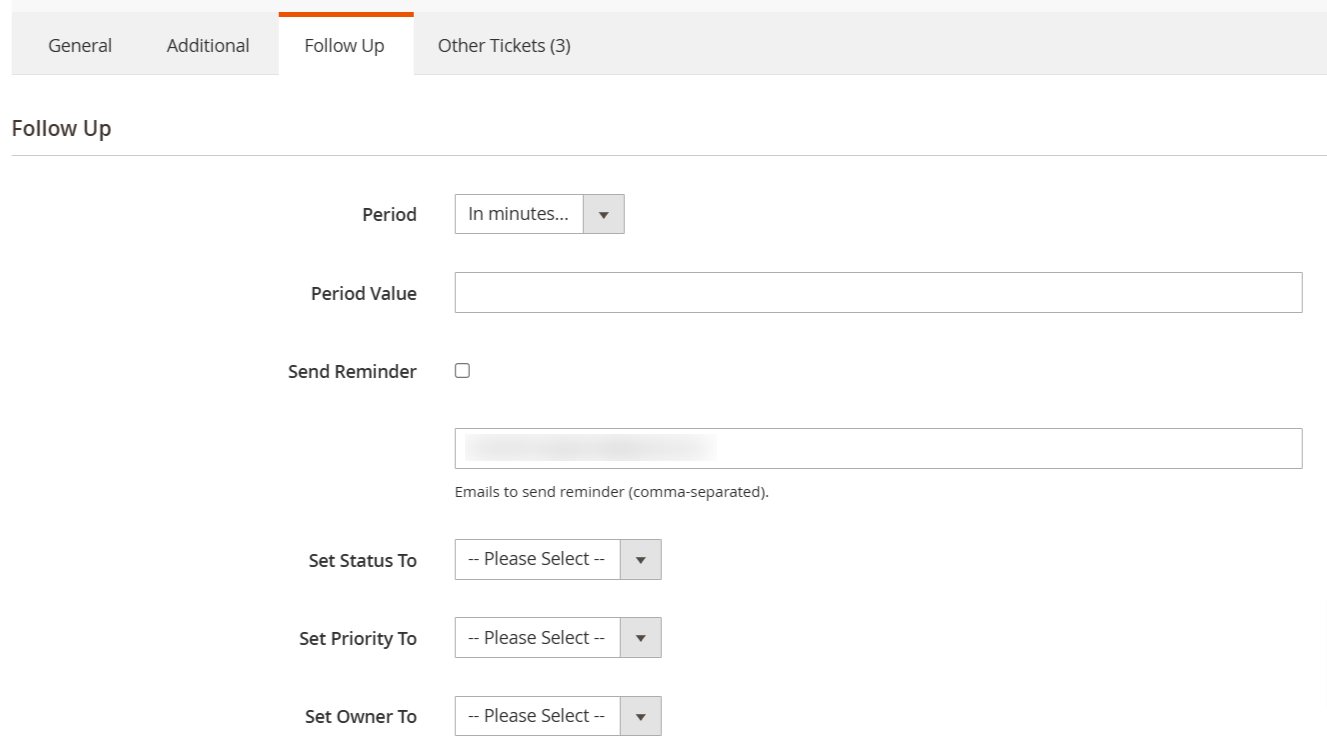
An agent can set email reminders for themselves, other agents, and customers. If a ticket remains unanswered for an extended period, the designated action will be executed alongside the reminder.
To create a reminder, select a ticket and navigate to the Follow Up tab. Here, you will find the following options to easily configure reminders:
Period: The time unit for the reminder interval, which can be set to: Minutes Hours Days Weeks Months Custom: Allows you to specify an exact date for execution.
Period Value: The quantity of the time units selected above.
Send Reminder: Sends a reminder email to a specified address. This feature is useful for maintaining the ticket response schedule.
Set Status To: The status that will be assigned to the ticket when the reminder is triggered.
Set Priority To: The priority level that will be assigned to the ticket upon reminder activation.
Set Owner To: The staff member who will be assigned to the ticket when the reminder is triggered.
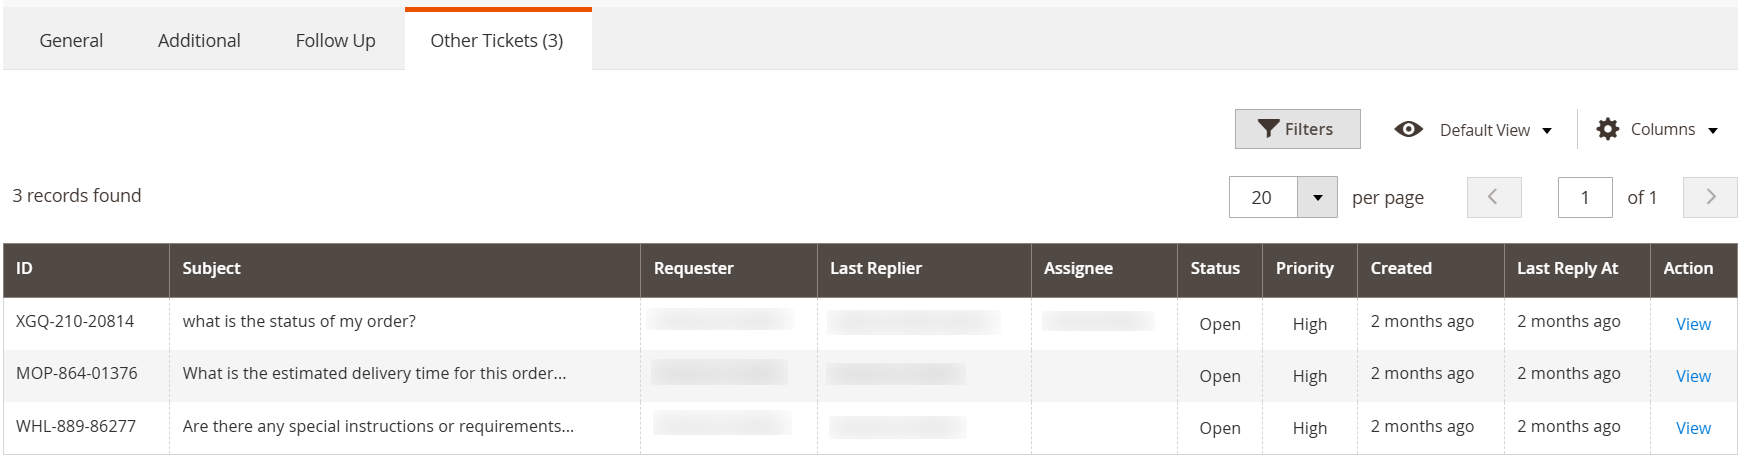
Other Tickets
The Other Tickets tab displays a list of all previous and ongoing tickets related to the customer. This feature enables support agents to quickly access the history of the customer’s interactions with the support team. By reviewing other tickets, agents can deliver more informed assistance, maintain continuity, and prevent duplicate solutions. The tab shows key information, including the ticket ID, subject, status, and priority of each ticket.
===== Add Departments=====
Go to the Mavenbird-> Contact Form Pro -> Departments backend page.Press the button Create New Departments and fill in the following properties
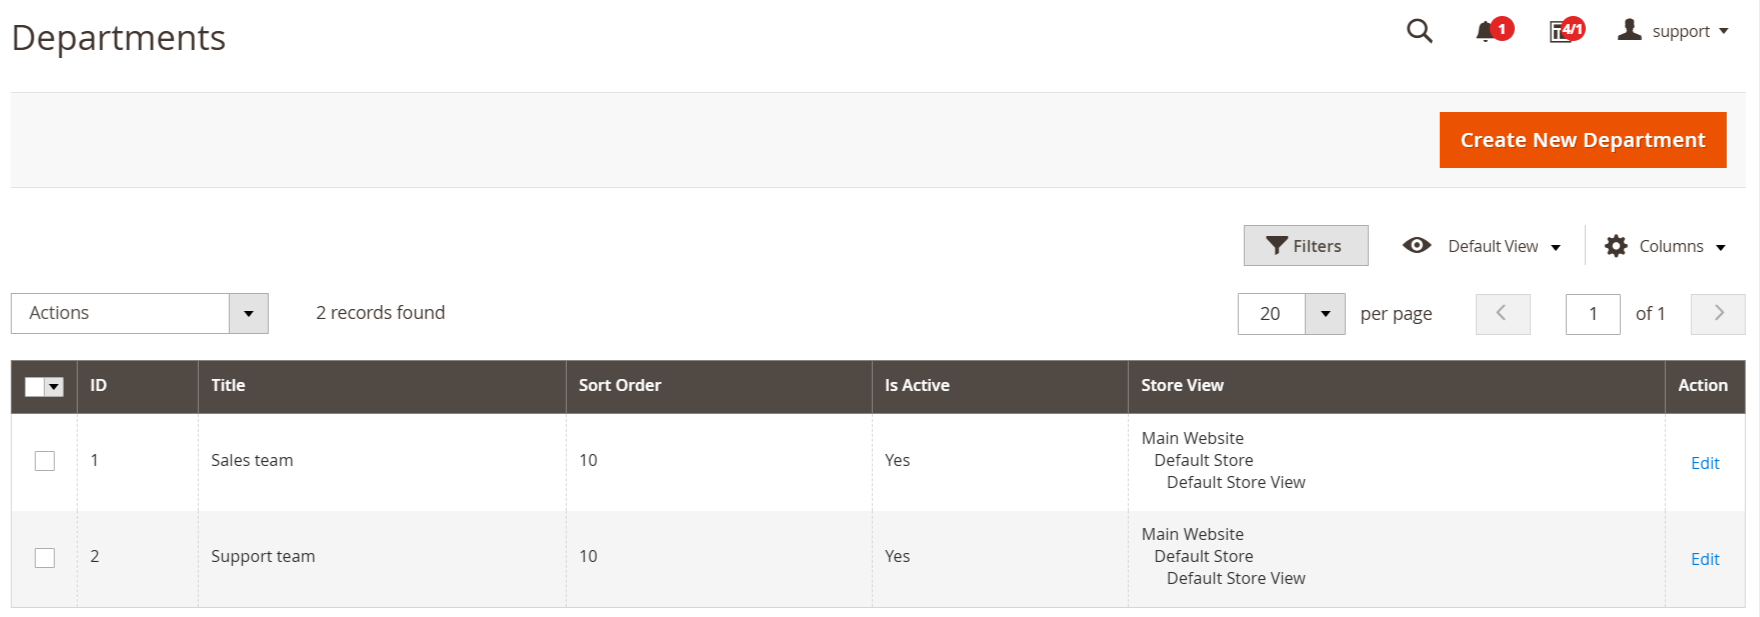
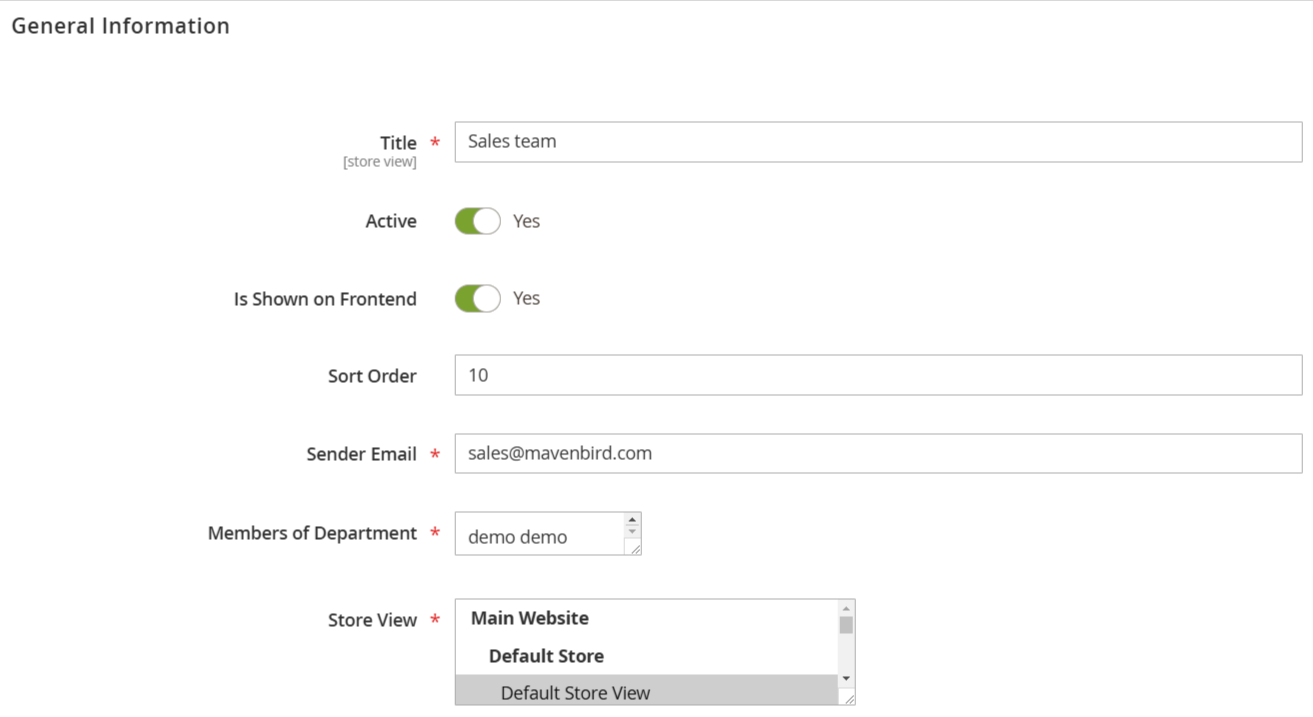
Title: Name of the department.
Is Active: Whether the department is active.
Is Shown at the Frontend: If the option is enabled, customers can select this Department upon submitting new tickets.
Sort Order: Sort order, in which departments are shown in drop-down selection menus.
Sender Email: Email address will be used as From when a member of this department replies to a ticket, so the customer can directly reply to email notifications. Such replies will be automatically fetched and added to tickets only when the corresponding mailbox is registered as a Gateway.
Members of Department: List of agents assigned to a department. They are regular backend users, defined at System -> Permissions -> All Users. The agent can also be registered in multiple departments.
Stores: Sets the store's view or views where this department shall be used for assigning tickets.

If a ticket is unassigned, send notifications to all department members: If this option is activated, all agents (all agents in all departments) will receive notifications (i.e., new messages) about unassigned tickets (including notifications about new tickets).
If a ticket is unassigned, send some notifications via email: You can receive notifications (new messages) about unassigned tickets (including notifications about new tickets) via email.
Add Email Gateways
Go to the Mavenbird-> Contact Form Pro -> Gateways backend page.Press the button Create New Gateway and fill in the following properties:
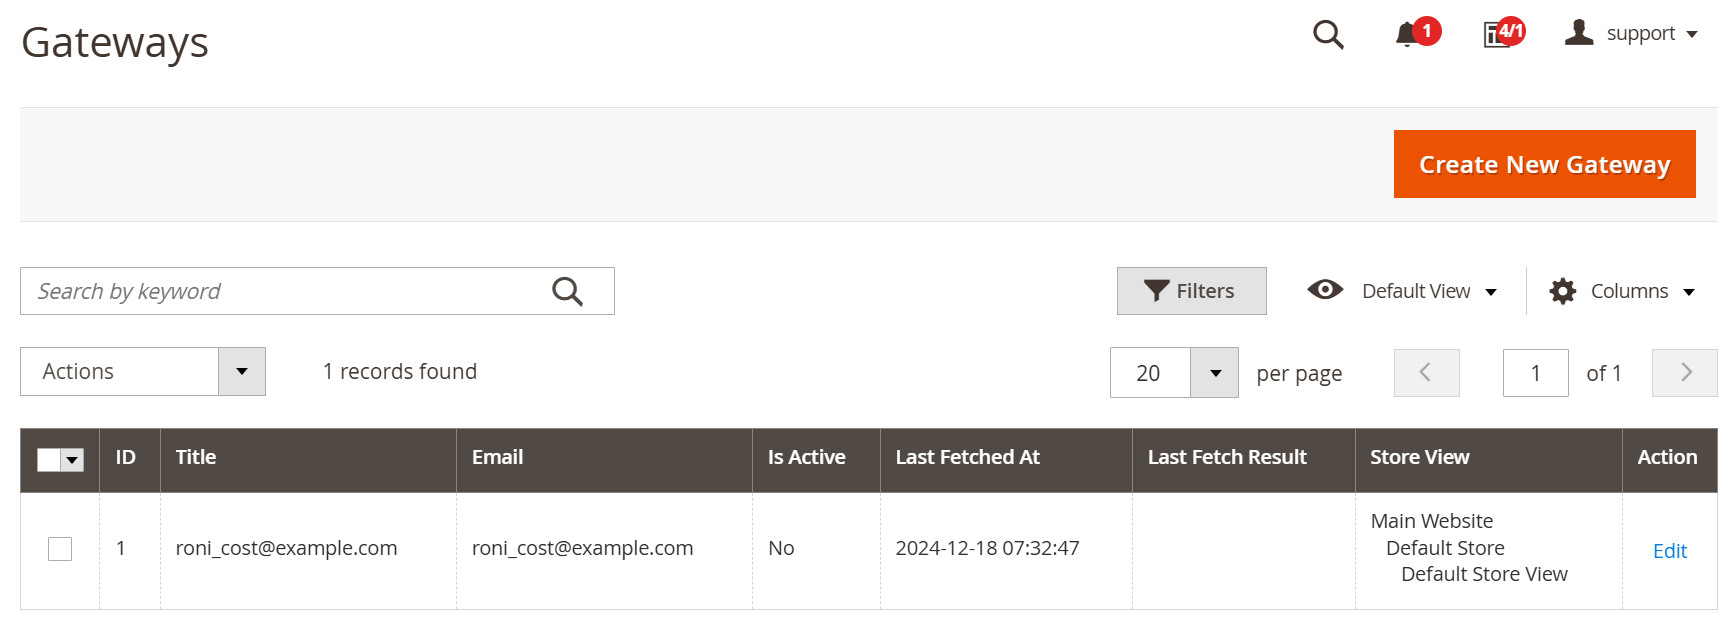
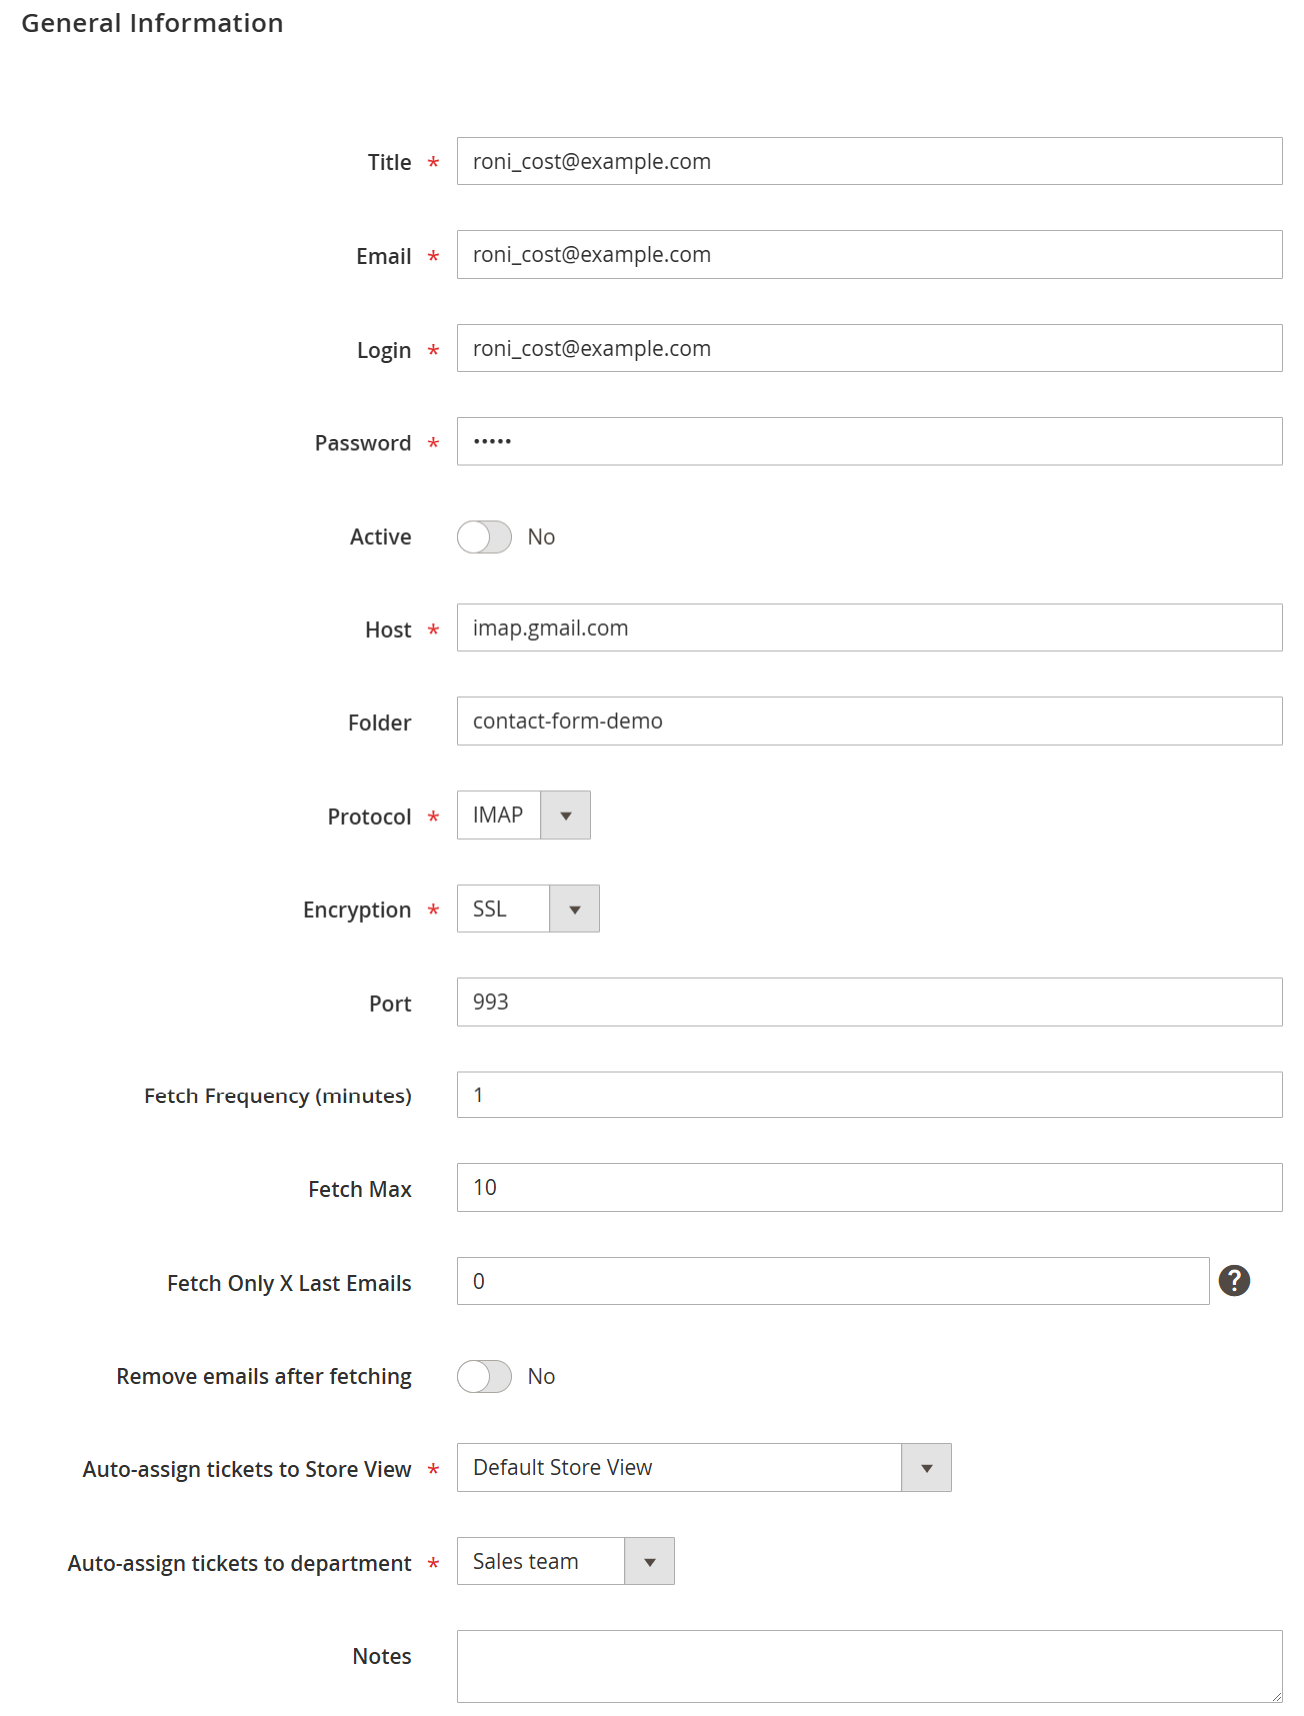
Title: The internal title of the gateway. You can use any phrase.
Email: The email address of your mailbox.
Login: The login to your mailbox.
Password: The password to your mailbox. If you have set a two-step authentication, you need to generate a special password to apply and use instead of your regular one. Here is how it can be done for GMail.
Is Active: Whether Gateway is active. Our cron task fetches emails via a registered mailbox only when it is activated here.
Host: The hostname of your mail server.
Folder: Is a special field which forces Contact Form Pro to fetch emails only from a specific folder inside the mailbox. Typically this option is used when the Help Desk shares a mailbox with some other service or extension.
Protocol: The protocol used by your mail server (IMAP or POP3).
Encryption: The encryption method used by your mail server.
Port: The port used by your mail server.
Fetch Frequency (minutes): How often the contact form pro should fetch new emails from your mailbox.
Fetch Max: The maximum number of fetched emails per one connection to your email server.
Fetch Only X Last Emails: Can be useful for some mailboxes. Leave empty to disable this feature.
Remove emails after fetching: Makes our extension remove emails after fetching them.
Auto-assign tickets to Store View: Allows you to automatically set a storeview for tickets created from emails on this Gateway. It is extremely useful for multi-stores and separating staff duties.
Auto-assign tickets to department: Allows you to automatically set tickets created for the Department from emails on this Gateway. It is extremely useful in separating staff duties.
Notes: Any additional notes. You can check Gateway's current status by pressing the Debug button at the top menu ribbon.
Add Priorities
Go to the Mavenbird-> Contact Form Pro -> Priorities backend page. Press the button Create New Priority and fill in the following properties:
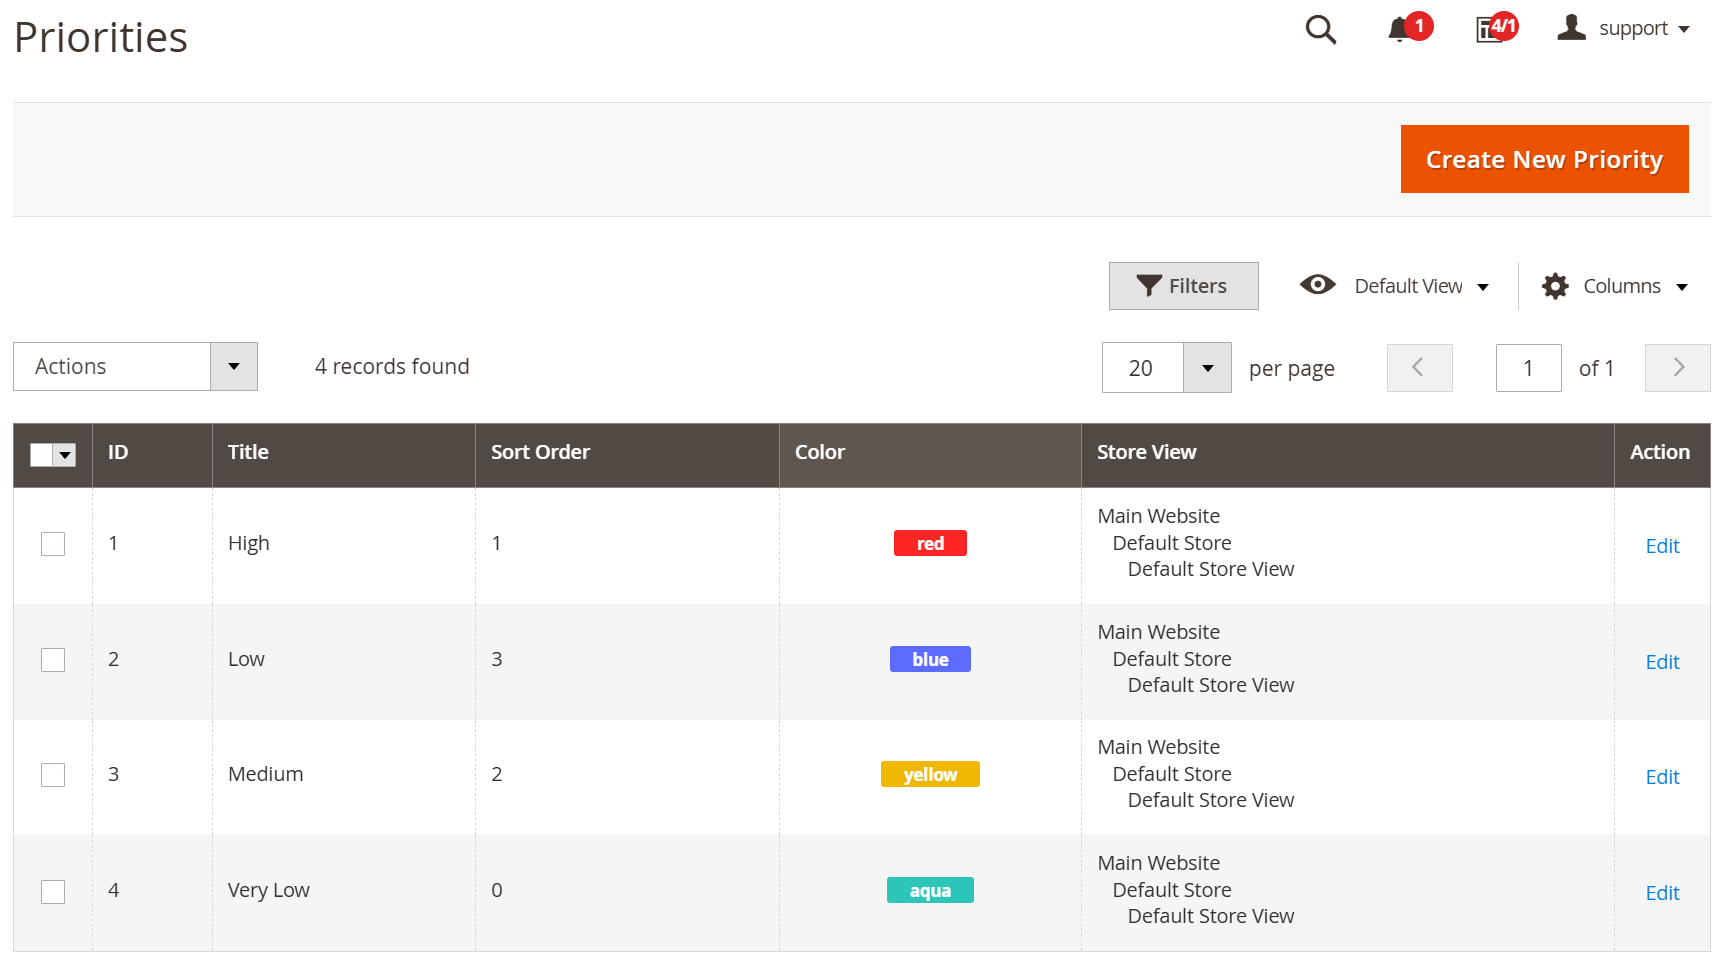
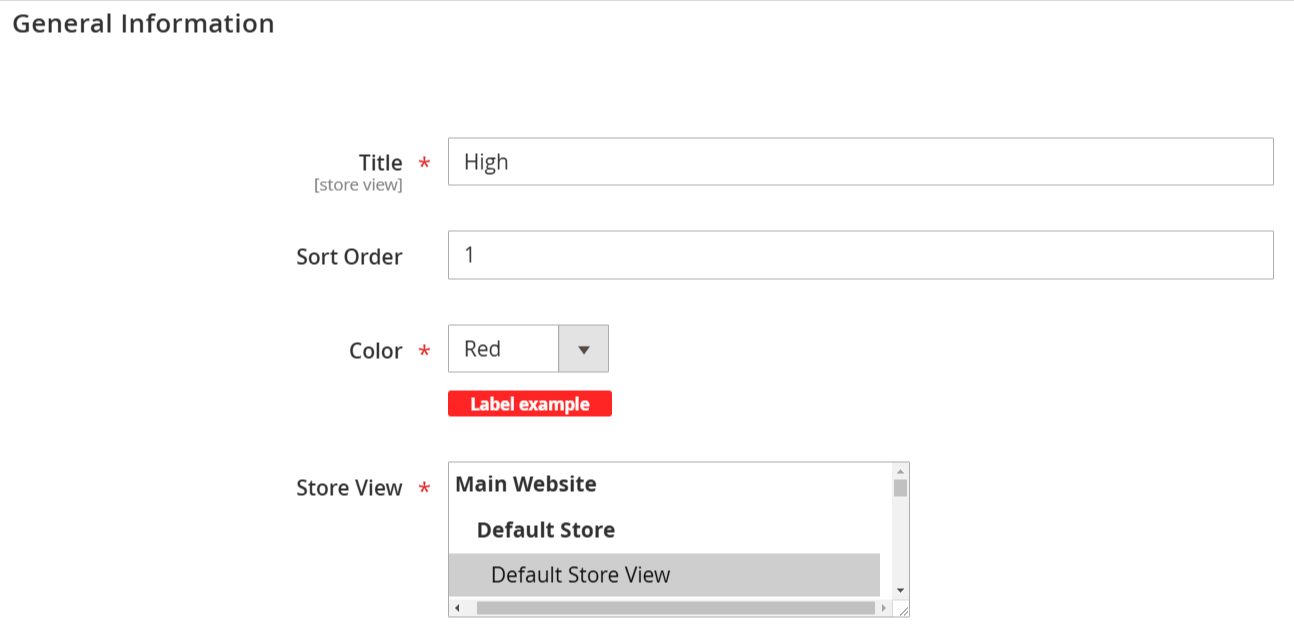
Title: Label of the priority.
Sort Order: Sorting order, in which priorities will display at the drop-down selection menu.
Color: The color of priority label (used for better visualization in a Grid).
Stores: Sets the store's view or views where this priority can be used for ticket workflow.
Add Statuses
Go to the Mavenbird-> Contact Form Pro -> Statuses backend page.Press the button Create New Status and fill in the following properties:
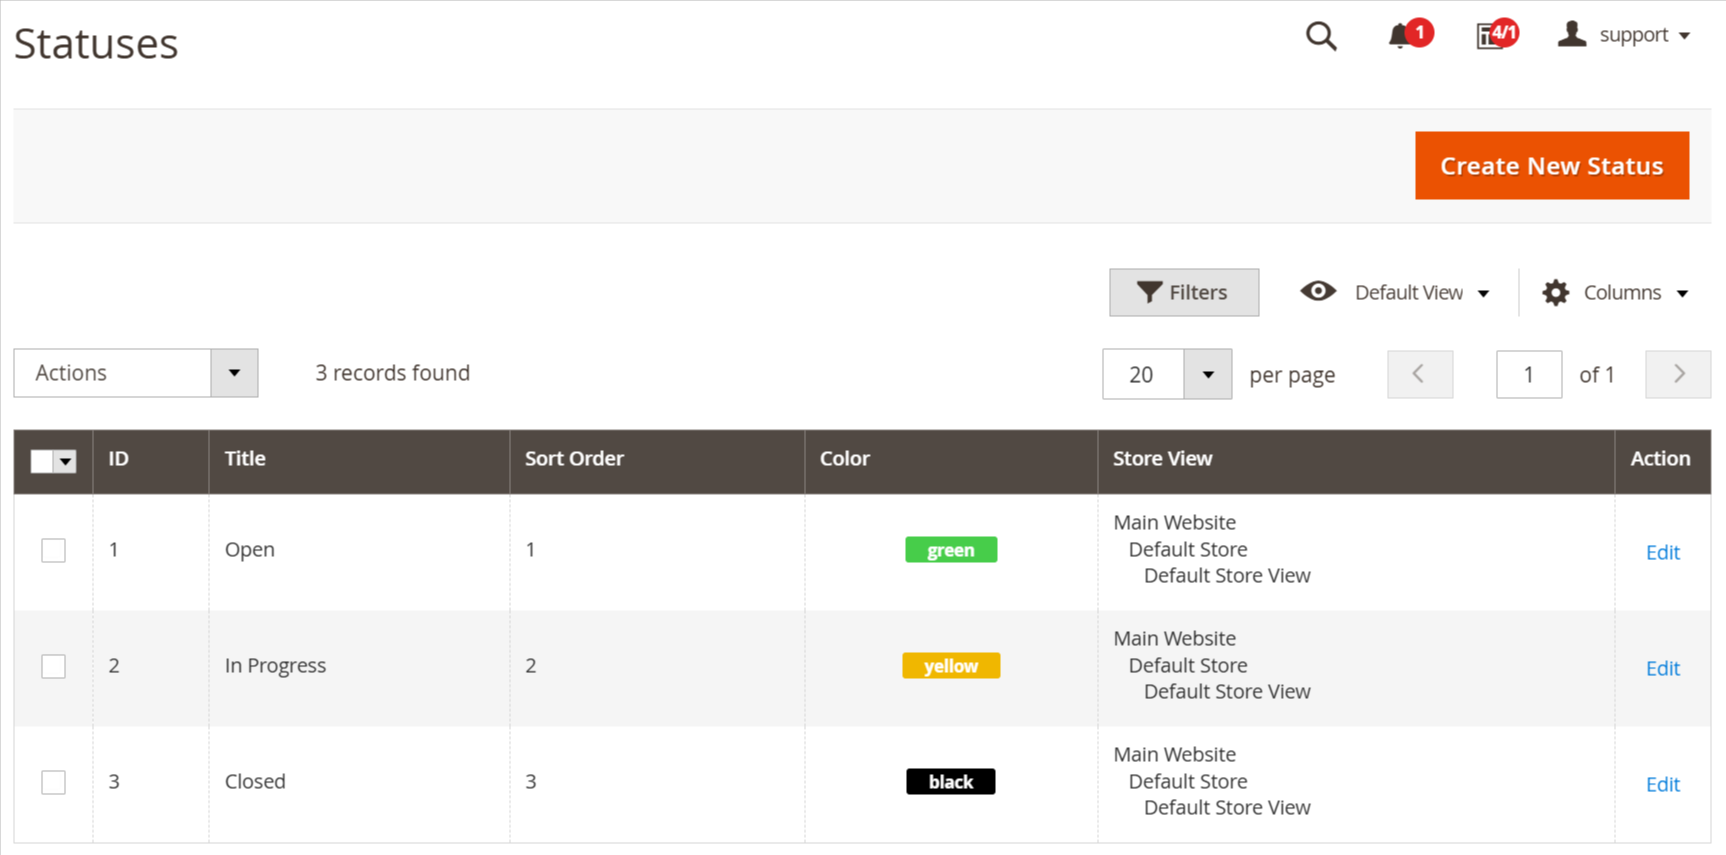
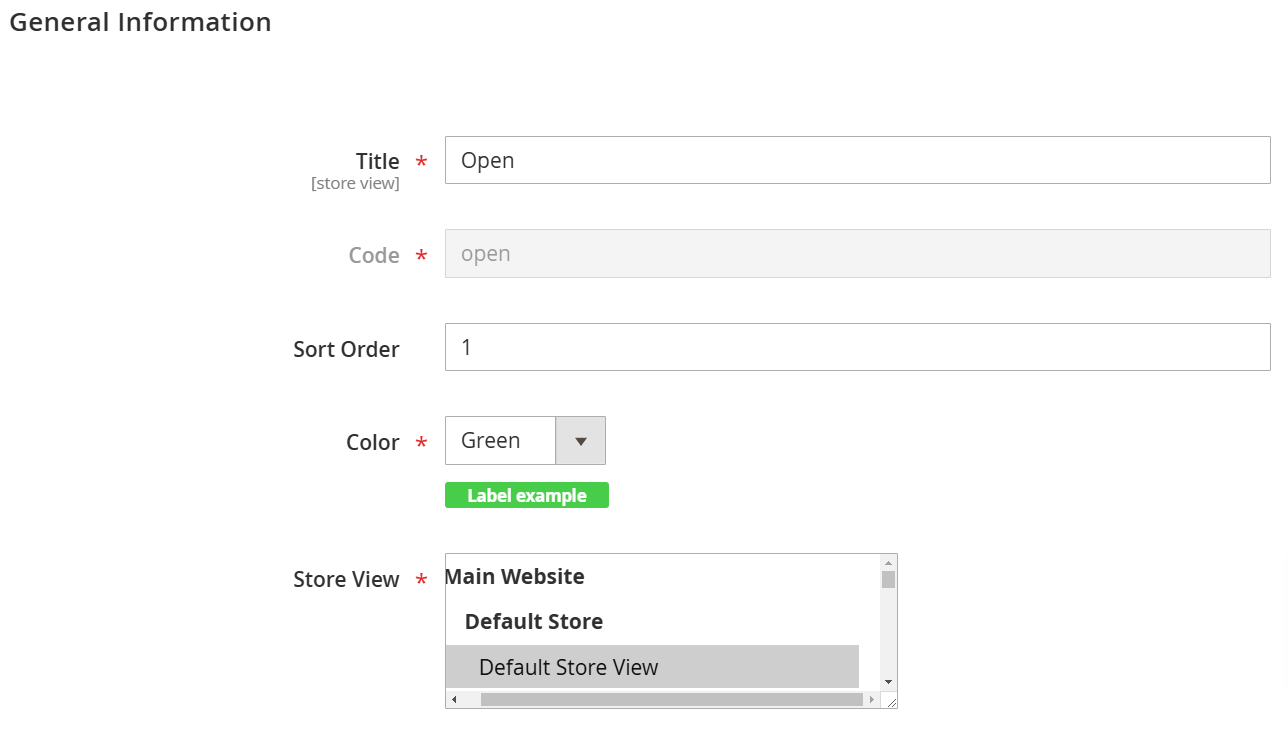
Title: Label of the status.
Code: Unique code of the status. It can contain only letters, digits, and underscore.
Sort Order: Sorting order, in which statuses will be displayed on a drop-down selection menu.
Color: The color of the status label (used for better visualization in Grid).
Stores: Sets the store view or views where the status will be used for ticket workflow.
Quick Responses
Go to the Mavenbird-> Contact Form Pro -> Quick Responses backend page.Press the button Create New Template and fill in the following properties:
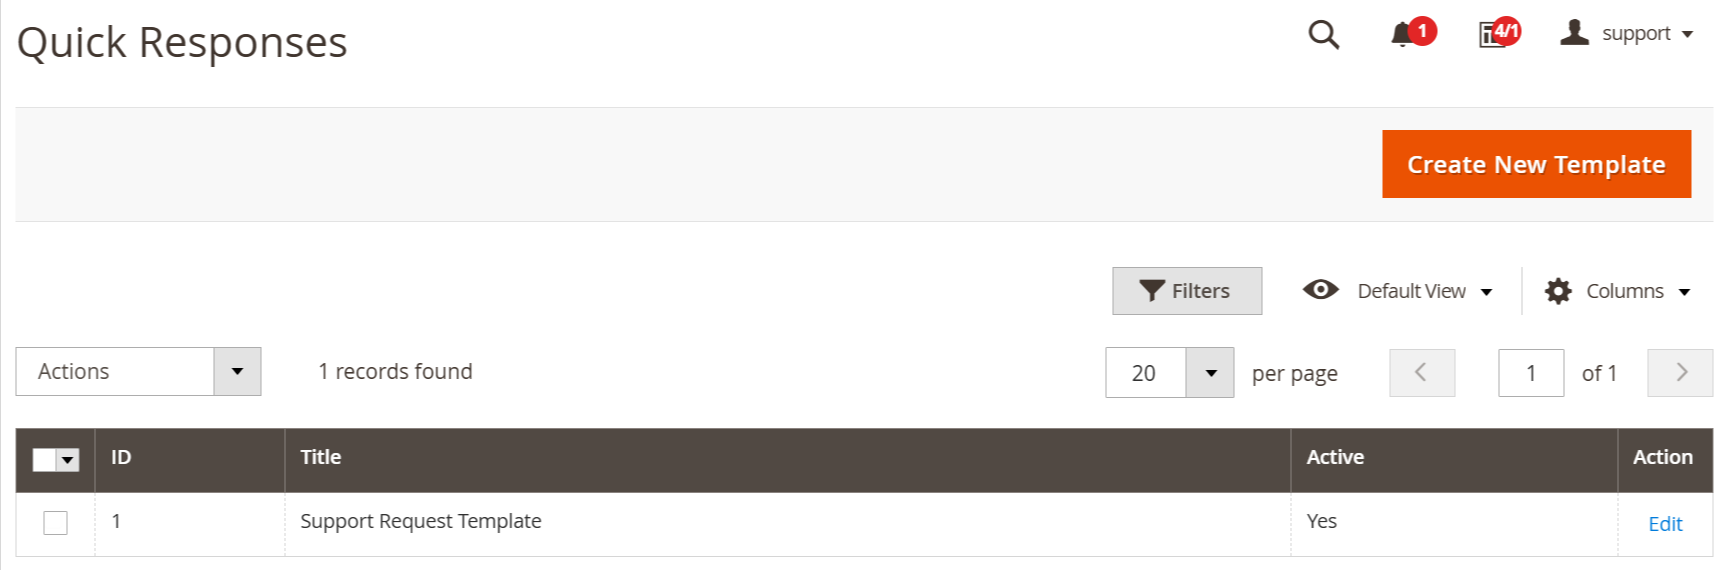
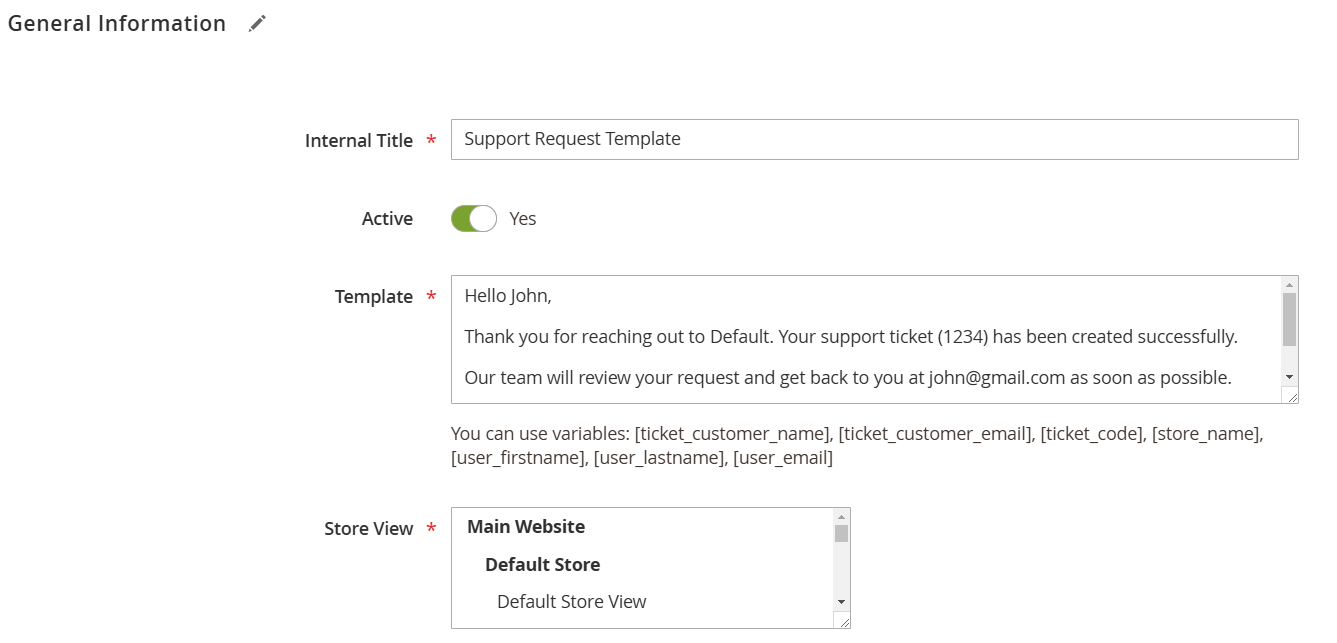
Internal Title: The internal title of the quick response. Customers will not see it.
Is Active: Whether this Quick Response is active will be displayed at the Ticket Edit page.
Template: Text of the quick response. This text will be inserted into the reply field. You can use the following variables here: [ticket_customer_name] - Customer's full name. [ticket_customer_email] - Customer's email address. [ticket_code] - Ticket number (eg. #TX-234234). [store_name] - Name of the store. [user_firstname] - Agent's first name. [user_lastname] - Agent's last name. [user_email] - Agent's email address.
Stores: Store views where this quick response can be used. If you have multiple languages, you need to have different quick responses for different store views.
Custom Fields
Go to the Mavenbird-> Contact Form Pro -> Custom Fields backend page.Press the button Create New Field and fill in the following properties:
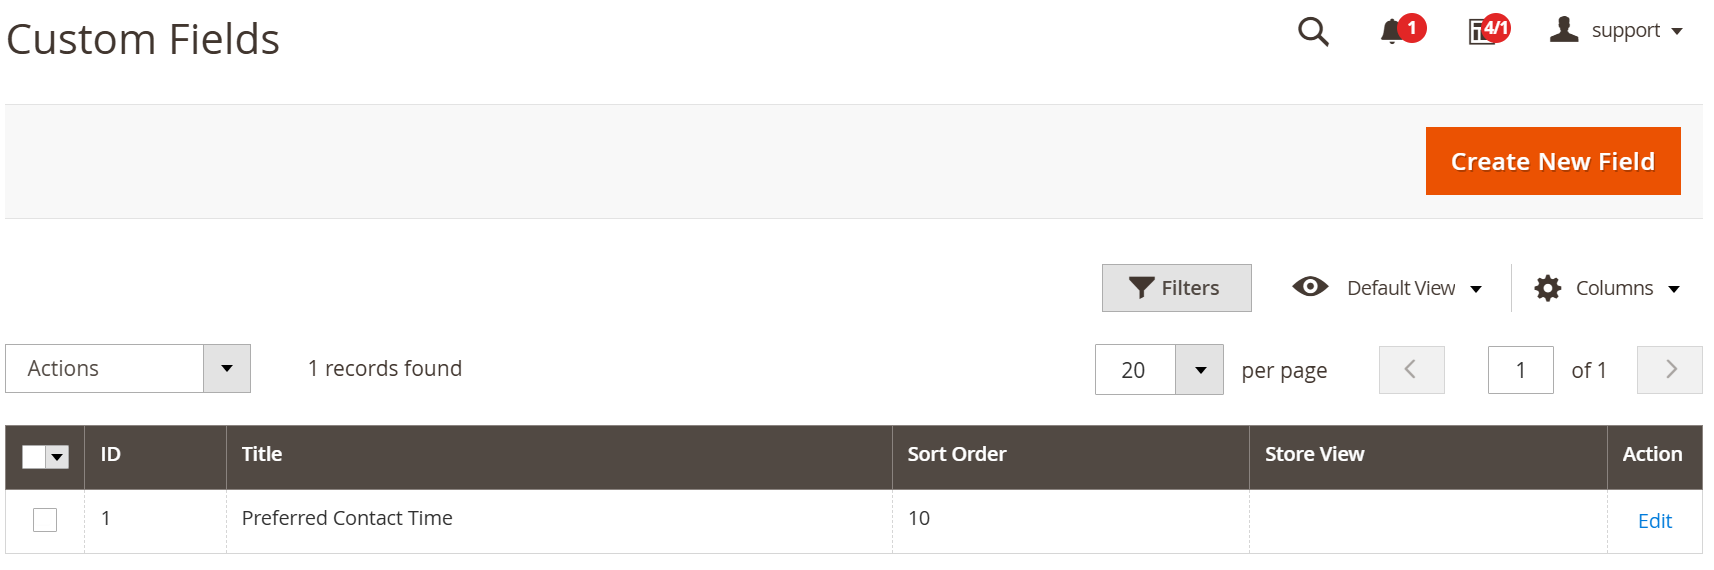
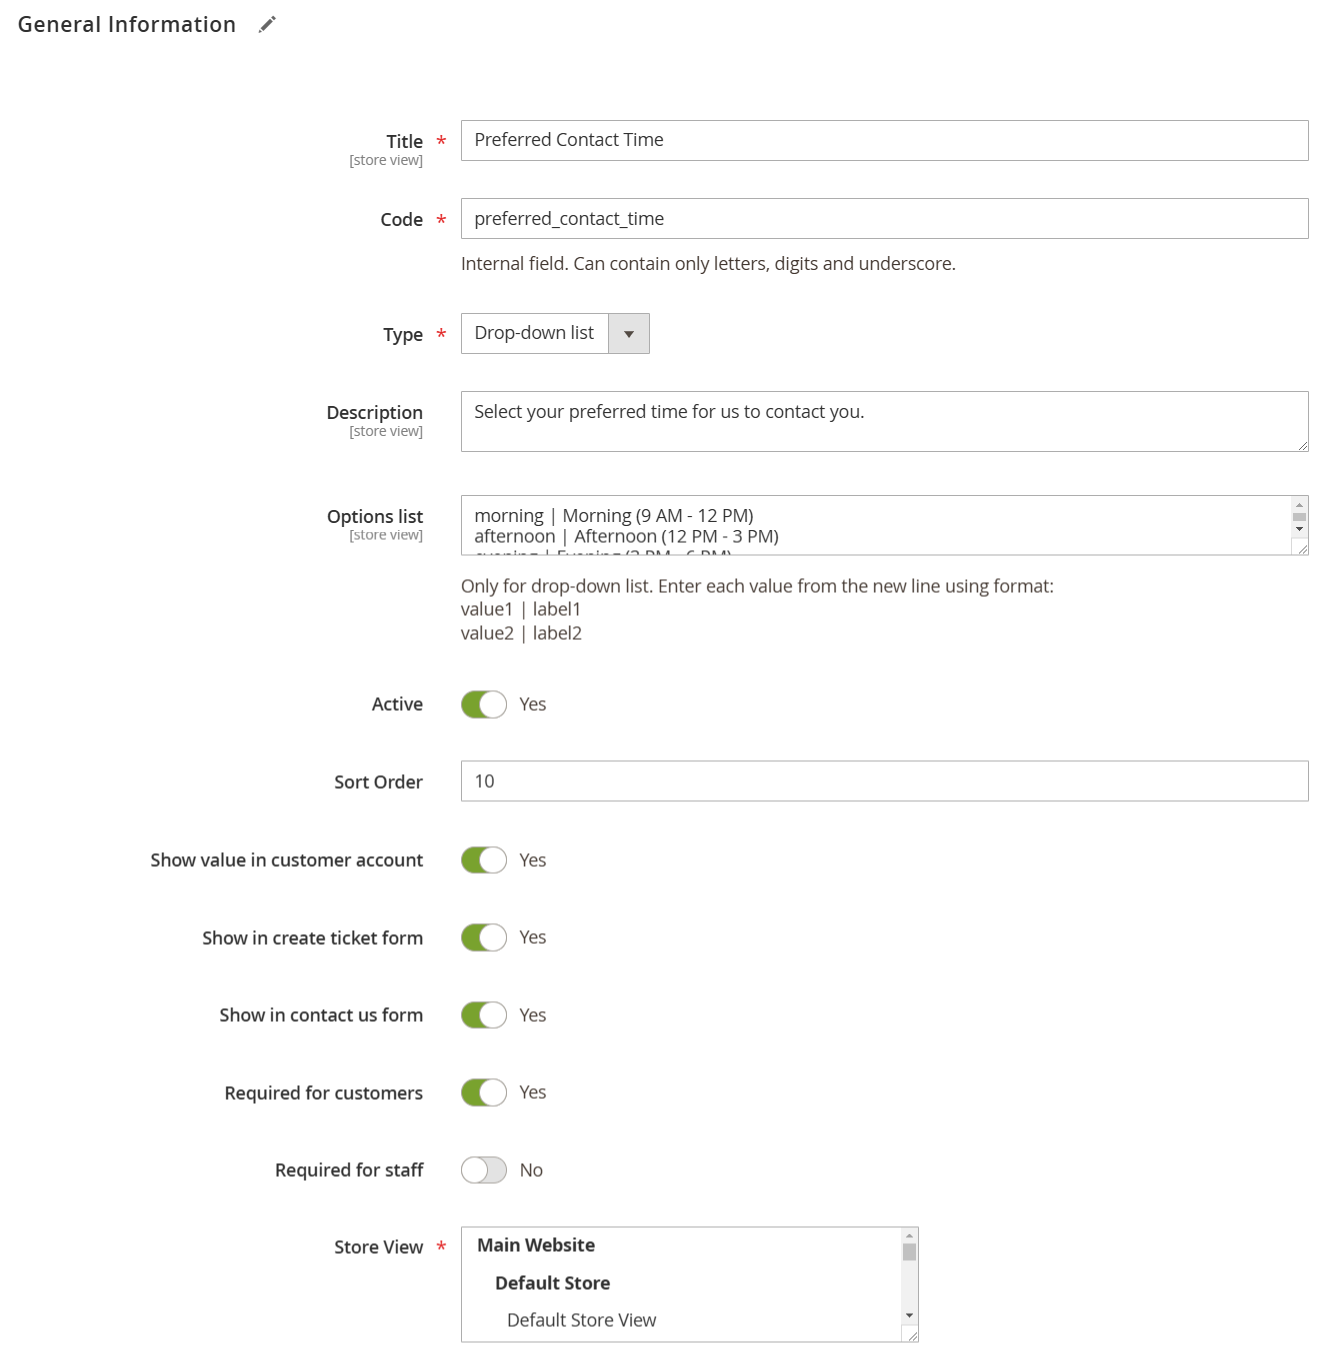
Title: Name of the field.
Code: Internal code of the field. It can contain only letters, digits, and the underscore.
Type: Field's type. The following types are possible: Text - One line text field. Multi-line text - Multiple lines text field (textarea). Date - Date with calendar. Checkbox Drop-down list
Description: Field's description.
Options list: Used only for fields with the 'drop-down list' type. Enter each value from the new line using the format: value1 | label1 value2 | label2
Active: Whether this Field is active will be displayed at the Ticket Edit page.
Show value in customer account: If the option is enabled, the field's value will be shown in the customer's account (ticket's page).
Show in creating ticket form: If the option is enabled, the field will be shown in the customer's account (create new ticket form).
Show in contact-us form: If the option is enabled, the field will be shown in the contact form and the feedback tab.
Required for customers: If the option is enabled, customers will be required to fill in this field when they create a new ticket.
Required for staff: If the option is enabled, agents will be required to fill in this field when they create a new ticket or reply.
Stores: Store views where this Field can be used. If you have multiple fields for different stores, you need to have different Fields for different store views.
Spam Patterns
Go to the Mavenbird-> Contact Form Pro -> Spam Patterns backend page.Press the button Create New Pattern and fill in the following properties:
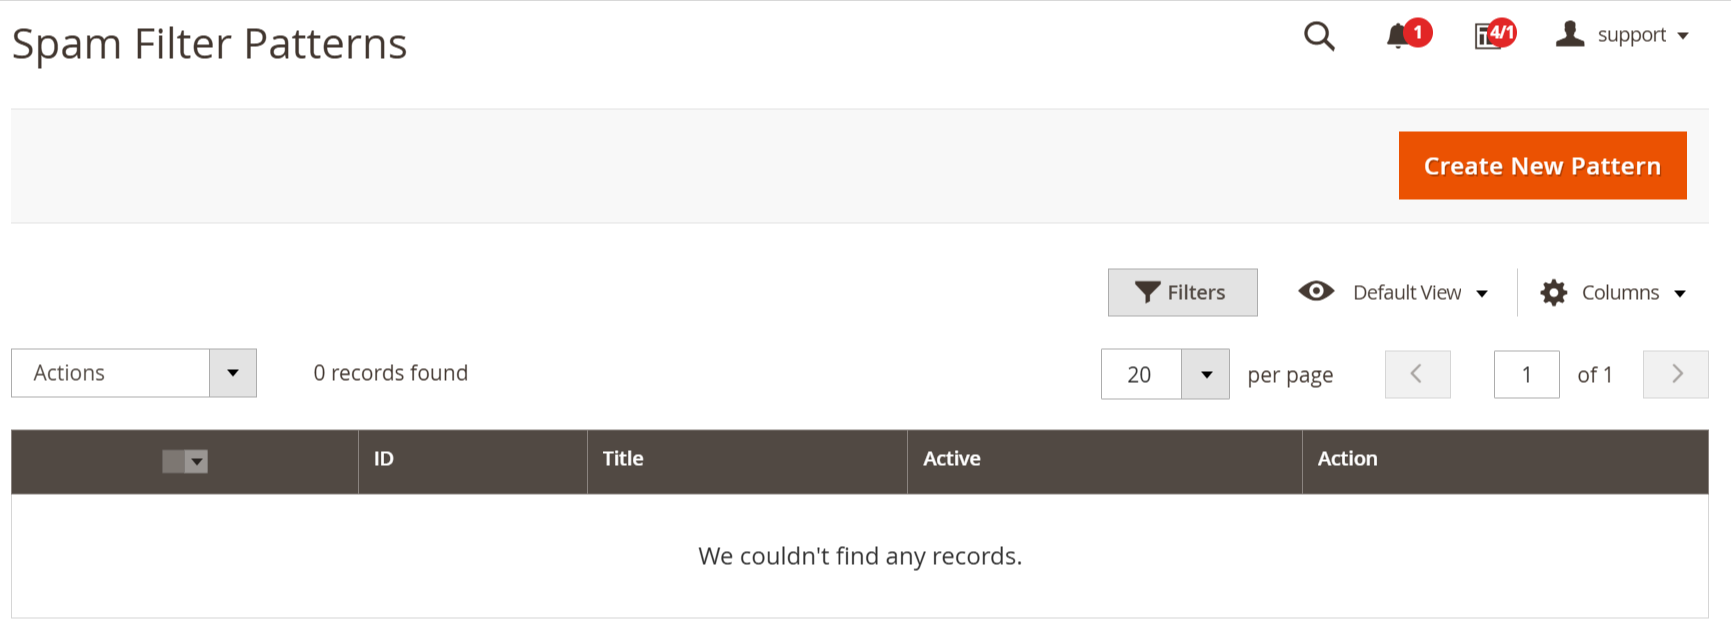
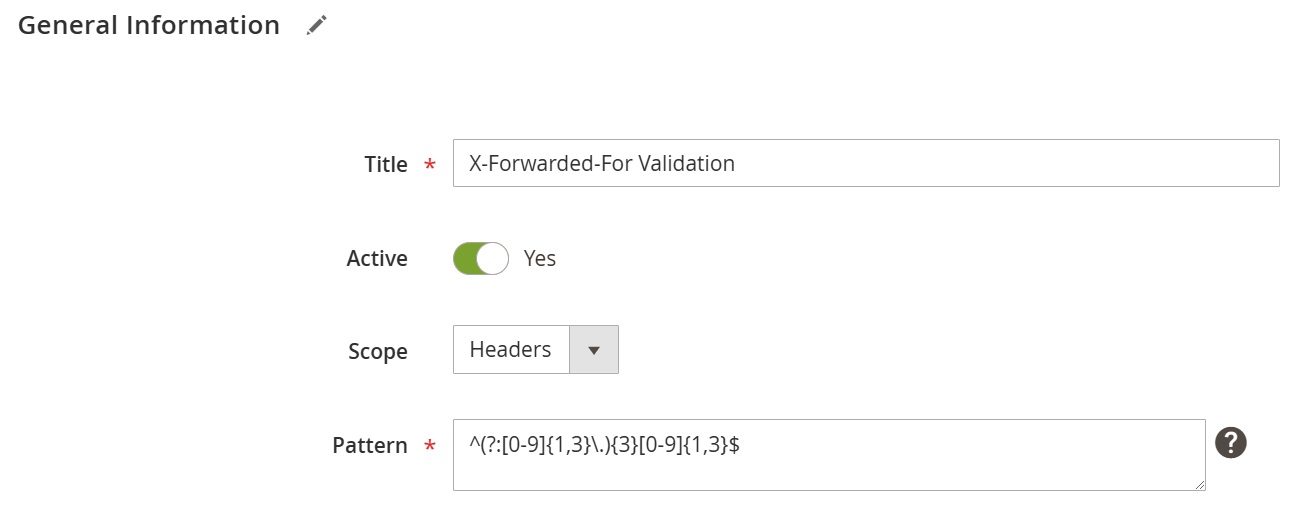
Title: Internal title of spam pattern.
Is Active: The period from which the spam pattern starts being active till it stops being active.
Scope: Sets an email field that will be checked for a matching pattern. You can set the following areas: Headers - Service information that is generated by the email client while sending the email. Subject - Subject of the email. Body - Main text of the letter or email.
Pattern: Expression in which an email is considered spam. The pattern supports regular expression, see Regular Expressions. Patterns must be covered in slashes A useful service in testing patterns can be found here.
Permissions
Go to the Mavenbird-> Contact Form Pro -> Permissions backend page.Press the button Create New Permission and fill in the following properties:
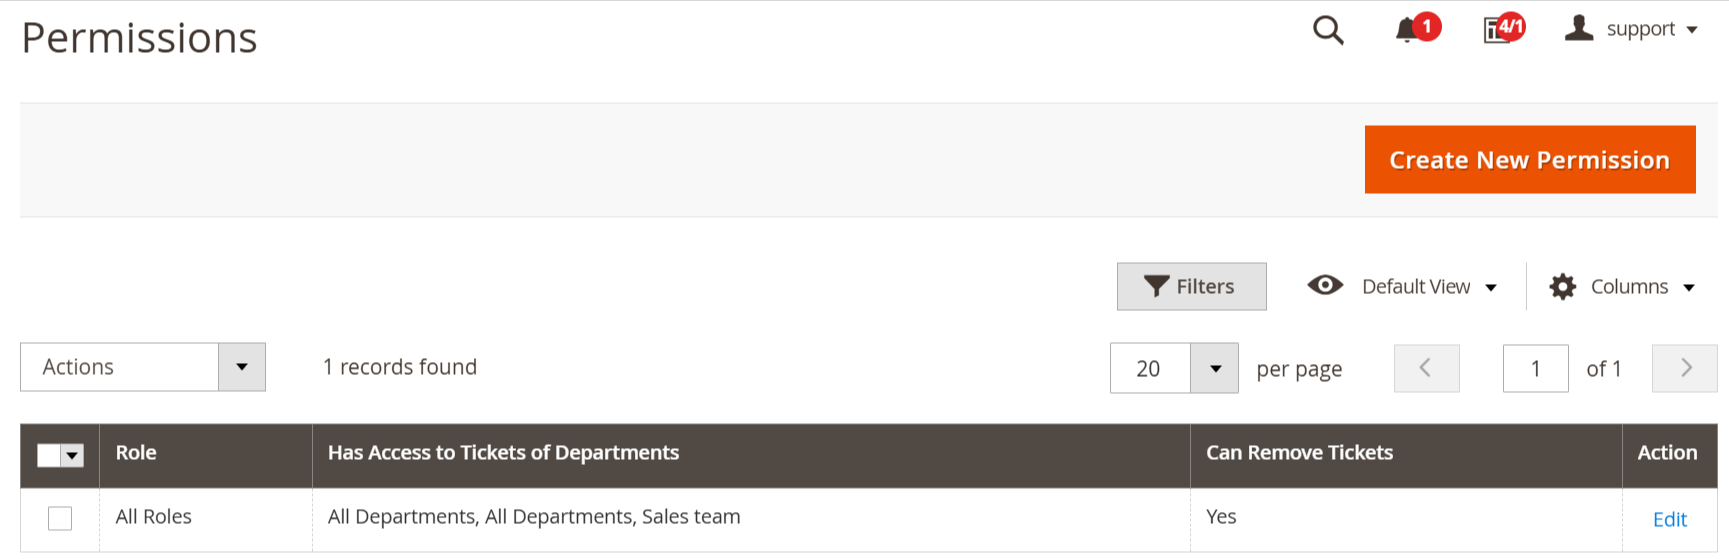
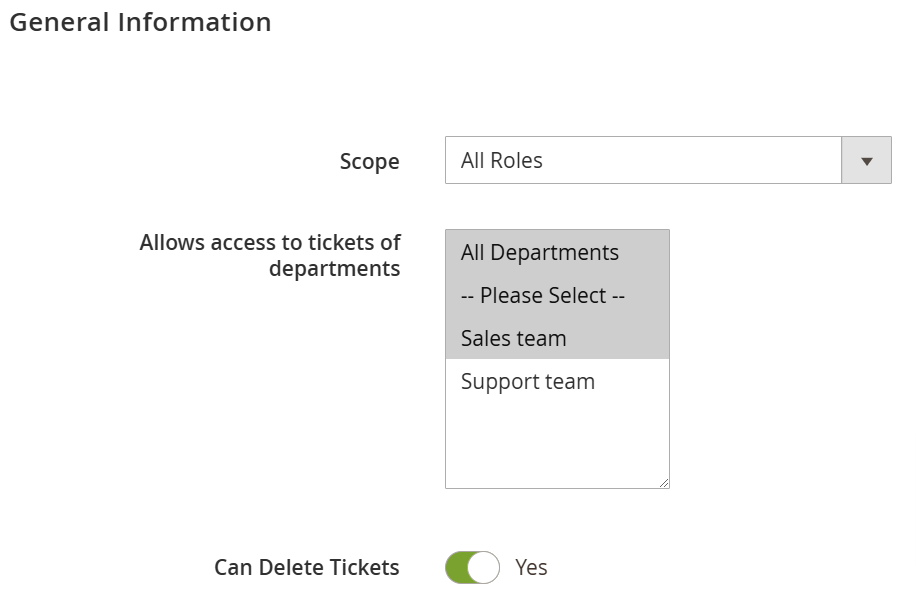
Below setting means that any staff member has access to tickets from all departments, and any user can delete tickets.
- Role: All Roles
- Has access to tickets of department: All Departments
- Can remove tickets: Yes
Workflow Rules
Go to the Mavenbird-> Contact Form Pro -> Workflow Rules backend page.Press the button Create New Rule and fill in the following properties:
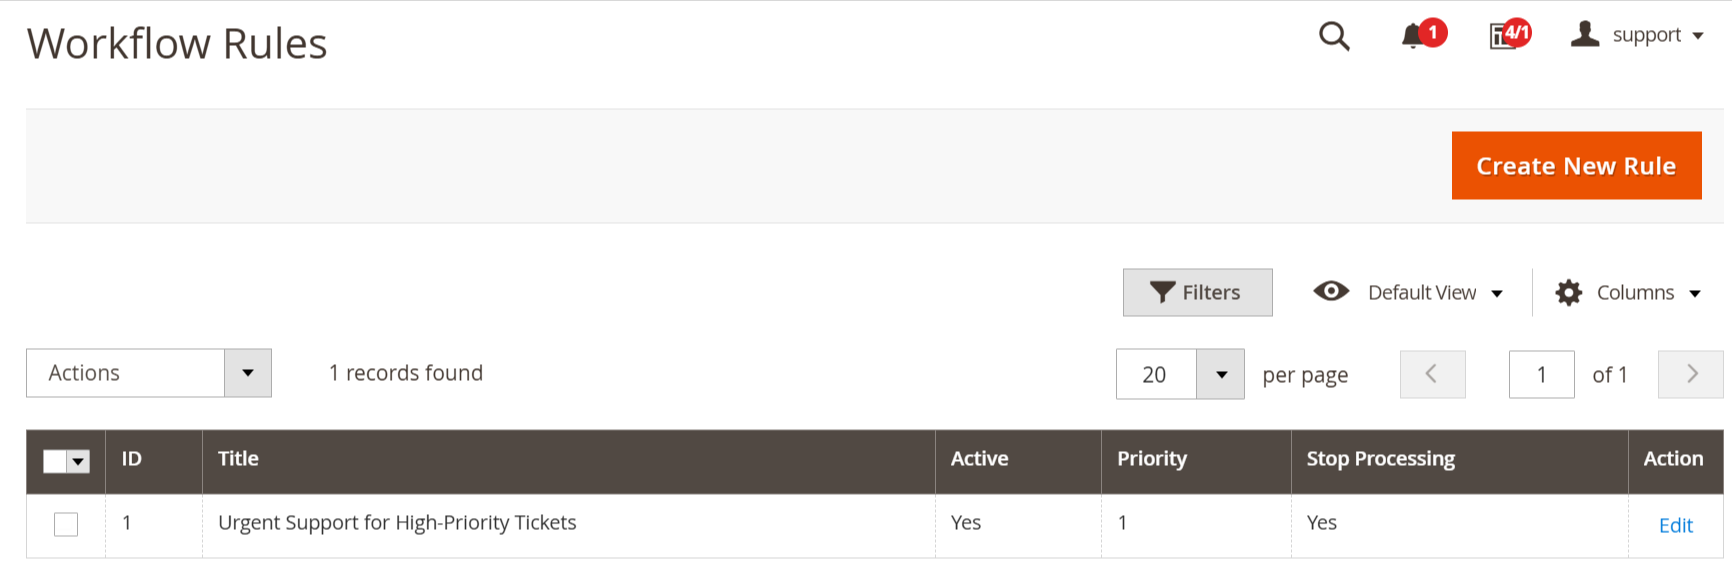
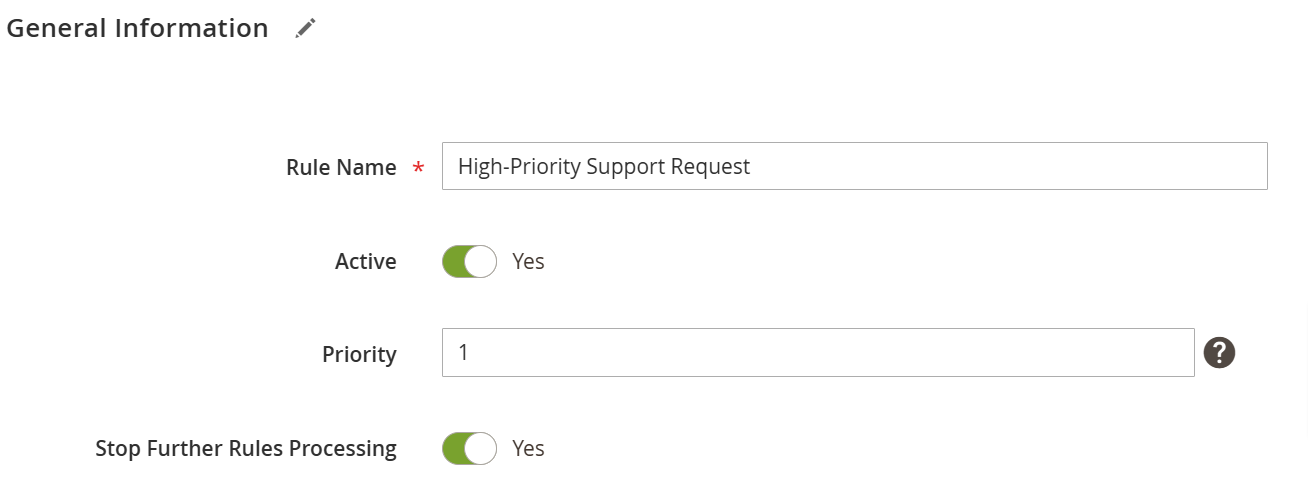
Rule Name: A logical name for a rule.
Active: Verifies whether the rule is active or not.
Stop Further Rules Processing: If multiple rules are defined for the same event, this option can help control their execution (see below).
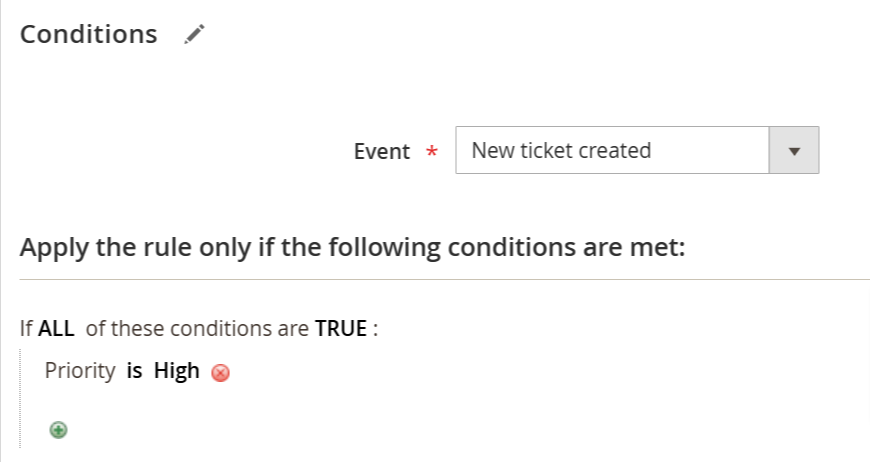
Events:
New ticket is created: This is triggered upon ticket creation, but before any reply (including initial) is added.
New Reply from Customer: This is triggered when a new reply from a customer appears.
New Reply from Staff: This is triggered when a new reply from a staff appears.
New Reply from Third Party: This is triggered when a new reply from a third-party appears.
Ticket Assigned to Staff: This is triggered when a ticket owner changes his or her ticket.
Ticket Was Changed: This is triggered whenever any change is done to a ticket (added message, changed status or priority, or even changed custom field).
Ticket Was Converted to RMA: This is triggered when a ticket is converted to RMA. This event can be used only when Mavenbird RMA extension is installed.
.Check Every Hour: This is triggered by our cron task. Make sure that the cron is enabled when using this event.
Conditions:
Subject: The title on a ticket.
Last message body: The contents of the last public message left on a particular ticket.
Created at: The date a ticket was created.
Updated at: The date of a ticket's latest update (e. g. new message appeared, or properties changed).
Store: This is the place the ticket was submitted into (note: this condition does not properly detect backend-created tickets, as they can be bound to any store. If you wish to detect backend creation, you need to use the Ticket Source condition in addition).
Priority (before change): A priority which a particular ticket has before the ending of the event (used only for Ticket was changed event).
Priority: Current ticket priority.
Status (before change): The status of a particular ticket before the end of an event (used only for Ticket was changed event).
Status: Current ticket status.
Department (before change): The department to which a particular ticket was assigned before the end of an event (used only for a Ticket was changed event).
Department: current ticket department.
Owner (before change): The person who held a particular ticket before an event ended (used only for a Ticket was changed event).
Owner: Current ticket owner.
Last Reply By: Who gave the last reply on this ticket: Customer or Staff agent.
Last Reply Type: The type of message last left on the ticket.
Hours since Created: A period from the creation of a particular ticket (note: this condition is not precise, use equal or greater or equal or lesser comparators here).
Hours since Updated: The period from the latest update of a particular ticket (note: this condition is not precise, use equal or greater or equal or lesser comparators here).
Hours since the Last Reply: The period from when the last message appeared on a particular ticket (note: this condition is not precise, use equal or greater or equal or lesser comparators here).
Tags: The tags associated with a particular ticket in the Additional tab of the Tags field.
Ticket Source: The creation source of a ticket, which has four options: Email, Backend, Contact Tab , Contact Form and Customer Account.
Satisfaction Survey Results
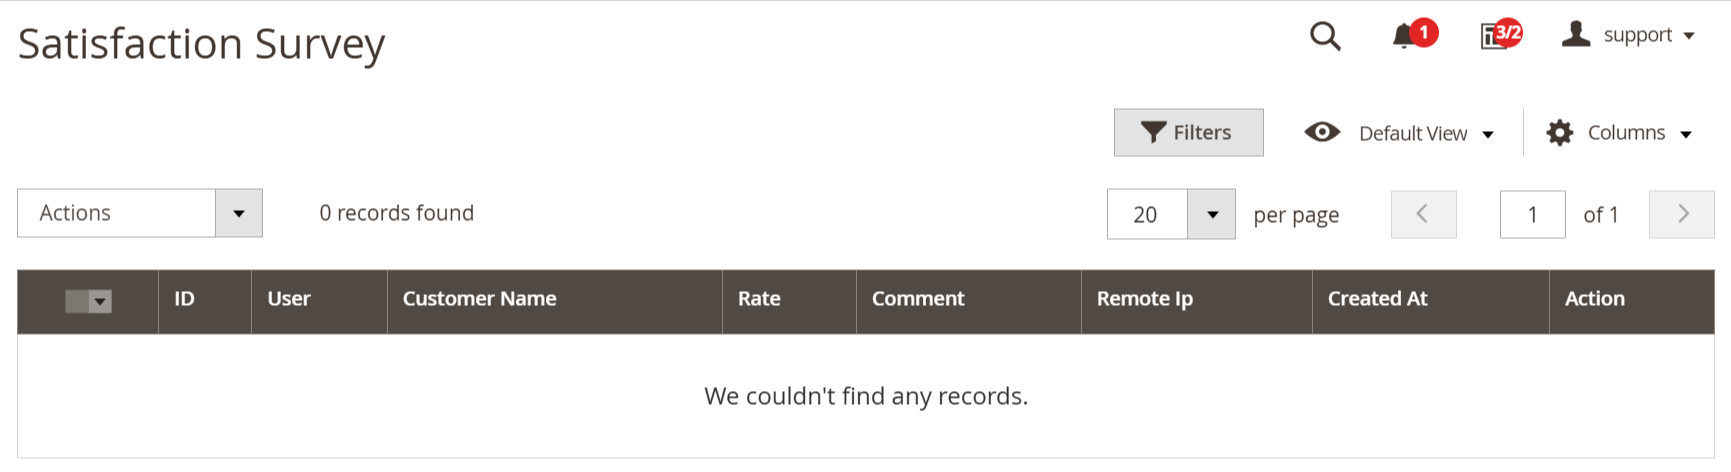
The Satisfaction Survey feature offers essential insights into customers’ perceptions of your support team's performance. It allows you to evaluate service quality and pinpoint areas for improvement, contributing to an enhanced customer experience and increased satisfaction levels. By regularly analyzing survey results, you can take proactive measures to refine your support operations, ensuring your team consistently meets and exceeds customer expectations.
Go to the Mavenbird-> Contact Form Pro -> Satisfaction Survey Results backend page.
Frontend View
Here contact form are shown on frontend.
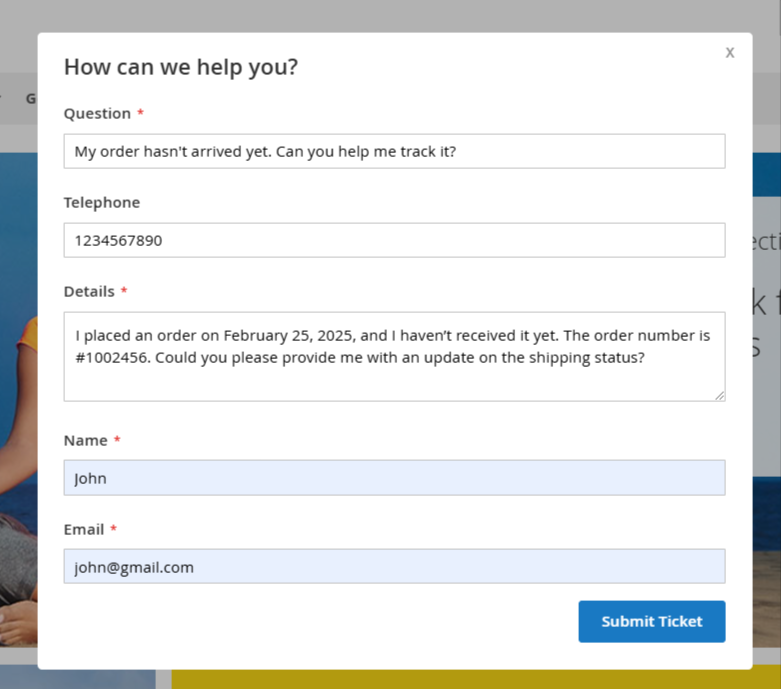
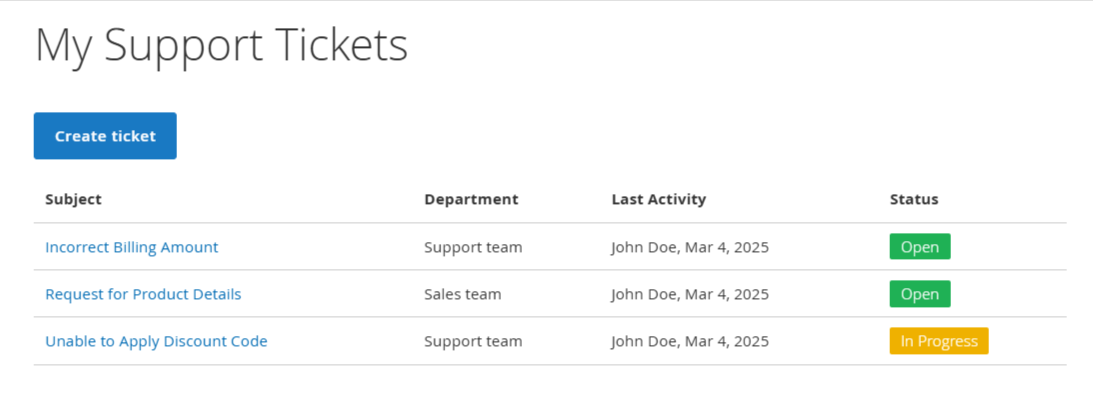
The customer can manage and create their ticket form My Account > My Support Tickets section.
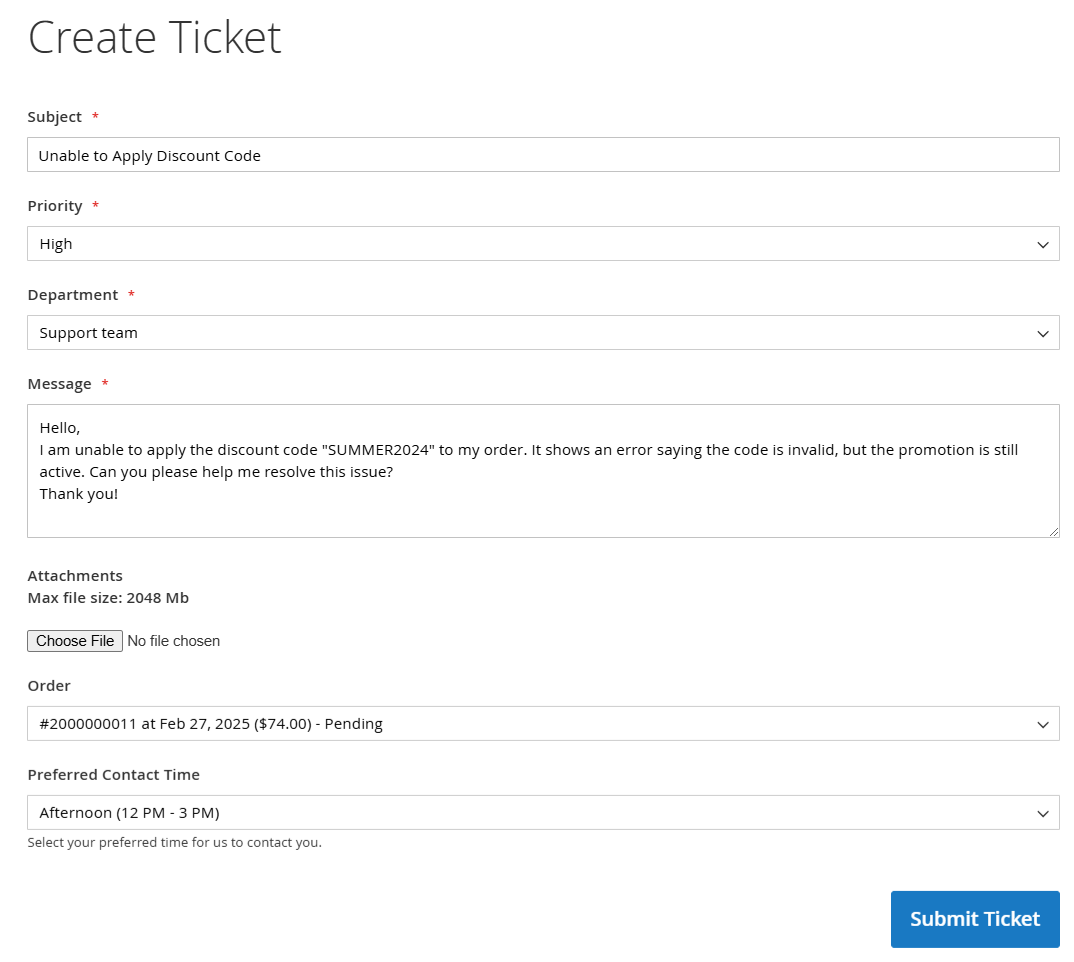
Customers can specify a Priority level and select a Department when submitting a new ticket, provided these options are enabled during the extension setup.
Additionally, the extension allows attachments to tickets, which is invaluable when customers need to share screenshots or other files to illustrate the issues they are experiencing.